
When I was little, my mom always made a giant apple slab pie for every chilly family gathering — the kitchen smelled like cinnamon and butter, and the house felt like a warm hug. I remember pressing my nose to the oven door while the crust bubbled and a syrupy apple perfume escaped through the vents. That memory stuck: big pan, simple steps, and plenty of sticky-crisp edges to fight over. I recreate that nostalgia with this Yummy Apple Slab Pie recipe whenever I want to fill my home with comfort and the kind of smell that makes people wander into the kitchen uninvited. It’s generous, forgiving, and exactly the sort of dessert that feeds a crowd and sparks stories.
Quick Facts
- Yield: Serves 12
- Prep Time: 35 minutes
- Cook Time: 40 minutes
- Total Time: 75 minutes
Why This Recipe is Awesome
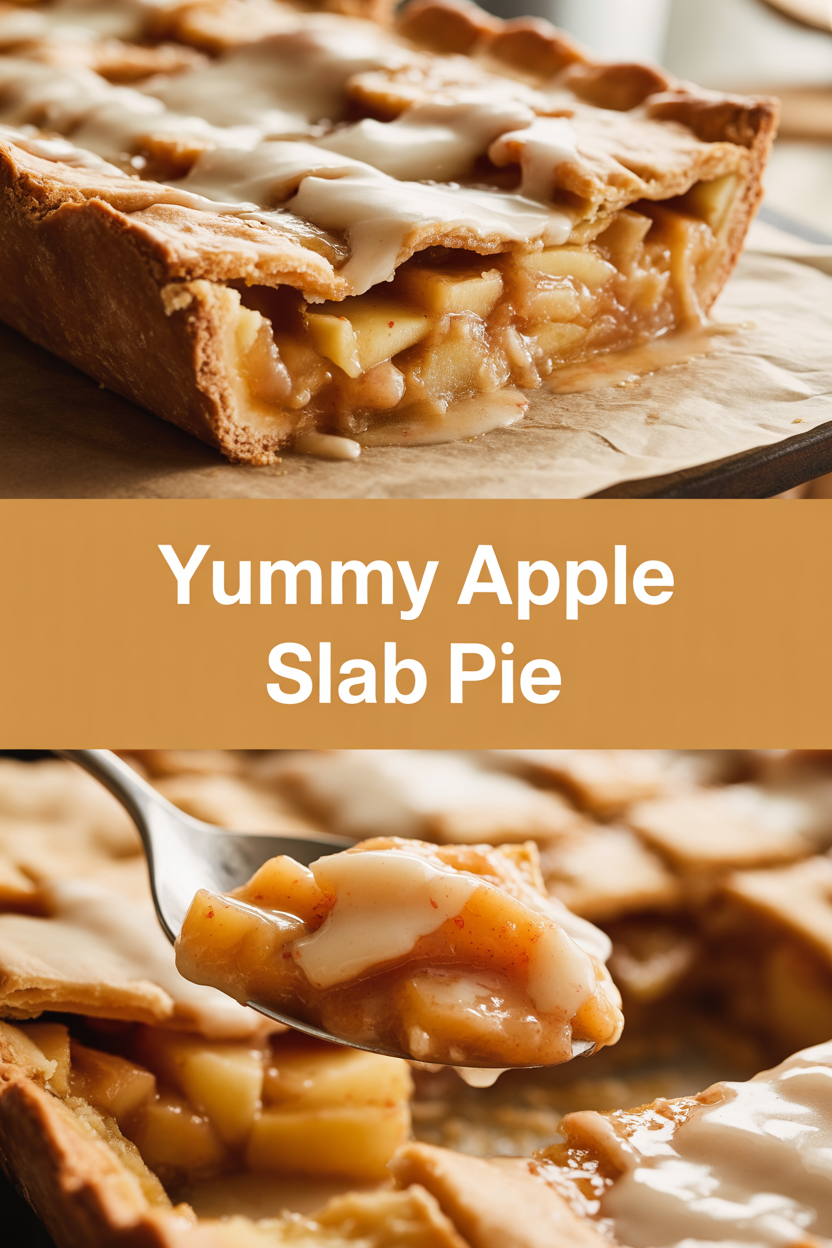
This slab pie gives you that classic apple-pie flavor but in a lazy, crowd-pleasing sheet-pan format. The crust crisps up into golden, buttery edges while the filling stays tender and saucy — that sweet-tart apple bite with warm cinnamon and sticky caramel notes tastes like fall in every forkful. It’s easy enough for a weeknight celebration and pretty enough for a potluck. And bonus: you get more crispy perimeter crust to fight over. Who doesn’t love crispy edges?
Ingredients
For the Main Dish:
- For the crust: 2 (15 oz) refrigerated pie crusts (store-bought) — OR make your own: 2 1/2 cups all-purpose flour, 1 tsp salt, 2 tbsp sugar, 1 cup (8 oz) cold unsalted butter, 6–8 tbsp ice water.
- Apples: 6 medium apples (about 3 lb) — I like a mix of **Granny Smith** and **Honeycrisp** (peeled, cored, and sliced about 1/4″ thick), roughly 6 cups sliced.
- Granulated sugar: 3/4 cup
- Brown sugar: 1/4 cup packed
- Cornstarch: 2 tbsp (thickens the filling)
- Cinnamon: 1 1/2 tsp
- Nutmeg: 1/4 tsp
- Salt: pinch (about 1/8 tsp)
- Lemon juice: 1 tbsp (keeps apples bright)
- Vanilla extract: 1 tsp
- Unsalted butter: 2 tbsp, cut into small pieces to dot the top
- Egg wash: 1 large egg + 1 tbsp water, beaten
- Coarse sugar: 1–2 tbsp for sprinkling (optional)
- Optional: 1/2 cup caramel sauce for drizzling (store-bought or homemade)
- Pan: 18×13 inch half-sheet baking pan (jelly-roll pan)
For the Sauce / Garnish (if applicable):
- Quick caramel: 1/2 cup packed brown sugar, 2 tbsp unsalted butter, 2 tbsp heavy cream — melt together and drizzle warm.
How I Make It
Step 1:
Preheat the oven to 375°F. I line my 18×13 pan with parchment and unroll both pie crusts, letting them sit at room temp for a few minutes so they don’t crack. Toss the sliced apples in a large bowl with 1 tbsp lemon juice to stop browning — you’ll smell that bright citrus hit right away.
Step 2:
In the bowl with the apples, add 3/4 cup granulated sugar, 1/4 cup brown sugar, 2 tbsp cornstarch, 1 1/2 tsp cinnamon, 1/4 tsp nutmeg, a pinch of salt, and 1 tsp vanilla. Stir gently until every apple slice gets a sugary, spiced coat. Taste one — it should taste lively, not cloying. If your apples are very tart, add another tablespoon of brown sugar.
Step 3:
Press one pie crust into the pan, making sure it reaches all corners and hangs slightly up the sides. Pour the apple mixture into the crust, mounding it toward the center. Dot the apples with the 2 tbsp butter. Roll the second crust out just enough to cover the pan; place it on top and crimp the edges. Trim excess, and cut a few slits in the top so steam escapes — you’ll hear gentle hissing as it bakes.
Step 4:
Brush the top with the beaten egg wash and sprinkle coarse sugar if using. Bake at 375°F for 40 minutes or until the crust turns deeply golden and the filling bubbles through the vents and edges. Watch the bubbling — when syrup peeks out and the top sounds crisp when you tap it, the pie’s done. If the edges brown too quickly, tent loosely with foil after 25 minutes.
Step 5:
Let the pie rest for at least 20 minutes so the filling thickens and slices hold. Drizzle warm caramel if you want extra richness. Serve slightly warm with vanilla ice cream or a dollop of whipped cream — the cold cream against the warm, saucy apples tastes heavenly.
Pro Tips
- Use a mix of tart and sweet apples for the best flavor and texture — Granny Smith + Honeycrisp or Fuji create a nice balance.
- If the store-bought crust tears, patch with a little water and a pinch of flour; press together with a fork. Nobody needs perfect pastry seams to enjoy big flavor.
- Let the pie rest 20–30 minutes before slicing. Cutting too soon makes the slices slide apart because the filling stays molten.
- For a homemade crust: keep butter cold, handle dough minimally, and chill 30 minutes before rolling to prevent shrinking.
Common Mistakes to Avoid
- Skipping preheating: Classic rookie move. It changes texture and bake time.
- Overmixing: Leads to dense or chewy results. Mix until just combined.
- Guessing cook time: Always use visual cues or a timer, not just vibes.
- Overcrowding pans: Give your food some breathing room to crisp properly.
Alternatives & Substitutions
- Use 6 cups pears instead of apples for a milder, softer filling (adjust sugar down 2 tbsp if very sweet).
- Swap cornstarch with 3 tbsp tapioca starch — it yields a glossy, slightly chewier filling.
- For dairy-free: use coconut oil in the crust (solid & cold) and skip butter dots; use coconut cream for caramel.
- For gluten-free: buy a gluten-free refrigerated crust or make one with 2 1/4 cups gluten-free flour blend + 1/4 cup almond flour.
Variations & Tips
- Caramel-Apple Slab: Fold 1/2 cup caramel bits into the filling for extra gooey pockets.
- Spiced-Up: Add 1/2 tsp ground cardamom or 1/4 tsp ground ginger for a warm, exotic twist.
- Maple Pecan Top: Sprinkle chopped toasted pecans and 2 tbsp maple syrup on top before baking for crunch.
- Mini Slab: Bake in a 9×13 pan for about 30–35 minutes at 375°F — watch bubbling for doneness.
- Kid-Friendly: Keep spices minimal and serve with caramel dipping sauce on the side for kids to dunk each slice.
- Creative Twist: Add a layer of thinly sliced apples under the top crust brushed with apricot jam for shine.
FAQ (Frequently Asked Questions)
- Can I make this ahead of time?
- Yes! Assemble the pie, cover tightly, and refrigerate for up to 24 hours before baking. You can also freeze the unbaked slab (well-wrapped) for up to 2 months; bake from frozen, adding 10–15 minutes to the time and tenting with foil if the edges brown too fast.
- Can I double the recipe?
- Sure thing. Use two sheet pans and rotate them halfway through baking for even color. Make sure your oven has room — don’t stack pans directly on top of each other.
- Can I substitute butter with oil?
- Technically yes, but you’ll miss that buttery magic. Use ¾ the amount of oil.
- How do I know it’s done?
- Look for a deeply golden crust and syrup bubbling through the slits and edges. Give the top a gentle tap — it should sound crisp, not soggy. If the filling bubbles and the crust is golden, you’re good to go.
- What if I don’t have ingredient X?
- No problem — substitute 2 tbsp sugar with maple syrup or honey (reduce other liquids slightly), or use lemon-lime soda (1–2 tbsp) in a pinch to brighten flavor if you lack lemon juice.
How I Like to Serve It
I serve this slab pie slightly warm with a scoop of vanilla ice cream that slowly melts into the bubbling apples. It works beautifully at potlucks, casual dinners, and holiday spreads — slice with a sharp knife and warm each plate in the oven for a few minutes if you want extra-warm servings. Pair it with coffee or a spiced apple cider for fall vibes, or a glass of cold milk for a kid-friendly treat.
Notes
- Store leftovers covered at room temperature for up to 2 days or refrigerated up to 4 days. Reheat at 325°F for 10–12 minutes to revive crispness.
- If using meat in other recipes, cook poultry to a safe internal temp of 165°F; not applicable to this pie but a good safety reminder.
Final Thoughts
Closing: Now go bake this — let your kitchen smell like cinnamon-and-butter nostalgia, slice it while it’s still warm, and enjoy the satisfied smiles around your table. You deserve that extra piece.