
My grandmother taught me how to make butter tarts on a sunlit kitchen table that still smelled like cinnamon and old wood. I remember standing on a stool, watching her palms fold golden butter into sugar like she was tucking secrets into pastry — that memory tastes like warm caramel and the tiniest bit of mischief. These are the tarts she made at every family gathering: flaky shells, gooey centers with a whisper of vanilla, and a few chewy raisins for personality. I’ve played with measurements and techniques over the years, kept what works, tossed what didn’t, and now I’m handing you the version that reliably makes people close their eyes and smile. Let’s make some memories (and sticky fingers).
Quick Facts
- Yield: Serves 12
- Prep Time: 25 minutes
- Cook Time: 18–22 minutes
- Total Time: 45 minutes
Why This Recipe is Awesome
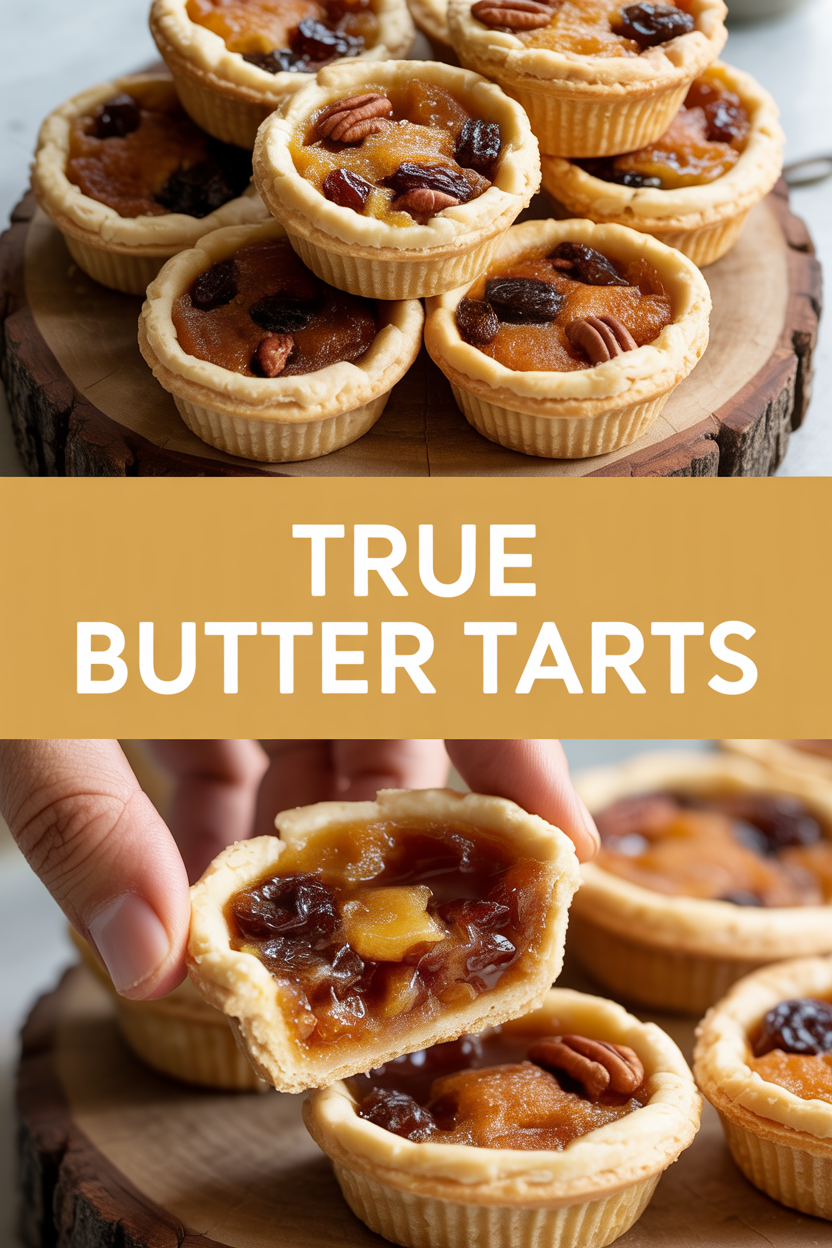
These butter tarts hit every nostalgic note: flaky crust, a glossy, slightly chewy caramel center, and that warm buttery aroma that fills the kitchen. They look fancy but come together quickly — it’s so easy even your oven can’t mess it up. Expect sticky edges, a delicate crackle on top, and a soft, gooey middle that begs for a napkin. Perfect for potlucks, holiday tables, or a very rewarding Tuesday.
Ingredients
For the Main Dish:
- 1 (15 oz) package refrigerated pie crusts or 1 batch of homemade pastry (enough for a 9″ pie, chilled)
- 1/2 cup (1 stick) unsalted butter, melted
- 1 cup packed brown sugar (light or dark)
- 1/2 cup light corn syrup (or pure maple syrup for a richer flavor)
- 2 large eggs
- 1 tsp pure vanilla extract
- 1/4 tsp fine salt
- 1/2 cup raisins (optional) or mini chocolate chips (optional)
- 1/2 cup chopped pecans or walnuts (optional)
For the Sauce / Garnish (if applicable):
- Optional dollop of whipped cream or vanilla ice cream for serving
- Optional: 1 tbsp coarse sea salt for a salted-tart finish
How I Make It
Step 1:
Preheat the oven to 375°F. If you use a refrigerated crust, unroll it and gently press it into 12 wells of a muffin tin so the dough forms small cups. I like to chill the pressed shells in the fridge for 10 minutes — that helps keep them flaky and prevents shrinking. If you roll your own dough, keep it cool and work quickly.
Step 2:
In a medium bowl, whisk together the melted butter, brown sugar, and light corn syrup until shiny and smooth. Add the eggs, vanilla, and salt, and whisk until just combined. The mixture will smell like warm caramel and look glossy — that’s the good stuff.
Step 3:
Stir in your optional raisins and chopped nuts if you like texture. Spoon about 2 tablespoons of filling into each chilled tart shell. Don’t overfill — the filling puffs and then settles, and you want a little room for glossy edges. I gently tap the tin on the counter to level the filling and release air bubbles; you’ll hear tiny plinks as the liquid finds its place.
Step 4:
Bake on the center rack at 375°F for 18–22 minutes, until the edges of the tarts turn golden brown and the centers jiggle slightly when you shake the pan. Watch them closely in the last few minutes; the tops can go from glossy to too-set quickly. The smell will be buttery and sweet, like a cozy bakery in your oven.
Step 5:
Let the tarts cool in the tin for 10 minutes so the centers firm up just enough, then transfer to a wire rack to finish cooling. Serve warm or at room temperature with a scoop of vanilla ice cream or a dollop of whipped cream. Sprinkle a pinch of coarse sea salt on top for a grown-up, salty-sweet finish.
Pro Tips
- Chill the crust before baking. Cold dough keeps its shape and produces flakier edges.
- Use a light corn syrup for a classic texture; swap in pure maple syrup for deeper flavor but expect a slightly softer set.
- Don’t overfill — aim for about 2 tablespoons per tart. The filling expands and can spill over, making sticky cleanup.
- If you want perfect bottoms, partially blind-bake the shells for 6 minutes, cool, then fill and finish baking.
Common Mistakes to Avoid
- Skipping preheating: Classic rookie move. It changes texture and bake time.
- Overmixing: Leads to dense or chewy results. Mix until just combined.
- Guessing cook time: Always use visual cues or a timer, not just vibes.
- Overcrowding pans: Give your food some breathing room to crisp properly.
Alternatives & Substitutions
- Swap corn syrup for equal maple syrup for a richer, slightly earthier flavor; the texture will be a touch softer.
- Use mini chocolate chips instead of raisins for a kid-friendly twist — the chips sink into the filling into molten pockets of chocolate.
- Dairy-free option: use vegan butter and a gluten-free pie crust to make these both dairy-free and gluten-free. Expect a slightly different crumb but still delicious.
- For a lower-sugar option, reduce brown sugar to 3/4 cup and add 1–2 tbsp apple sauce for moisture (texture changes slightly).
Variations & Tips
- Pecan Butter Tarts: Add 1/2 cup chopped pecans and a pinch of cinnamon for a praline vibe.
- Chocolate Chip: Stir in 1/2 cup mini chocolate chips instead of raisins.
- Maple-Bourbon: Use 1/2 cup maple syrup and 1 tbsp bourbon for a warm, adult flavor.
- Salted Caramel: Finish with a sprinkle of flaky sea salt right after baking.
- Mini Tarts: Use a mini muffin tin for bite-sized tarts; reduce bake time by 2–4 minutes.
- Fruit Twist: Fold in 1/3 cup chopped dried apricot for bright, chewy pops.
FAQ (Frequently Asked Questions)
- Can I make this ahead of time?
- Yes! Bake the tarts and store them in an airtight container at room temperature for up to 2 days or in the fridge for up to 4 days. Reheat gently in a 350°F oven for 5–7 minutes to revive that freshly-warmed feel.
- Can I double the recipe?
- Sure thing. Bake in two muffin tins or in batches. If you double the filling, mix in two bowls or use a larger bowl and stir gently to keep things even. Bake times stay the same per batch.
- Can I substitute butter with oil?
- Technically yes, but you’ll miss that buttery magic. Use 3/4 the amount of oil and expect a slightly different mouthfeel and flavor.
- How do I know it’s done?
- Look for golden edges and a glossy top that still jiggles a little in the center. If the center is completely set and dry, the filling will be more like a candy than a tart — aim for a soft, slightly wobbly center.
- What if I don’t have ingredient X?
- Out of raisins? Use mini chocolate chips or chopped dried cherries. No corn syrup? Use maple syrup or a mix of honey and water (1:1) — texture shifts but flavor stays friendly.
How I Like to Serve It
I love these warm, right out of the oven with a scoop of vanilla ice cream and strong coffee — the hot tart meets cold cream and I’m a happy person. They make a charming dessert at holiday parties, and they travel well to potlucks (just keep them level). For afternoons, pair one with a cup of black tea or a sweet cider. They feel festive in winter and comfortingly nostalgic in summer.
Notes
- Store in an airtight container at room temperature up to 2 days, or refrigerate up to 4 days. Reheat in a 350°F oven for 5–7 minutes to refresh.
- Not a meat dish, so no internal safe-temp note needed here — just safe, happy baking.
Final Thoughts
Closing: These butter tarts give you that warm, buttery hug from the inside out — now go impress someone — or just yourself — with your homemade masterpiece!