
Okay, full disclosure: I once tried to make red velvet brownies for a party and arrived triumphant with a pan so visually dramatic people stopped mid-conversation. The deep red, crackly top smelled like cocoa and butter and made the room hush (well, until someone asked if they were “cakey” or “brownie”). I’ve turned that happy accident into a reliable little ritual—fudgy center, crisp edges, and a cheeky cream cheese swirl if I’m feeling fancy. These brownies bake up fast, travel well, and somehow feel both elegant and comfort-food cozy. Stick with me and I’ll show you how to nail the color, the chew, and the seductive crinkly top every time.
Quick Facts
- Yield: Serves 9–12
- Prep Time: 15 minutes
- Cook Time: 28 minutes
- Total Time: 1 hour (including cool)
Why This Recipe is Awesome
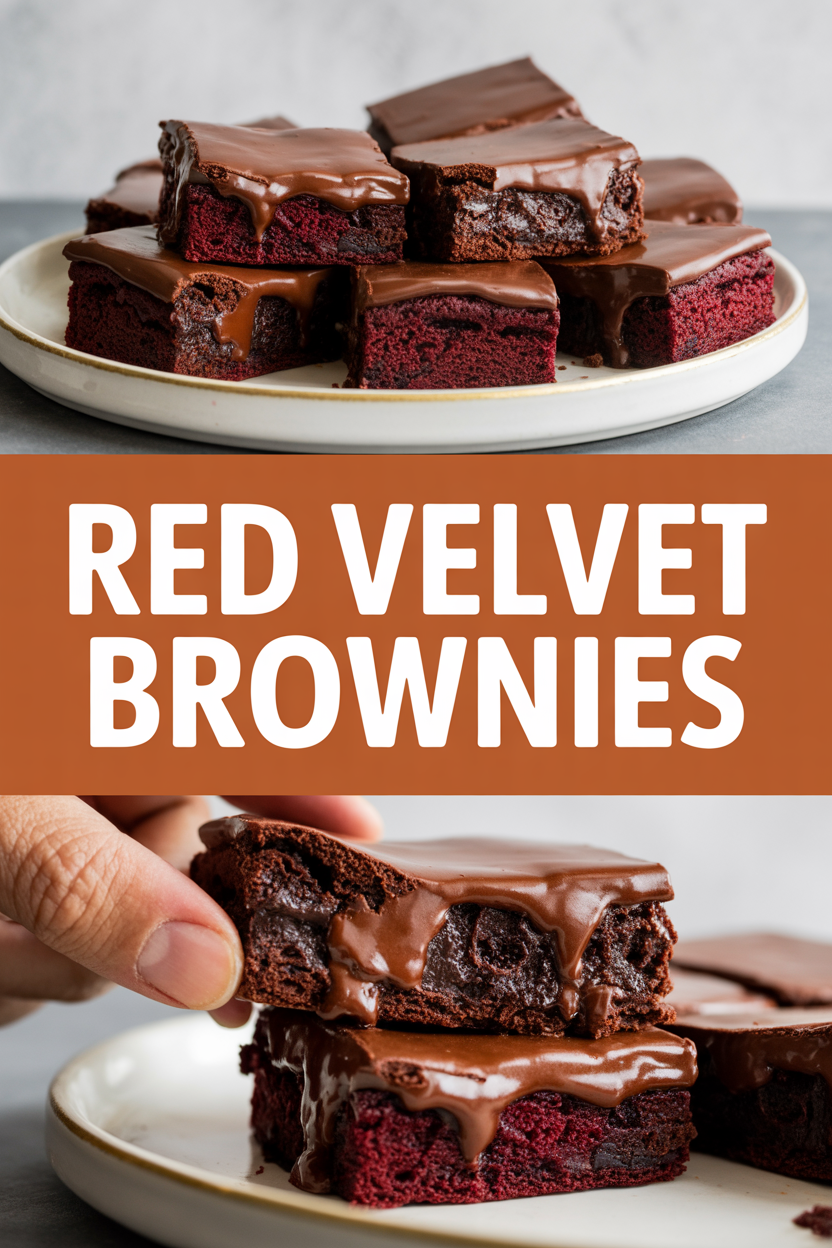
This recipe gives you that retro red velvet vibe with the dense, fudgy texture of a brownie — the best of both worlds. Think deep red color, a glossy, crackly top that makes a satisfying snap when you cut it, and a buttery, cocoa-rich bite. It’s easy enough for a weeknight emergency dessert and pretty enough for a birthday. Also: it’s so simple even your oven can’t mess it up (but I’ll still nag you to preheat it).
Ingredients
For the Main Dish:
- 1 cup (2 sticks) unsalted butter, melted
- 1 1/2 cups granulated sugar
- 3 large eggs, room temperature
- 2 tsp vanilla extract
- 2 tbsp red food coloring (or 1 tbsp gel)
- 1/3 cup unsweetened cocoa powder
- 3/4 cup all-purpose flour
- 1/2 tsp fine sea salt
- 1/2 tsp baking powder
- 1 tbsp distilled white vinegar
- 2 tbsp buttermilk (or plain yogurt)
For the Sauce / Garnish (if applicable):
- Optional cream cheese swirl: 4 oz cream cheese (softened), 1/4 cup powdered sugar, 1/2 tsp vanilla. Dollop and swirl before baking.
How I Make It
Step 1:
Preheat your oven to 350°F and line an 8×8-inch pan with parchment, leaving an overhang. In a medium bowl, whisk the melted butter and 1 1/2 cups sugar until glossy. The kitchen will fill with a warm, buttery aroma — the good kind that makes you forgive yourself for eating the batter later.
Step 2:
Whisk in the eggs one at a time, then stir in the vanilla and red food coloring. The batter goes bright and dramatic — watch it deepen and shine. If you skip stirring thoroughly here, you’ll end up with color streaks, so take a few extra seconds to make it uniform.
Step 3:
Sift together the cocoa, flour, salt, and baking powder. Fold the dry into the wet until almost combined — stop mixing when you see no dry streaks. Add the vinegar and buttermilk and fold gently; the vinegar helps lift the color and gives a whisper of tang.
Step 4:
Pour the batter into the prepared pan and smooth the top with an offset spatula. If you’re doing a cream cheese swirl, dollop spoonfuls of the cream cheese mixture (beat the 4 oz cream cheese with 1/4 cup powdered sugar and 1/2 tsp vanilla) over the batter and drag a knife through to create marbled patterns. Bake for 28 minutes or until the edges look set and a toothpick inserted into the center has a few moist crumbs clinging. You want a tacky, fudgy center — not bone-dry.
Step 5:
Let the brownies cool in the pan for 30 minutes before lifting them out on the parchment. The top will crackle as it cools; that sound means success. Slice into squares and serve slightly warm or at room temperature. I like the scent of cocoa lingering when I cut — it feels like dessert therapy.
Pro Tips
- Use room-temperature eggs so they incorporate smoothly and give glossy texture.
- If you want deeper color without more food dye, use a teaspoon of brewed espresso (cooled) — it intensifies chocolate without changing flavor.
- Don’t overbake. Pull the brownies at 28 minutes when the center still jiggles slightly; they’ll firm as they cool.
- Line the pan with parchment and leave an overhang for easy removal — this saves you from heroic knife fights later.
Common Mistakes to Avoid
- Skipping preheating: Classic rookie move. It changes texture and bake time.
- Overmixing: Leads to dense or chewy results. Mix until just combined.
- Guessing cook time: Always use visual cues or a timer, not just vibes.
- Overcrowding pans: Give your food some breathing room to crisp properly.
Alternatives & Substitutions
- Butter ↔ coconut oil: Use the same amount if you want a dairy-free option, but expect a faint coconut note.
- Buttermilk ↔ plain yogurt: Use the same amount; yogurt keeps tang and moisture.
- All-purpose flour ↔ 1:1 gluten-free flour blend: Use a blend with xanthan gum, but texture turns slightly crumblier.
- To make this dairy-free: swap butter for vegan butter or coconut oil and use dairy-free cream cheese for the swirl.
Variations & Tips
- Add 1/2 cup white chocolate chips for pockets of sweet melty contrast.
- Make them nutty: fold in 1/2 cup chopped pecans or walnuts for crunch.
- Spicy twist: add a pinch of cayenne or cinnamon to the dry mix for warmth and depth.
- Mini cupcakes: scoop batter into a lined muffin tin for red velvet brownie bites (reduce bake time to 16–18 minutes).
- Salted-sugar top: sprinkle flaky sea salt on top right after baking for a sweet-salty pop.
FAQ (Frequently Asked Questions)
- Can I make this ahead of time?
- Yes! Bake and cool completely, then store airtight at room temperature for up to 3 days. For longer storage, freeze cut squares layered with parchment in a freezer bag for up to 2 months. Thaw on the counter or warm briefly in a 300°F oven.
- Can I double the recipe?
- Sure thing. Use a 9×13-inch pan and bake for about 35–38 minutes, checking frequently for that fudgy-center cue.
- Can I substitute butter with oil?
- Technically yes, but you’ll miss that buttery magic. Use ¾ the amount of oil.
- How do I know it’s done?
- Look for set, slightly pulling-away edges, a shiny crackly top, and a center that leaves a few moist crumbs on a toothpick. If the center is liquid, add 2–3 minutes and check again.
- What if I don’t have ingredient X?
- Out of buttermilk? Mix 2 tbsp milk with 1 tsp lemon juice and let sit 5 minutes. No cocoa? Use 2 oz melted dark chocolate and omit the cocoa (reduce butter by 1 tbsp).
How I Like to Serve It
I serve these warm with a scoop of vanilla ice cream and a stray sprinkle of flaky sea salt for grown-up sweetness. They work great at potlucks — they travel well and disappear fast. For a cozy night, pair a square with strong coffee or a mug of hot milk and let the fudgy crumbs be your confetti.
Notes
- Store airtight at room temperature up to 3 days, or freeze for up to 2 months. Reheat gently to revive the fudgy center.
- If you’re serving to kids (or anyone picky), reduce the food coloring by half — you’ll keep the flavor without staining fingers dramatically.
Final Thoughts
Closing: Now go impress someone — or just yourself — with your homemade masterpiece! Put on some music, preheat to 350°F, and enjoy the delicious chaos of baking.