
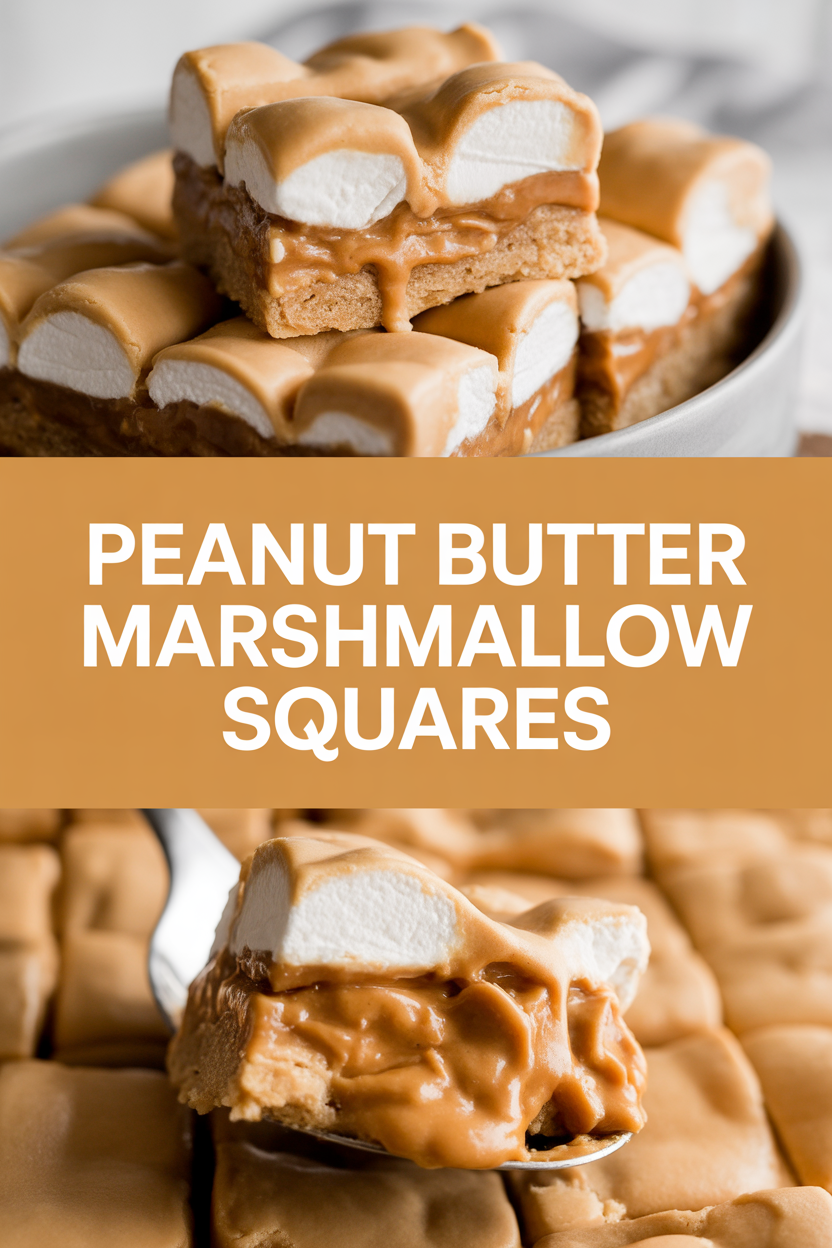
I’m not exaggerating when I say these Peanut Butter Marshmallow Squares once saved a whole picnic. Picture me, sunburned and hangry, waving an 8×8 pan like a white flag — the peanut butter smell did its magic and everyone forgave my sunburned face. These bars feel like a candy bar and a hug at the same time: chewy, a little crunchy from the rice cereal, and gloriously gooey on top. They come together fast, they travel well, and they stop arguments in their tracks. Plus, you only need a handful of pantry staples and about an hour (mostly chilling) to get to peanut-buttery heaven.
Quick Facts
- Yield: Serves 16
- Prep Time: 15 minutes
- Cook Time: 0 minutes (no-bake)
- Total Time: 1 hour 15 minutes (includes chilling)
Why This Recipe is Awesome
This recipe nails texture: chewy, slightly crisp, and pillow-soft on top. It tastes like the best parts of a peanut butter cup mashed into a bar you can pick up with your hands. It’s simple enough for weeknights and fun enough for parties — honestly, it’s so easy even your oven can’t mess it up. Bonus: the kitchen fills with a warm, nutty aroma that makes everyone ask, “Are those ready yet?”
Ingredients
For the Main Dish:
- 1/2 cup unsalted butter (1 stick)
- 1 cup creamy peanut butter (room temp)
- 1/4 cup light brown sugar, packed
- 1/2 cup light corn syrup (or honey)
- 4 cups crisp rice cereal (Rice Krispies)
- Pinch of kosher salt
- 7 oz marshmallow creme (1 jar) for topping
- 2 tbsp unsalted butter (for marshmallow topping)
- 1/2 cup creamy peanut butter (for marshmallow topping)
- 1 cup miniature marshmallows, optional toasted for garnish
For the Sauce / Garnish (if applicable):
- Optional: 2 oz dark chocolate, melted for drizzling
- Optional: flaky sea salt for finishing
How I Make It
Step 1:
Line an 8×8-inch pan with parchment, leaving an overhang to lift the bars easily. In a medium saucepan over medium heat, melt 1/2 cup butter, 1 cup peanut butter, 1/4 cup brown sugar, and 1/2 cup corn syrup while stirring. Watch the mixture turn glossy and send up that toasty, nutty smell — it happens fast, so stir constantly.
Step 2:
Remove the pan from heat and stir in a pinch of salt. Pour the warm mixture over 4 cups rice cereal in a large bowl and fold gently until the cereal gets evenly coated. You want most pieces coated but still a little texture — overmixing makes the bars too dense.
Step 3:
Press the peanut-butter-coated cereal firmly into your prepared 8×8 pan. Use a piece of parchment or the back of a measuring cup to compact it — you want a tight, even layer with golden edges. At this point your kitchen smells like walking into a candy shop.
Step 4:
Make the topping: in a small saucepan over low heat, melt 2 tbsp butter with 1/2 cup peanut butter and 7 oz marshmallow creme, stirring until glossy and smooth. Don’t let it boil; keep it gentle. Pour the sticky marshmallow mixture over the pressed base and spread quickly with a spatula. If you like, scatter 1 cup mini marshmallows on top.
Step 5:
Chill the pan in the refrigerator for at least 1 hour until the bars set. For toasted mini marshmallows, use a kitchen torch or pop the pan under a hot broiler for 10–20 seconds—watch closely. Lift the bars from the pan using the parchment overhang and cut into 16 squares. Drizzle melted dark chocolate and finish with flaky salt if you want a grown-up touch.
Pro Tips
- Use room-temperature peanut butter for smoother mixing and fewer lumps.
- If your mixture stiffens before you finish pressing, warm the pan briefly over low heat to soften, then continue pressing—work quickly.
- Swap corn syrup for honey if you prefer a less processed sweetener; the texture stays great but the flavor shifts to floral notes.
- For clean cuts, chill the bars well and wipe your knife between cuts.
Common Mistakes to Avoid
- Skipping preheating: Classic rookie move. It changes texture and bake time.
- Overmixing: Leads to dense or chewy results. Mix until just combined.
- Guessing cook time: Always use visual cues or a timer, not just vibes.
- Overcrowding pans: Give your food some breathing room to crisp properly.
Alternatives & Substitutions
- Use almond butter or cashew butter instead of peanut butter for a milder, nuttier flavor; the bars taste lighter and a little sweeter.
- Switch corn syrup to honey or maple syrup — expect a slightly softer texture and a flavor shift.
- For a nut-free option, use sunflower seed butter and make sure the cereal is processed in a nut-free facility.
- Use gluten-free crisp rice cereal to keep these bars gluten-free; texture stays very similar.
Variations & Tips
- Chocolate Lover: Stir 2 oz melted dark chocolate into the topping or drizzle on top.
- Salted PB Bars: Sprinkle flaky sea salt over the bars after topping — that contrast makes them addictive.
- S’mores Twist: Swap half the rice cereal for crushed graham crackers and torch the marshmallow top until golden.
- Spicy PB: Add 1/4 tsp cayenne to the peanut butter mixture for a grown-up kick.
- Cookie Crust: Press crushed graham crackers with melted butter as the base and follow with the peanut-cereal layer on top for extra structure.
FAQ (Frequently Asked Questions)
- Can I make this ahead of time?
- Yes! Make the bars up to 3 days ahead and store them in an airtight container in the refrigerator. Let them sit at room temperature for 10–15 minutes before serving for a softer bite.
- Can I double the recipe?
- Sure thing. Use a 9×13-inch pan and expect similar chill time; you’ll press into the larger pan and might need an extra minute or two to spread the topping evenly.
- Can I substitute butter with oil?
- Technically yes, but you’ll miss that buttery magic. Use ¾ the amount of oil (so 6 tbsp instead of 8 tbsp) and note the bars will taste slightly different and feel less rich.
- How do I know it’s done?
- Look for a firm, evenly set marshmallow topping and a compacted peanut-cereal base. The bars should hold their shape when you lift them from the pan and slice cleanly after chilling.
- What if I don’t have ingredient X?
- If you don’t have marshmallow creme, melt 3 cups mini marshmallows with 2 tbsp butter over low heat. If you lack corn syrup, use honey or more brown sugar dissolved in a little warm butter.
How I Like to Serve It
I love these bars with an afternoon coffee or as the show-stopping dessert at a potluck. They travel well, so I toss them in a tin lined with parchment for beach days or office parties. In cold weather, serve slightly warmed (microwave 10–12 seconds) and pair with a mug of hot cocoa for maximum cozy vibes.
Notes
- Store in an airtight container in the refrigerator for up to 5 days, or freeze individually wrapped bars for up to 2 months. Thaw at room temperature for 20–30 minutes before serving.
- No meat here, so no safe-temp notes needed — just enjoy responsibly!
Final Thoughts
Closing: Go make a batch and share them — or don’t. Either way, you’ve got an easy, joyful treat that tastes like childhood and looks like you planned it all along. Now go impress someone — or just yourself — with your homemade masterpiece!