
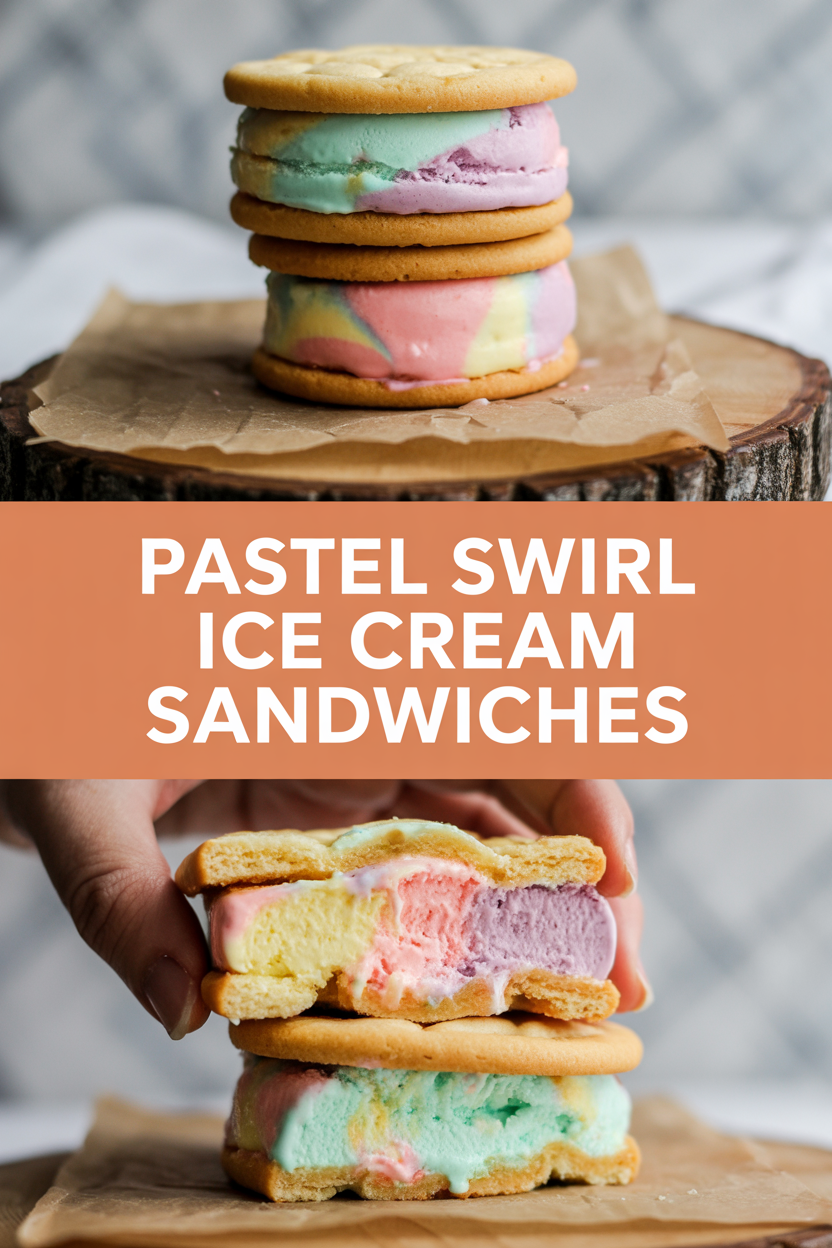
Okay, full disclosure: I once tried to make ice cream sandwiches look “aesthetically pleasing” for a party and ended up with more pastel on my shirt than on the cookies. Lesson learned: the mess is half the fun. These Pastel Swirl Ice Cream Sandwiches deliver that joyful, whimsical look without a single temperamental step. Think pillowy, buttery sugar cookies hugging a cloud of creamy, softly colored vanilla ice cream—each bite snaps, yields, and melts in the most satisfying way. I’ll walk you through quick homemade cookies (or a shortcut with store-bought), how to swirl the ice cream without turning it into tie-dye chaos, and little hacks I wish someone had told me before my shirt sacrifice.
Quick Facts
- Yield: Serves 12
- Prep Time: 30 minutes
- Cook Time: 10–12 minutes (cookies) or 0 minutes (store-bought)
- Total Time: ~2 hours 42 minutes (including freeze time)
Why This Recipe is Awesome
This recipe gives you nostalgic, handheld ice cream sandwiches with a fun, pastel twist—no fancy equipment, no temperamental custard. The cookies bake up with crisp, golden edges and soft centers, while the ice cream stays ultra-creamy and scoopable for easy assembly. It’s playful, portable, and crowd-pleasing—basically dessert that doubles as a conversation starter. Plus, it’s so easy even your most distracted friend can pull it off (speaking from experience).
Ingredients
For the Main Dish:
- 1 1/2 cups unsalted butter (3 sticks), softened
- 1 1/2 cups granulated sugar
- 1 large egg
- 2 tsp vanilla extract
- 3 1/2 cups all-purpose flour
- 1 tsp baking powder
- 1/2 tsp kosher salt
- 1 1/2 quarts vanilla ice cream (about 48 oz), slightly softened
- Gel food coloring in pastel shades (pink, blue, yellow, green) — a few drops of each
- Optional: sprinkles or melted chocolate for dipping
- Shortcut option: 24 store-bought large sugar cookies or soft snickerdoodles
For the Sauce / Garnish (if applicable):
- 3 oz dark or milk chocolate, melted for dipping (optional)
- 1/3 cup assorted sprinkles (optional)
How I Make It
Step 1:
I preheat the oven to 350°F and line two baking sheets with parchment. In my stand mixer, I cream together 1 1/2 cups softened butter and 1 1/2 cups sugar until light and fluffy—about 2–3 minutes. I add the egg and 2 tsp vanilla, scraping the bowl so everything blends smoothly. The kitchen smells like warm butter and sugar already; that tell-tale scent always gets me.
Step 2:
I whisk together 3 1/2 cups flour, 1 tsp baking powder, and 1/2 tsp salt in a bowl, then add to the wet ingredients in two batches. I mix just until the dough comes together—no overworking here. If the dough seems a hair dry, I add a teaspoon of milk. Tip: scoop dough with a 2-tablespoon cookie scoop so the cookies stay uniform.
Step 3:
I roll the dough into 24 even balls and flatten them gently on the sheet to about 3 inches across. I bake at 350°F for 10–12 minutes until the edges turn golden and the centers look set but soft. The cookies smell buttery and sweet; I let them cool on the sheet for 5 minutes so they firm up, then transfer to a rack. If you’re short on time, pull out store-bought cookies and skip this step—no judgment here.
Step 4:
While the cookies cool, I tackle the ice cream swirl. I scoop the slightly softened vanilla ice cream into a bowl and divide it into 4 smaller bowls. I add a tiny dot of gel coloring to each (start small—gel packs intense color) and gently fold to create soft, pastel shades. Don’t overmix; I leave streaks for that pretty swirl effect. I spoon dollops of each color into a loaf pan lined with plastic wrap, then use a butter knife to swirl. The ice cream should reach a thick but spreadable texture—like soft-serve that still holds its shape. I press the surface smooth, cover tightly, and freeze for at least 2 hours.
Step 5:
When the ice cream firms up, I remove it from the pan, slice it into 12 even slabs using a sharp knife warmed under hot water (wipe between cuts). I sandwich a piece of ice cream between two cookies, pressing gently so the ice cream spreads to the edges. For a fancy finish, I dip edges in melted chocolate or roll in sprinkles, then return to the freezer for another 15–20 minutes so everything sets. Bite in and listen to that crisp crack of cookie meeting creamy ice cream—pure joy.
Pro Tips
- Use gel food coloring—it gives vivid pastel colors without watering down the ice cream.
- If your ice cream melts too fast, pop the sandwich on a baking sheet and freeze in batches instead of assembling all at once.
- Warm your knife under hot water and dry it between cuts for clean ice cream slices.
- For extra chew, add 1/4 cup light brown sugar to the cookie dough—hello, caramel notes.
Common Mistakes to Avoid
- Skipping preheating: Classic rookie move. It changes texture and bake time.
- Overmixing: Leads to dense or chewy results. Mix until just combined.
- Guessing cook time: Always use visual cues or a timer, not just vibes.
- Overcrowding pans: Give your food some breathing room to crisp properly.
Alternatives & Substitutions
- Swap butter for coconut oil for a subtle tropical note; expect a slightly softer cookie texture.
- Use vegan or coconut-based ice cream to make a dairy-free version—textures vary, so freeze a bit longer before slicing.
- Substitute all-purpose flour with a 1:1 gluten-free blend for a gluten-free option; the cookies may be crumblier.
- Use store-bought cookies (soft chocolate chip, snickerdoodles) to save time—flavor changes but assembly stays the same.
Variations & Tips
- Make them lemon-poppyseed: add 1 tbsp lemon zest to the dough and use lemon ice cream or lemon curd swirled in.
- Adult twist: gently swirl in 2 tbsp of your favorite liqueur (amaretto or Kahlúa) into the ice cream for grown-up flavor.
- Chocolate lover: add 1/4 cup cocoa to the cookie dough and use cookies as a chocolate shell for vanilla pastel ice cream.
- Mini version: use smaller cookies and make 24 minis for parties or kids’ lunches.
- Decorate with edible flowers or gold leaf on the chocolate-dipped edge for a fancy party showstopper.
FAQ (Frequently Asked Questions)
- Can I make this ahead of time?
- Yes! Assemble the sandwiches, wrap individually in plastic wrap or parchment, and freeze up to 1 month. Thaw at room temperature for 5–10 minutes before eating for easier biting.
- Can I double the recipe?
- Sure thing. Use two loaf pans for the ice cream and bake cookies in batches. You’ll need more freezer space but the timing per batch stays the same.
- Can I substitute butter with oil?
- Technically yes, but you’ll miss that buttery magic. Use ¾ the amount of oil and expect a slightly different texture—less flaky, more tender.
- How do I know it’s done?
- For cookies: look for golden edges and a set center. For ice cream: it should slice cleanly and hold shape after freezing 2 hours.
- What if I don’t have ingredient X?
- No egg? Use 2 tbsp applesauce or 2 tbsp plain yogurt. No gel food coloring? Use natural powders like beet or matcha in tiny amounts, but colors will be subtler.
How I Like to Serve It
I serve these at backyard parties with big pitchers of lemonade or cold brew coffee—kids go wild for the colors, and adults appreciate the grown-up cookie base. They shine at summer BBQs, birthday parties, or as a whimsical after-dinner treat. If I’m feeling cozy, I pair one with a warm mug of spiced tea and let the contrast of warm drink and cold dessert do its magic.
Notes
- Store leftovers wrapped in the freezer for up to 1 month. Thaw 5–10 minutes before serving.
- If using meat in other recipes, cook to safe temps; this recipe is vegetarian-friendly.
Final Thoughts
Closing: Go make these, wear an apron you don’t love, and embrace the joyful mess—your pastel-perfect ice cream sandwiches await!