
When I was little, my grandmother always kept a tall tin of vanilla wafers in the back of the pantry like it contained treasure. She’d call me into the kitchen the minute she heard the kettle whistle and hand me a warm spoon to taste the custard with a wink. That bowl of layered pudding — silky pale custard, sweet ripe bananas, and crunchy wafer surprises — became my comfort on rainy afternoons and victory dessert after school plays. Making this Old-Fashioned Homemade Banana Pudding today brings that exact smell of warm vanilla and banana into my kitchen, and I swear it mends things. Come along; I’ll show you how to make it like she did, with a couple of modern cheats that actually help.
Quick Facts
- Yield: Serves 8
- Prep Time: 20 minutes
- Cook Time: 10 minutes
- Total Time: 150 minutes (includes 2 hours chill)
Why This Recipe is Awesome
This recipe gives you the creamy, custardy center everyone fights over and the satisfying crumb of crunchy vanilla wafers. It feels like dessert and like a hug at the same time. It’s forgiving, quick on the stove, and the flavors — pure vanilla, banana sweetness, and a little buttery richness — sing together. It’s so easy even your oven won’t get jealous. Who doesn’t love a dessert you can assemble in layers and then relax while it chills?
Ingredients
For the Main Dish:
- Whole milk — 3 cups
- Granulated sugar — 3/4 cup
- Cornstarch — 1/4 cup
- Large egg yolks — 4 (reserve whites if you want a meringue)
- Unsalted butter — 2 tbsp
- Vanilla extract — 1 tbsp
- Salt — 1/4 tsp
- Ripe bananas — 4 medium (about 2 cups sliced)
- Vanilla wafers — 12 oz box (about 3 cups)
- Heavy cream — 1 1/2 cups (for whipped cream)
- Powdered sugar — 2 tbsp (for whipped cream)
For the Sauce / Garnish (if applicable):
- Optional: Caramel sauce — 1/3 cup for drizzling
- Optional: chopped pecans — 1/3 cup for crunch
How I Make It
Step 1:
Whisk together 3 cups whole milk and 3/4 cup sugar in a medium saucepan until the sugar feels smooth. Stir in 1/4 cup cornstarch and 1/4 tsp salt so you don’t get lumps. Warm the mixture over medium heat, stirring constantly with a heatproof spatula until steam rises and the mixture thickens — about 6–8 minutes. You’ll smell sweet vanilla notes even before you add vanilla; it smells like dessert happening.
Step 2:
Temper the 4 egg yolks by whisking them in a bowl, then slowly pour about a cup of the hot milk into the yolks while whisking. Pour the yolk mixture back into the saucepan and continue to cook for another 1–2 minutes while it thickens to a pudding consistency. Take it off the heat and whisk in 2 tbsp unsalted butter and 1 tbsp vanilla until glossy and smooth. If you overheat, the custard will scramble, so keep the heat moderate and stir constantly.
Step 3:
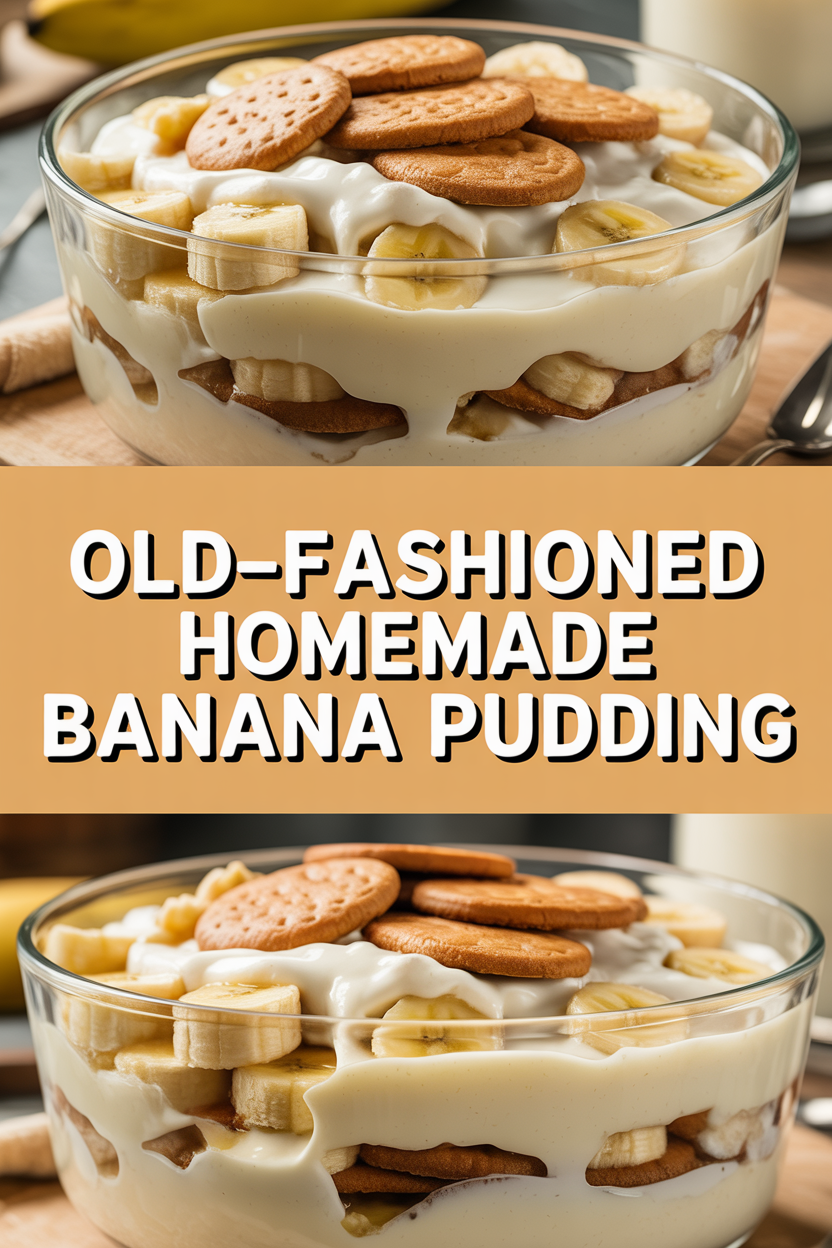
Slice the 4 ripe bananas into rounds — not too thin or they’ll turn to mush. Arrange a single layer of vanilla wafers on the bottom of a 9×13-inch dish, spoon on a layer of warm custard, then scatter 1/3 of the banana slices. Repeat layers (wafers, custard, bananas) and finish with a final layer of custard that covers the top. The custard will sink lovingly into the wafers, softening edges and creating little pockets of cream. You’ll hear the faint snap of wafers as you press them in — satisfying, right?
Step 4:
Let the dish cool to room temperature, then cover with plastic wrap and chill for at least 2 hours — overnight if you can. Chilling lets the custard set and the wafers soften to that perfect, spoonable texture. If you rush this step, the center stays too loose; patience pays off in texture and flavor.
Step 5:
Just before serving, whip 1 1/2 cups heavy cream with 2 tbsp powdered sugar and 1 tsp vanilla to soft peaks and dollop or pipe over the pudding. Sprinkle with crushed wafers or chopped pecans, and drizzle with caramel sauce if you like. Scoop into bowls and enjoy the contrast: silky custard, tender bananas, and soft-but-still-there cookie bites.
Pro Tips
- Use room-temperature egg yolks to prevent shock when you temper them — they mix more smoothly.
- If your custard gets lumpy, press it through a fine-mesh sieve into a clean bowl to rescue the texture.
- Pick bananas that have some yellow with a few brown speckles — they taste sweet but hold their shape.
- Make it a day ahead: the flavors meld beautifully overnight and the texture improves after chilling.
Common Mistakes to Avoid
- Skipping preheating: Classic rookie move. It changes texture and bake time.
- Overmixing: Leads to dense or chewy results. Mix until just combined.
- Guessing cook time: Always use visual cues or a timer, not just vibes.
- Overcrowding pans: Give your food some breathing room to crisp properly.
Alternatives & Substitutions
- Swap whole milk for 2 cups coconut milk + 1 cup almond milk for a dairy-free version; expect a slightly thinner custard and a coconut undertone.
- Use gluten-free vanilla cookies instead of wafers for a gluten-free option; texture stays similar.
- Replace heavy cream whipped topping with chilled full-fat coconut cream for dairy-free whipped cream.
- Use Greek yogurt (1 cup) swirled into the top for tang and to cut sweetness — keeps the texture creamy but lighter.
Variations & Tips
- Banana Foster twist: sauté bananas in butter and brown sugar for a minute before layering to add caramelized depth.
- Chocolate layer: add a thin layer of chocolate pudding or ganache between layers for a banana-chocolate dream.
- Mini parfaits: assemble in small glasses for single-serve presentation at parties.
- Nutty crunch: fold in 1/2 cup chopped pecans between layers for texture and toasty flavor.
- Retro baked meringue: reserve the egg whites, beat to soft peaks with 1/2 cup sugar, top the pudding, and briefly torch or broil until golden for a showy finish.
FAQ (Frequently Asked Questions)
- Can I make this ahead of time?
- Yes! Assemble the pudding up to 24 hours ahead and keep it covered in the fridge. Add the whipped cream and crunchy toppings right before serving for best texture.
- Can I double the recipe?
- Sure thing. Use a larger pan (like two 9×13 dishes or a 13×9 and a deep 9×13) and maintain the same chilling time; you may need slightly longer to cool to fridge temperature if you have larger volume.
- Can I substitute butter with oil?
- Technically yes, but you’ll miss that buttery magic. Use 3/4 the amount of neutral oil (about 1 1/2 tbsp) and expect a slightly less glossy custard.
- How do I know it’s done?
- Watch the custard: it will thicken and coat the back of a spoon, leaving a clean line when you run your finger through it. After chilling, the pudding should hold a spoonful without collapsing.
- What if I don’t have ingredient X?
- Swap vanilla wafers with shortbread or graham crackers for a different crunch. Out of cornstarch? Use 1/3 cup flour but cook a little longer to remove raw flour taste.
How I Like to Serve It
I serve this banana pudding chilled on humid summer evenings with a tall glass of iced tea, or at cozy winter potlucks where everyone grabs seconds. For dinner parties, I make it the night before and spoon it into shallow bowls so everyone gets a little wafer in every bite. It fits holidays, weeknight comforts, and everything in between — a real crowd-pleaser.
Notes
- Store covered in the refrigerator for up to 3 days. The texture changes over time as wafers soften; still delicious, just different.
- This recipe doesn’t require a reheating step. If you add a baked meringue, serve within a few hours to keep the peaks lively.
Final Thoughts
Closing: Now go make some memories — and maybe sneak a wafer when no one’s watching. Your kitchen will smell like childhood, and you’ll have a dessert everyone asks for again and again.