
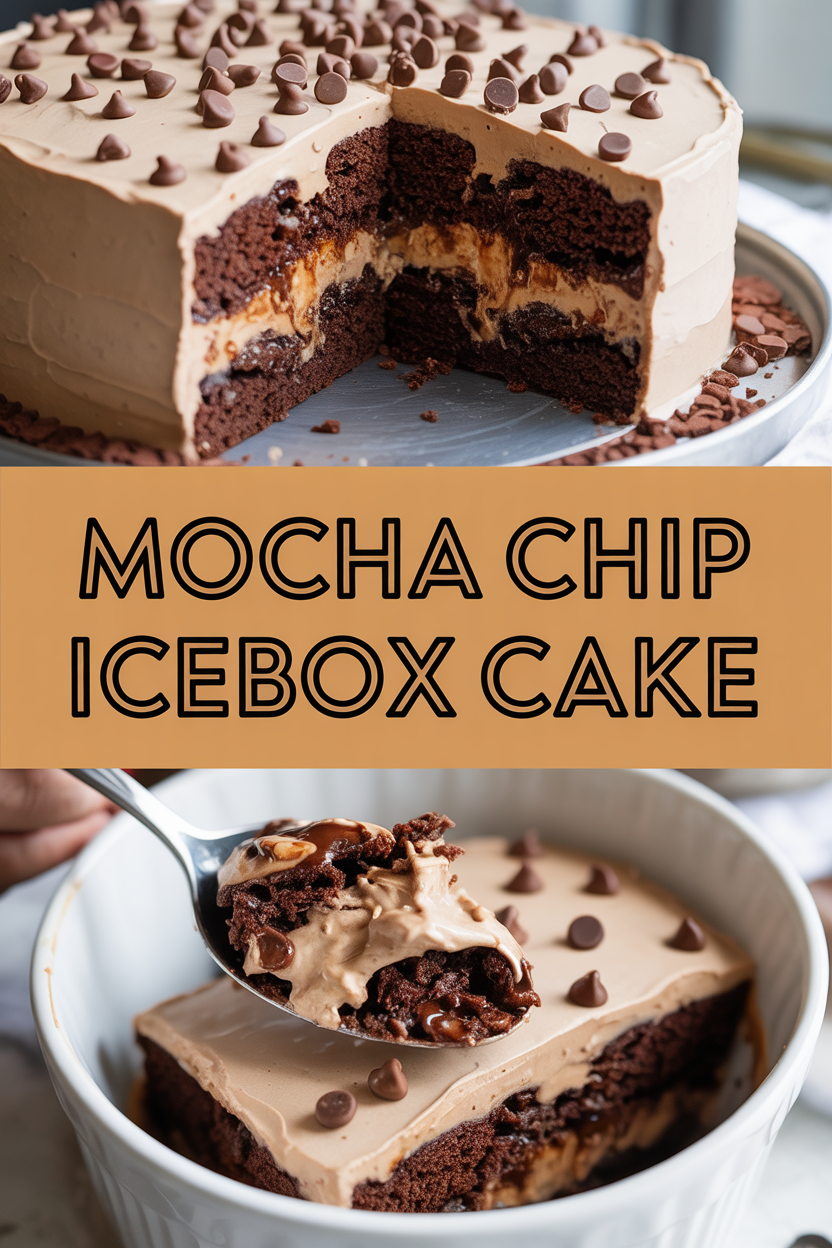
Okay, full disclosure: I made this Mocha Chip Icebox Cake when I wanted dessert that felt fancy but required zero oven babysitting — and I totally beat my own record for “most impressed with my own dessert.” I promise this is the kind of recipe you can toss together while the laundry tumbles and still produce a glossy, coffee-kissed cake that makes people ask for the recipe. It layers crisp chocolate wafers with clouds of coffee-scented whipped cream and pockets of mini chocolate chips, then chills until the cookies soften into cake-like slices. If you love mocha, texture contrast, and desserts that improve overnight, we’re getting along just fine.
Quick Facts
- Yield: Serves 8–10
- Prep Time: 20 minutes
- Cook Time: 0 minutes
- Total Time: 4 hours 20 minutes (including chilling)
Why This Recipe is Awesome
This icebox cake tastes like a café dessert made in your pajamas. It pairs crisp, chocolatey wafers with pillowy, coffee-infused whipped cream and crunchy mini chips that melt into little mocha pockets. The texture plays between soft and snap, and the coffee aroma sneaks up on you with every bite. Plus, it requires no baking — perfect for hot days or when you want more party energy and less stove drama. Honestly, it’s so easy even your most distracted roommate can’t mess it up.
Ingredients
For the Main Dish:
- 2 cups heavy whipping cream, cold
- 1/2 cup powdered sugar
- 2 tsp instant espresso powder (or 1 tbsp very strong brewed coffee, cooled)
- 1 tsp vanilla extract
- 1/8 tsp fine salt
- 1 cup mini chocolate chips
- 1/2 cup finely chopped dark chocolate (optional, for extra depth)
- 1 package (about 9 oz) chocolate wafer cookies or chocolate graham crackers (about 40–45 wafers)
- 1/3 cup strong brewed coffee, cooled (for brushing wafers, optional)
For the Sauce / Garnish (if applicable):
- 4 oz dark chocolate, chopped
- 1/2 cup heavy cream
- Extra mini chocolate chips or shaved chocolate for sprinkling
How I Make It
Step 1:
Pour the cold 2 cups heavy whipping cream into a chilled bowl, sprinkle in the 2 tsp instant espresso powder and 1/2 cup powdered sugar, and add 1 tsp vanilla. Whip on medium-high until you get soft peaks — you want a glossy, slightly billowy texture. Listen for that gentle change in the mixer’s hum; when the cream holds a velvety peak that folds over, stop. Overwhipping makes it grainy, so watch it closely.
Step 2:
Gently fold in 1 cup mini chocolate chips and the optional chopped dark chocolate. Use a rubber spatula and large strokes so you keep the airy texture. If you like a stronger coffee flavor, fold in the 1 tbsp cooled strong coffee here. The mixture should smell richly of espresso and look pale and fluffy.
Step 3:
Spread a thin layer of the whipped mocha cream across the bottom of an 8×8-inch pan (or a loaf pan for neat slices). Arrange a single layer of chocolate wafers on top — break a few cookies to fill gaps. Lightly brush wafers with the cooled 1/3 cup brewed coffee if you want faster soaking and deeper coffee flavor, but don’t drown them; you only want a whisper of coffee, not soggy cookies.
Step 4:
Layer more whipped cream over the cookies and repeat, finishing with a thick layer of cream on top. Press the layers gently with a spatula so the wafers contact the cream but don’t smash them flat. Cover tightly with plastic wrap and chill for at least 4 hours, preferably overnight. The chilling softens the wafers into cake-like layers and lets flavors marry.
Step 5:
Make the ganache if you want a shiny finish: heat 1/2 cup heavy cream until steaming (don’t boil), pour it over 4 oz chopped dark chocolate, let sit 1 minute, then whisk until smooth. Cool slightly, pour over the chilled cake, and scatter extra mini chips or chocolate shavings. Slice with a warm knife for clean edges and serve cold. Enjoy the crackle of the ganache, the mocha perfume, and the creamy mouthfeel.
Pro Tips
- Whip the cream in a cold bowl and keep the beaters chilled for faster, more stable peaks.
- If you use instant espresso powder, dissolve it in a tablespoon of hot water first to avoid speckles; it amps the mocha flavor without watery cream.
- For neat slices, freeze the cake for 20 minutes before slicing — the knife will glide through like a dream.
- Want a firmer cake? Use a 9×5 loaf pan so layers stay tall and sliceable; adjust layering slightly.
Common Mistakes to Avoid
- Skipping preheating: Classic rookie move. It changes texture and bake time.
- Overmixing: Leads to dense or chewy results. Mix until just combined.
- Guessing cook time: Always use visual cues or a timer, not just vibes.
- Overcrowding pans: Give your food some breathing room to crisp properly.
Alternatives & Substitutions
- Use coconut whip (chilled canned coconut cream) for a dairy-free version; the texture will stay creamy but taste a touch coconutty.
- Swap mini chocolate chips for chopped hazelnuts or toasted almonds for a nutty crunch; expect a slightly less melt-in-your-mouth feel.
- Replace heavy cream with full-fat Greek yogurt mixed with a little honey for a tangy, lighter layer — the cake will have less lift and more density.
- Use gluten-free chocolate wafers or gluten-free graham crackers to make this gluten-free; the soaking time stays the same.
Variations & Tips
- Mint mocha: add 1/2 tsp peppermint extract to the cream and use Andes-style mint chips.
- Caramel mocha: drizzle salted caramel between layers for gooey pockets.
- Almond joy: fold in shredded coconut and swap dark chocolate for milk chocolate chips.
- Spiked adult version: brush wafers with a tablespoon of coffee liqueur for a grown-up kick.
- Chocolate overload: add a layer of ganache between layers for extra richness.
- Fruit twist: scatter thinly sliced strawberries between layers for a bright contrast to the mocha.
FAQ (Frequently Asked Questions)
- Can I make this ahead of time?
- Yes! Make it up to 48 hours ahead, keep it tightly covered, and store it in the fridge. The flavors improve overnight as the wafers soften. If you add ganache, wait to drizzle it until 1 hour before serving for the freshest shine.
- Can I double the recipe?
- Sure thing. Use a 9×13-inch pan or two 8×8 pans. Increase chilling time slightly — aim for at least 6 hours when you double it so the center firms up.
- Can I substitute butter with oil?
- Technically yes, but you’ll miss that buttery magic. Use ¾ the amount of oil and expect a leaner mouthfeel.
- How do I know it’s done?
- You’ll know it’s done when the cookies have softened into cake-like layers and the top holds a clean slice without collapsing. The edges should look settled, not weepy, and the cake should feel firm to the touch after chilling.
- What if I don’t have ingredient X?
- No espresso powder? Use a strong shot of brewed coffee (about 1 tbsp concentrated). No wafers? Use thin graham crackers or even thinly sliced pound cake — adjust soaking slightly so nothing turns mushy.
How I Like to Serve It
I slice this cake into neat squares and serve with a small spoonful of extra whipped cream and a dusting of cocoa. It pairs beautifully with an afternoon cup of coffee, an after-dinner espresso, or a chilled glass of dessert wine. Bring it to potlucks — people love anything you can make ahead, and this one looks like you spent hours fussing.
Notes
- Store leftovers covered in the fridge for up to 4 days. The texture softens over time but still tastes great.
- If you want perfectly clean slices, warm the knife under hot water and wipe it dry between cuts.
Final Thoughts
Closing: Now go impress someone — or just yourself — with your homemade mocha masterpiece!