
Okay, picture this: I’m in my kitchen in ridiculous socks, whispering sweet nothings to a dozen tiny cheesecakes while my blender hums like a tiny robot willing to help. These mini protein cheesecakes came out of my “I want dessert but also my jeans” era — creamy, tangy, and sneaky with protein powder so you feel slightly virtuous while you lick the spoon. They smell like warm butter and vanilla, the tops turn a soft golden color, and the centers wobble just enough before setting into silky bites. Bonus: they freeze beautifully, so you always have a celebratory snack for emergency cravings (or heroic post-workout treats).
Quick Facts
- Yield: Serves 12 (mini cheesecakes)
- Prep Time: 20 minutes
- Cook Time: 18 minutes
- Total Time: 1 hour (including 30 minutes chill)
Why This Recipe is Awesome
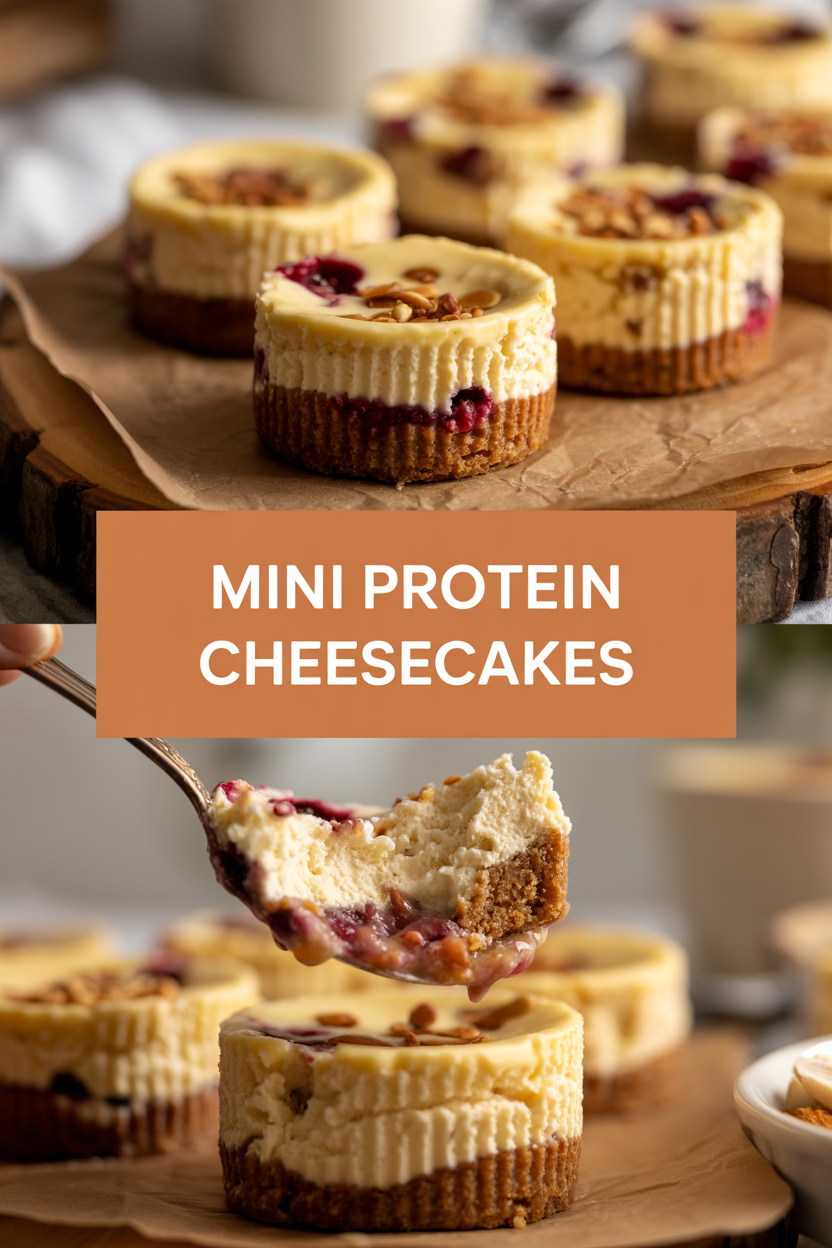
These mini cheesecakes give you creamy, tangy cheesecake flavor with an extra protein boost — perfect when you want dessert but also want to feel like you made a smart choice. They have a crisp buttery crust, a luxuriously smooth filling, and a delicate jiggle in the center that says “perfection” when you tap the tin. Plus, they’re portable, Instagram-friendly, and so simple that even your oven can’t mess them up. Who doesn’t love a dessert that doubles as a snack?
Ingredients
For the Main Dish:
- Crust: 1 1/2 cups graham cracker crumbs (about 6–7 full sheets) or gluten-free crackers
- 2 tbsp granulated sugar
- 4 tbsp (1/4 cup) melted butter (or coconut oil for dairy-free)
- Filling: 16 oz (2 packages) cream cheese, room temperature
- 1/2 cup plain Greek yogurt (or sour cream)
- 1/3 cup vanilla protein powder (whey or plant-based)
- 1/2 cup pure maple syrup or honey
- 1 large egg
- 1 tsp pure vanilla extract
- Pinch of salt
For the Sauce / Garnish (if applicable):
- 1 cup mixed berries (fresh or frozen) + 1 tbsp honey, simmered into a quick compote
- Or 2 tbsp melted peanut butter drizzled on top
- Optional: fresh mint leaves or a dusting of cocoa powder
How I Make It
Step 1:
Preheat the oven to 325°F. Line a 12-cup muffin tin with paper liners or spray lightly with nonstick spray. In a bowl, stir together the graham crumbs, melted butter, and sugar until the mixture feels like damp sand. Press about 1 tablespoon of crust into the bottom of each muffin cup — I press with the back of a small measuring spoon and listen for that satisfying little clunk as it evens out.
Step 2:
Beat the cream cheese at medium speed until smooth and silky (no lumps). Add the Greek yogurt, protein powder, maple syrup, egg, vanilla, and a pinch of salt. Mix just until combined — scrape the bowl down so everything blends evenly. Pro tip: room-temperature cream cheese blends into velvet much faster, and your mixer doesn’t need to whir for ages.
Step 3:
Divide the filling evenly among the 12 crust-lined cups (about 3 tablespoons per cup). Tap the tin gently on the counter to settle the batter and pop any air bubbles. The batter smells like vanilla clouds right now — that sweet, tangy aroma always makes me grin.
Step 4:
Bake at 325°F for 15–18 minutes. Watch for the edges to set and turn slightly golden while the centers still wobble a bit when you jiggle the pan — that jiggle means creamy, not raw. If you like smooth tops, slide a thin knife around each cake after baking to prevent tiny cracks.
Step 5:
Cool on the counter for 15 minutes, then chill in the fridge for at least 30 minutes to firm up (I prefer 2 hours for clean slices). Top with berry compote or a drizzle of peanut butter just before serving. Those first bites will give you a crisp crust, creamy middle, and a tiny protein-powered pep in your step.
Pro Tips
- Use room-temperature cream cheese so the filling blends smooth and you don’t overwork the batter.
- Measure your protein powder — too much can dry the filling; start with 1/3 cup and adjust next time if you want more protein punch.
- For crack-free tops, avoid high speed on your mixer and bake at a moderate temperature (325°F) instead of blasting them.
- Freeze extras in an airtight container with parchment between layers; thaw in the fridge overnight before serving.
Common Mistakes to Avoid
- Skipping preheating: Classic rookie move. It changes texture and bake time.
- Overmixing: Leads to dense or chewy results. Mix until just combined.
- Guessing cook time: Always use visual cues or a timer, not just vibes.
- Overcrowding pans: Give your food some breathing room to crisp properly.
Alternatives & Substitutions
- Swap Greek yogurt for sour cream for a tangier, silkier bite.
- Use almond flour crust for a gluten-free option; it gives a nuttier flavor and crumblier texture.
- Replace butter with coconut oil for dairy-free; expect a slight coconut taste and softer crust.
- If you don’t have protein powder, add an extra 2 tbsp Greek yogurt and 1 tbsp cornstarch for structure — flavor stays similar.
Variations & Tips
- Chocolate boost: stir 2 tbsp unsweetened cocoa powder into the filling and use chocolate protein powder.
- Lemon zest: add 1 tbsp lemon zest and 1 tbsp lemon juice for a bright citrus version.
- Peanut butter swirl: dollop 1 tbsp peanut butter on top of each filled cup and swirl with a toothpick.
- Berry-studded: fold 1/3 cup chopped strawberries into the batter for bursts of fruit.
- Keto-friendly: use a sugar substitute and almond flour crust to lower carbs.
- Creative twist: top with toasted coconut and a sprinkle of flaky sea salt for a tropical-salty contrast.
FAQ (Frequently Asked Questions)
- Can I make this ahead of time?
- Yes! Make them up to 3 days ahead and keep covered in the fridge. Freeze extras for up to 2 months and thaw in the fridge overnight.
- Can I double the recipe?
- Sure thing. Use two muffin tins or bake in batches. If you bake more than one tin at once, rotate them halfway through baking for even color.
- Can I substitute butter with oil?
- Technically yes, but you’ll miss that buttery magic. Use ¾ the amount of oil (so 3 tbsp oil for this crust) and expect a slightly different mouthfeel.
- How do I know it’s done?
- Look for set, slightly golden edges and a center that still jiggles faintly — it firms as it chills. Overbaking yields dry texture, so err on the side of a little wobble.
- What if I don’t have ingredient X?
- Out of protein powder? Add another 2–3 tbsp Greek yogurt and a teaspoon of cornstarch. No graham crackers? Use crushed digestive biscuits or 1 1/4 cups almond flour with 2 tbsp sugar and 3 tbsp butter for a nutty crust.
How I Like to Serve It
I love to serve these chilled with a bright berry compote and a tiny mint leaf for color. They pair beautifully with a strong espresso or a summery iced tea. Bring them to potlucks — people always gravitate toward the little cups — or save them for solo movie nights when you want something indulgent but still feel like you made a sensible choice.
Notes
- Store cheesecakes in an airtight container in the fridge for up to 3 days, or freeze for longer storage.
- No meat here, but if you ever cook meat, remember safe temps: poultry 165°F, ground meats 160°F, steaks/roasts 145°F.
Final Thoughts
Closing: These mini protein cheesecakes prove you can have your cake and a sensible-sounding snack too — go impress someone, or just yourself, with your homemade masterpiece!