
I promise I didn’t plan to eat half the batch before anyone arrived — those little chocolate eggs are alarmingly persuasive. If you like sticky fingers, sweet nostalgia, and a recipe that refuses to be fussy, these Krispie Easter Nests are your new best friend. I love how the kitchen fills with that warm, sugary scent while marshmallows melt into glossy goo; it makes the whole house feel like spring in a pan. They come together fast, look adorable on a platter, and people always comment on the crunchy-chewy contrast. Bonus: kids can help press the nests into tins, which makes them a deliciously messy craft session as much as a dessert. Grab a bowl and a spatula — you’ll be smiling in minutes.
Quick Facts
- Yield: Serves 12 nests
- Prep Time: 15 minutes
- Cook Time: 10 minutes
- Total Time: 25 minutes
Why This Recipe is Awesome
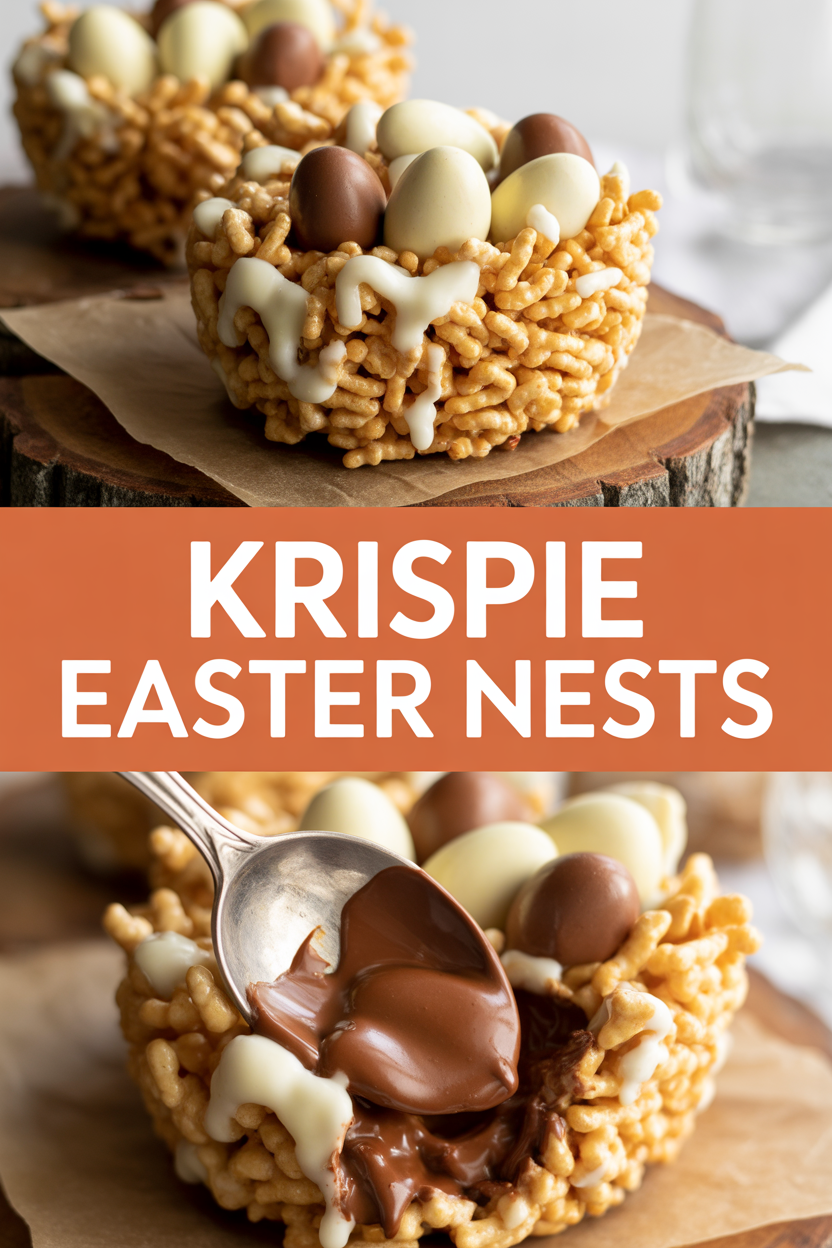
It’s effortless, cheerful, and perfectly textural — crunchy cereal hugged by gooey marshmallow with a pop of chocolate eggs on top. This recipe requires minimal ingredients and no oven, so it’s so easy even your oven can’t mess it up. The nests taste sweet but not cloying, and you get that irresistible contrast between the soft marshmallow and the crisp Rice Krispies. Plus, they look ridiculously cute on a spring dessert table. Who doesn’t love tiny edible nests full of candy?
Ingredients
For the Main Dish:
- 3 tbsp unsalted butter
- 1 (10 oz) bag mini marshmallows (about 3 1/2 cups)
- 1 tsp vanilla extract
- 4 cups Rice Krispies cereal
- 12–24 mini chocolate eggs (Cadbury mini eggs or small M&Ms work great)
- Nonstick spray or extra butter for greasing hands/muffin tin
For the Sauce / Garnish (if applicable):
- 2 oz dark or milk chocolate, chopped (for drizzling; optional)
- 1 tsp coconut oil (optional — helps chocolate shine)
How I Make It
Step 1:
I start by greasing a 12-cup muffin tin with nonstick spray or a little butter so the nests come out easily. Then I melt 3 tbsp unsalted butter in a large, heavy-bottomed saucepan over low heat. The butter sizzles softly and smells comforting as it warms — that’s my cue to dump in the marshmallows.
Step 2:
Stir the marshmallows constantly with a heat-safe spatula until they become glossy and smooth, about 3–4 minutes. Watch closely — marshmallows will go from clumpy to silky quickly. I add 1 tsp vanilla right at the end for warmth and depth of flavor. If your marshmallows seize or look grainy, keep stirring; a few extra seconds of heat usually rescues them.
Step 3:
Remove the pan from heat and fold in 4 cups Rice Krispies immediately, mixing thoroughly so every flake gets coated. You’ll hear that delightful sticky-rustle as the cereal gets enveloped — that’s the sound of success. Work fast so the mixture stays pliable.
Step 4:
Scoop about a heaping 1/3 cup of the mixture per nest into the prepared muffin tin. Press a shallow well into the center with a buttered spoon (or your fingers, greased with butter) to form the nest shape. Place 2–3 mini eggs into each well. Let the nests cool at room temperature for 15–20 minutes to firm up. If you’re impatient like me, pop them in the fridge for 10 minutes to speed things along.
Step 5:
If you want a fancy finish, melt 2 oz chocolate with 1 tsp coconut oil in 20-second bursts in the microwave, stirring until glossy, then drizzle over the nests. Carefully invert each nest onto a tray — they release easily if you greased the tin well — and serve. Watch people ooh and ahh at the crunchy sheen and candy-filled centers.
Pro Tips
- Heat gently: keep the marshmallow step on low heat so they melt without scorching. Burnt marshmallow tastes bitter.
- Grease everything: butter your hands or spray the spoon and muffin tin so the sticky mixture behaves. It makes shaping quick and painless.
- Measure cereal after scooping: cereal compresses when scooped, so pour it into a dry cup instead of scooping from the box to avoid dry nests.
- Make them ahead: form nests and store them unfilled; add eggs right before serving so they stay crisp and pretty.
Common Mistakes to Avoid
- Skipping preheating: Classic rookie move. It changes texture and bake time.
- Overmixing: Leads to dense or chewy results. Mix until just combined.
- Guessing cook time: Always use visual cues or a timer, not just vibes.
- Overcrowding pans: Give your food some breathing room to crisp properly.
Alternatives & Substitutions
- Use 3 tbsp coconut oil instead of butter for a dairy-free option — expect a slightly tropical flavor.
- Swap mini marshmallows for 1 cup marshmallow fluff plus 1/2 cup mini marshmallows if you like a smoother texture.
- Choose gluten-free puffed rice cereal for a gluten-free nest (check the package — some Rice Krispies contain barley).
- Replace mini chocolate eggs with chopped dried fruit or roasted nuts for less sugar and more texture.
Variations & Tips
- Double Chocolate: stir 2 tbsp cocoa powder into the melted marshmallows before adding cereal for a chocolatey nest.
- Peanut Butter Swirl: stir 1/3 cup creamy peanut butter into the melted marshmallow for nutty depth; press a peanut butter cup into each nest.
- S’mores Nests: mix in 1/2 cup crushed graham crackers and top with a toasted mini marshmallow and chocolate square.
- Tropical Twist: add 1/3 cup shredded coconut and top with a chocolate-covered pineapple bite.
- Adult Version: add a splash of 1 tsp Kahlúa to the melted marshmallow for grown-up flair (optional).
FAQ (Frequently Asked Questions)
- Can I make this ahead of time?
- Yes! Form the nests and store them in an airtight container for up to 3 days at room temperature. Add the chocolate eggs just before serving so they stay crisp and colorful.
- Can I double the recipe?
- Sure thing. Use a larger pan or two pots for melting the marshmallows so you don’t overcrowd the pan; work in batches for shaping.
- Can I substitute butter with oil?
- Technically yes, but you’ll miss that buttery magic. Use ¾ the amount of oil.
- How do I know it’s done?
- The marshmallow should look smooth and shiny and coat the cereal evenly. The nests set when they feel slightly firm to the touch and hold their shape after cooling.
- What if I don’t have ingredient X?
- If you lack mini eggs, use M&Ms, chocolate chips, or jellybeans. No marshmallows? Use marshmallow fluff plus a few mini marshmallows to help texture.
How I Like to Serve It
I plate these on a bright platter with a scattering of pastel paper grass for extra Easter vibes. They work great at brunch, a kids’ party, or as a sweet after-dinner treat. Serve with cold milk, hot coffee, or a sparkling lemonade to balance the sweetness. They bring spring to the table, whether you’re hosting or gifting a neighbor.
Notes
- Store nests in an airtight container at room temperature for up to 3 days. Refrigeration can make them a bit firmer.
- If nests harden, microwave one for 8–10 seconds to soften before serving — but don’t overdo it or they’ll get too gooey.
Final Thoughts
Closing: Go make a batch, hide one for yourself, and enjoy every sticky, crunchy bite — you deserve it!