
My grandma kept a jar of dried figs in the pantry like it held a secret treasure, and every winter afternoon our kitchen smelled like warm sugar and sun-dried fruit as she spooned that sticky filling between buttery crumbs. I learned to press the dough with the back of a spoon exactly the way she did — firm, not frantic — and that tiny ritual still calms me. These fig bars feel like those afternoons: a little rustic, a little sweet, and perfect with a mug of tea while the light fades. If you want a slice of nostalgia that tastes like a cozy living room and a folded-up apron, these bars deliver — and they come together faster than I can tell the story.
Quick Facts
- Yield: Serves 12
- Prep Time: 25 minutes
- Cook Time: 30 minutes
- Total Time: 55 minutes
Why This Recipe is Awesome
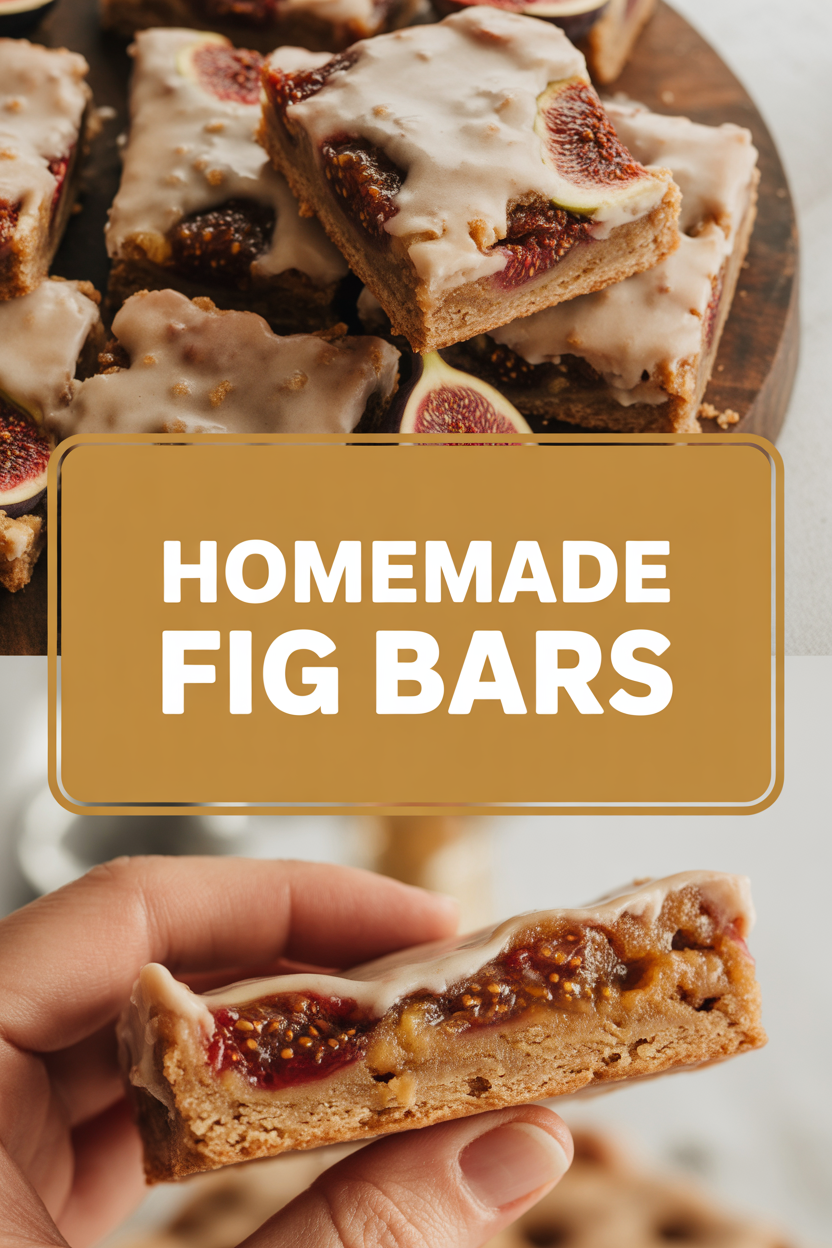
These homemade fig bars give you that perfect contrast: a sandy, buttery crust and a jammy, caramel-like fig filling. They taste fancy but behave like a cozy, reliable snack. Who doesn’t love a flaky edge and a gooey center? Bonus: they travel well, freeze beautifully, and feel extra impressive when you tell people you made the filling from dried figs.
Ingredients
For the Main Dish:
- 1 1/2 cups all-purpose flour
- 1 cup old-fashioned rolled oats
- 1/2 cup light brown sugar, packed
- 1/4 cup granulated sugar
- 1/2 tsp baking powder
- 1/4 tsp salt
- 3/4 cup (12 tbsp) cold unsalted butter, cubed
- 1 large egg
- 1 tsp vanilla extract
- 1 1/2 cups dried figs, stems removed and chopped (about 6 oz)
- 1/2 cup water
- 1/4 cup light brown sugar
- 1 tbsp lemon juice
- 1/2 tsp vanilla
- Pinch of salt
For the Sauce / Garnish (if applicable):
- Optional: 1/2 cup powdered sugar + 1–2 tbsp milk or lemon juice for a quick drizzle
How I Make It
Step 1:
I preheat the oven to 350°F and line an 8×8-inch pan with parchment, leaving an overhang for easy lifting. I pulse the flour, oats, brown sugar, baking powder, and salt in a bowl until they look uniform. I drop in the cold, cubed butter and rub it with my fingertips until the mixture looks like coarse sand with a few pea-sized bits — you want texture, not paste.
Step 2:
I whisk the egg and vanilla and stir it into the crumb mix until it just holds together when I press a handful. I reserve about a third of the dough for the topping and press the rest into the prepared pan to form an even base. Press firmly and listen for the slight squeak as the dough compacts — that tells me I pressed enough.
Step 3:
For the filling, I simmer the chopped figs, water, and brown sugar in a small saucepan over medium heat. I stir constantly as the figs soften and the mixture reduces into a jammy mass; this takes about 8–10 minutes. I stir in the lemon juice, vanilla, and a pinch of salt, then mash gently with a fork if I want a smoother texture. The kitchen fills with a warm, honeyed aroma — my favorite part.
Step 4:
I spread the fig filling over the crust in an even layer, leaving a little border so the filling doesn’t slip out. Then I crumble the reserved dough over the top or press it into a rustic lattice — either way works. I bake the pan for about 25–30 minutes, until the topping turns golden and the filling bubbles at the edges. Watch for golden edges and a glossy center; those cues tell me the bars finished baking.
Step 5:
I cool the bars in the pan for at least 30 minutes so the filling firms up enough to slice cleanly. When they reach room temperature, I lift the slab out with the parchment and cut into 12 squares. If I feel fancy, I whisk powdered sugar with a splash of milk and drizzle it over warm bars — the sugar melts into tiny white ribbons.
Pro Tips
- Use cold butter and work quickly for a tender, flaky crust.
- If your figs look dry, soak them in hot water for 10 minutes before chopping to plump them up.
- Line the pan with parchment and leave an overhang for easy removal and neat slices.
- Let the bars cool fully before slicing; warm filling tends to squish out and make a mess.
Common Mistakes to Avoid
- Skipping preheating: Classic rookie move. It changes texture and bake time.
- Overmixing: Leads to dense or chewy results. Mix until just combined.
- Guessing cook time: Always use visual cues or a timer, not just vibes.
- Overcrowding pans: Give your food some breathing room to crisp properly.
Alternatives & Substitutions
- Swap dried figs for dates or a mix of figs and dried apricots for a fruitier note — dates make the filling deeper and caramel-like.
- Use gluten-free 1:1 flour to make the crust gluten-free; expect a slightly crumblier texture.
- Replace butter with coconut oil (1:1) for a dairy-free option — expect a light coconut aroma.
- Stir a teaspoon of orange zest into the filling for brightness; it cuts the sweetness beautifully.
Variations & Tips
- Add a sprinkle of coarse sea salt on top before baking for a sweet-salty pop.
- Fold in 1/4 cup chopped walnuts or pecans for crunch in the filling.
- Make handheld size: press dough into a muffin tin and bake for mini fig bars (reduce bake time to ~20 minutes).
- Swap oats for ground almonds for a denser, nuttier crust.
- Stir 1 tsp ground cinnamon or cardamom into the filling for warming spice.
- Creative twist: swirl in a tablespoon of tahini with the fig jam for a savory, sesame note.
FAQ (Frequently Asked Questions)
- Can I make this ahead of time?
- Yes! I make the filling up to 3 days ahead and store it in an airtight container in the fridge. Assemble and bake on the day you want fresh bars. After baking, store cooled bars in the fridge for up to 5 days or freeze slices for up to 2 months.
- Can I double the recipe?
- Sure thing. Use a 9×13-inch pan and increase bake time slightly (add about 8–12 minutes), watching for golden edges and bubbling filling as your cue.
- Can I substitute butter with oil?
- Technically yes, but you’ll miss that buttery magic. Use ¾ the amount of oil.
- How do I know it’s done?
- You’ll see the topping turn golden and the filling bubble at the edges. The center should feel set, not liquid. If you jiggle the pan, the middle should wobble like firm jelly, not slosh.
- What if I don’t have ingredient X?
- No panic. Replace oats with extra flour or almond meal; swap brown sugar for maple syrup but reduce other liquids slightly; use date paste if you don’t have figs.
How I Like to Serve It
I slice these bars for afternoon tea, pack them in lunchboxes, or serve them at a potluck with coffee. They pair beautifully with sharp cheddar or a dollop of Greek yogurt for contrast. In cooler months, I heat a bar for 10–15 seconds in the microwave and serve it with a scoop of vanilla ice cream — pure comfort.
Notes
- Store baked bars in an airtight container at room temperature for up to 2 days, then move to the fridge for up to 5 days. Freeze individual bars on a tray, then bag for up to 2 months.
- If you prep the filling ahead, warm it slightly before spreading so it spreads easily; no special meat temps apply here.
Final Thoughts
Closing: These fig bars feel like a warm note from the past and a quick win for busy cooks — now go impress someone, or just yourself, with your homemade masterpiece!