
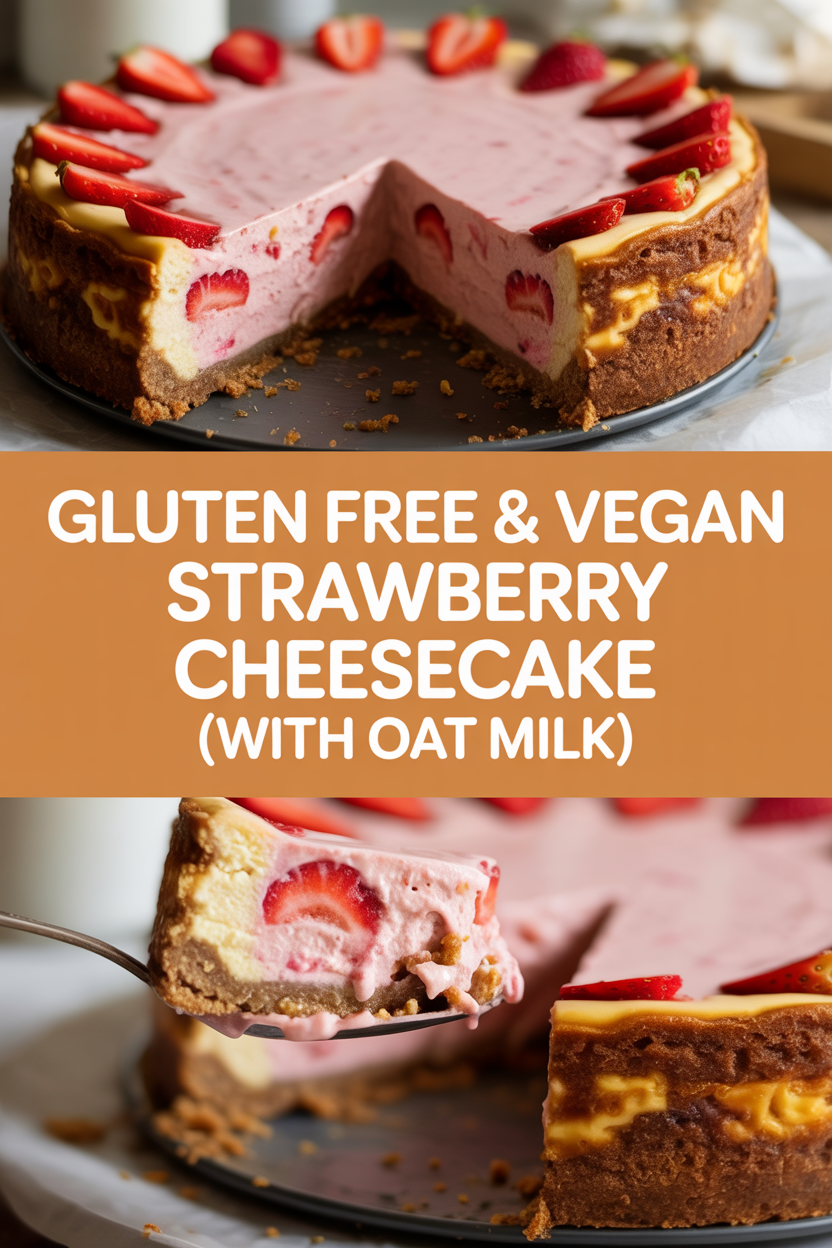
Summer always nudges me toward strawberries, and this year I decided to make a cheesecake that won’t offend my gluten-free or vegan friends — or my stubborn sweet tooth. Picture a buttery-tasting, crisp crust made from **gluten-free oats** and almonds, a silky, tangy filling brightened with **lemon** and **vanilla**, and a glossy strawberry topping that smells like a farmer’s market on a sunny morning. I love that this version uses **oat milk** to keep everything creamy without dairy. It chills to a perfect sliceable texture, so you can make it the day before a picnic and still show up like a dessert hero. Let’s make a strawberry cheesecake that feels indulgent but actually keeps things simple and friendly for home cooks.
Quick Facts
- Yield: Serves 8
- Prep Time: 25 minutes
- Cook Time: 45 minutes
- Total Time: 310 minutes (includes 4 hours chilling)
Why This Recipe is Awesome
This cheesecake tastes rich and velvety but stays vegan and gluten-free — so everyone at the table can have a slice. The crust gives a toasty crunch, the filling melts on your tongue with bright lemon notes, and the homemade strawberry topping adds juicy, jammy sweetness. It’s easy enough for a weeknight treat and pretty enough for company. Honestly, it’s so reliable even your oven can’t mess it up.
Ingredients
For the Main Dish:
- For the crust: 1 1/2 cups gluten-free rolled oats
- 1 cup raw almonds (or almond flour for a finer crust)
- 1/4 cup maple syrup
- 3 tbsp melted coconut oil
- 1/4 tsp fine sea salt
- For the filling: 2 cups raw cashews (soaked 4 hours or boiled 10 minutes)
- 12 oz vegan cream cheese (room temperature; optional but makes texture silkier)
- 3/4 cup pure maple syrup
- 1/4 cup melted coconut oil
- 3/4 cup oat milk (unsweetened)
- 3 tbsp cornstarch or arrowroot powder
- 2 tbsp lemon juice
- 2 tsp pure vanilla extract
- Pinch of salt
For the Sauce / Garnish (if applicable):
- 2 cups strawberries, hulled and halved
- 2 tbsp maple syrup (adjust to taste)
- 1 tsp lemon juice
- 1 tsp cornstarch mixed with 1 tbsp cold water (optional, for thickening)
- Fresh mint leaves for garnish (optional)
How I Make It
Step 1:
Preheat your oven to 350°F. Pulse the gluten-free oats and almonds in a food processor until they form a coarse meal — you want little specks, not a powder. Add maple syrup, melted coconut oil, and a pinch of salt, then pulse until the crumbs hold together when pressed. Press the mixture firmly into the bottom of a 9-inch springform pan, reaching just up the sides about 1/2 inch. You’ll smell warm, toasty nuts — that’s the good part.
Step 2:
Bake the crust for 10–12 minutes until the edges turn golden and smell nutty. Let it cool slightly while you make the filling. Don’t skip this step — a pre-baked crust stays crisp instead of soggy.
Step 3:
Combine the soaked cashews (drain them), vegan cream cheese, maple syrup, oat milk, coconut oil, lemon juice, vanilla, cornstarch, and a pinch of salt in a high-speed blender. Blend until ultra-smooth and glossy; scrape down the sides once or twice. The filling should look thick and velvety — if it feels too stiff, add 1–2 tbsp more oat milk.
Step 4:
Pour the filling over the warm crust and smooth the top with a spatula. Tap the pan lightly on the counter to release any air bubbles. Bake at 350°F for 40–45 minutes, until the edges set and the center jiggles slightly like gelatin. You want the middle to wobble but not look liquid. Turn off the oven, crack the door, and let the cheesecake rest inside for 30 minutes to avoid cracks.
Step 5:
Prepare the strawberry topping while the cake cools. Toss strawberries with maple syrup and lemon juice in a small saucepan. Cook over medium heat until the berries break down and the sauce thickens, about 6–8 minutes. Stir in the cornstarch slurry if you want a thicker glaze. Cool to room temperature, then spoon over the chilled cheesecake. Chill the whole cake for at least 4 hours or overnight for best slicing. Garnish with fresh mint and extra sliced strawberries before serving.
Pro Tips
- Soak the cashews for at least 4 hours or boil them 10 minutes for a creamy, blender-friendly filling.
- Use a good blender or food processor; texture depends on how smooth you go. Scrape the sides often.
- Let the cheesecake cool gradually (oven door cracked) to prevent cracks. A little jiggle in the center means perfect set after chilling.
- If your crust gets too brown, cover the edges with foil during the last minutes of baking.
Common Mistakes to Avoid
- Skipping preheating: Classic rookie move. It changes texture and bake time.
- Overmixing: Leads to dense or chewy results. Mix until just combined and smooth.
- Guessing cook time: Always use visual cues or a timer, not just vibes.
- Overcrowding pans: Give your food some breathing room to crisp properly.
Alternatives & Substitutions
- Swap raw almonds for sunflower seeds to make this nut-free — expect a slightly earthier flavor.
- Replace cashews with an extra 8 oz of vegan cream cheese for a faster, less creamy-from-scratch filling.
- Use coconut milk instead of oat milk for a richer texture and subtler coconut flavor.
- For a gluten-free graham crust, use crushed gluten-free graham crackers instead of oats and almonds.
Variations & Tips
- Mixed berry topping: Replace strawberries with a mix of blueberries and raspberries for color pop.
- Lemon swirl: Stir 1–2 tbsp lemon curd (vegan) into the filling before baking for bright streaks.
- Chocolate stripe: Melt 2 oz vegan dark chocolate and drizzle over the chilled cheesecake for drama.
- Mini cheesecakes: Bake in a muffin tin for portable, party-ready bites (reduce bake time to 20–25 minutes).
- Less sweet: Cut maple syrup in the filling by 1/4 cup if you prefer tartness to sweetness.
FAQ (Frequently Asked Questions)
- Can I make this ahead of time?
- Yes! Make the cheesecake a day ahead and keep it chilled. Store the strawberry topping separately and add it just before serving for the freshest look.
- Can I double the recipe?
- Sure thing. Use two 9-inch pans or one 10–11 inch pan. Bake time may increase by 5–10 minutes — watch for those set edges.
- Can I substitute butter with oil?
- Technically yes, but you’ll miss that buttery magic. Use ¾ the amount of oil.
- How do I know it’s done?
- Look for firm edges and a slightly wobbly center. The top should look set and not liquid. It firms further while chilling.
- What if I don’t have ingredient X?
- Short on cashews? Use more vegan cream cheese. No cornstarch? Reduce the filling liquid by 2–3 tbsp and chill longer.
How I Like to Serve It
I slice this cheesecake for weekend brunch with strong coffee or as the finale to a summer BBQ — it pairs beautifully with light white wine or sparkling water with lemon. For parties, I cut thin slices because this dessert feels decadent; for a cozy night, I serve generous wedges and watch everyone close their eyes on the first bite.
Notes
- Store: Keep refrigerated up to 4 days. Freeze slices wrapped tightly for up to 1 month; thaw overnight in the fridge.
- Chill time matters: allow at least 4 hours (overnight best) for clean slices.
Final Thoughts
Closing: Now go impress someone — or just yourself — with your homemade masterpiece!