
Chef’s tip time: I stumbled on this French Silk Pie like a kitchen spy, mid-recipe swap at a potluck, and I never looked back. I’ll let you in on the simplest trick—use room-temperature butter and a sharp, good-quality chocolate—and the pie practically makes itself. This version keeps things approachable (no weird liqueurs unless you want them), tastes utterly velvety, and rewards patience with the kind of silky, chocolatey texture that makes people whisper “wow” between forkfuls. Trust me, once you master the rhythm of creaming butter and folding in whipped cream, this pie becomes your secret party weapon.
Quick Facts
- Yield: Serves 8
- Prep Time: 25 minutes (plus chilling)
- Cook Time: 10 minutes (for crust if baking)
- Total Time: 4 hours 35 minutes (includes chilling; active time ~35 minutes)
Why This Recipe is Awesome
This French Silk Pie hits every chocolate craving: it’s silky, rich, and impossibly smooth without feeling heavy. The filling melts on your tongue, the crust gives a crunchy contrast, and the whipped cream on top adds cloud-like brightness. It’s so reliable even a harried host can pull it off—plus it makes the kitchen smell like melted chocolate heaven. Who doesn’t love a dessert that looks fancy but plays nice with casual weeknight prep?
Ingredients
For the Main Dish:
- 1 9-inch chocolate cookie crust (store-bought or homemade: 1½ cups chocolate cookie crumbs + 6 tbsp melted butter)
- 8 oz (1 cup / 2 sticks) unsalted butter, room temperature
- 1 cup granulated sugar
- 2 tsp vanilla extract
- 4 oz bittersweet or unsweetened chocolate, chopped and melted (use good quality; bittersweet gives more balanced sweetness)
- 3 large pasteurized eggs, room temperature (see safety note below)
- 1 cup heavy whipping cream, cold (for folding and topping)
- Pinch of salt
For the Sauce / Garnish (if applicable):
- 1 cup heavy cream, whipped to soft peaks (for topping)
- Chocolate shavings or cocoa powder, for dusting
- Optional: sea salt flakes or chopped toasted pecans for contrast
How I Make It
Step 1:
Make or press your crust into a 9-inch pie plate. If you bake it, preheat the oven to 350°F and bake the crust for 8–10 minutes until it smells toasty and looks set. Cool the crust on a rack while you work. If you use a store-bought crust, just chill it for 10 minutes so it firms up—this keeps it crisp when the filling goes in.
Step 2:
Melt the 4 oz chocolate gently over a double boiler or in short bursts in the microwave, stirring until glossy. Let the chocolate cool until it’s warm but not hot. If it’s too hot it will melt the butter and scramble your texture—so practice patience here.
Step 3:
In a stand mixer or with a hand mixer, cream the 1 cup butter and 1 cup sugar on medium-high for 4–5 minutes until pale and fluffy—this step builds the silk. Reduce speed and add the 3 pasteurized eggs one at a time, mixing well after each addition. Add the vanilla and a pinch of salt.
Step 4:
With the mixer on low, slowly pour in the warm melted chocolate and blend until smooth and utterly glossy. At this stage the filling smells like a chocolate bakery and looks decadent. In a separate chilled bowl, beat the 1 cup cold heavy cream to soft peaks, then fold it gently into the chocolate mixture with a rubber spatula. Folding keeps the filling airy and light—don’t deflate it by stirring vigorously.
Step 5:
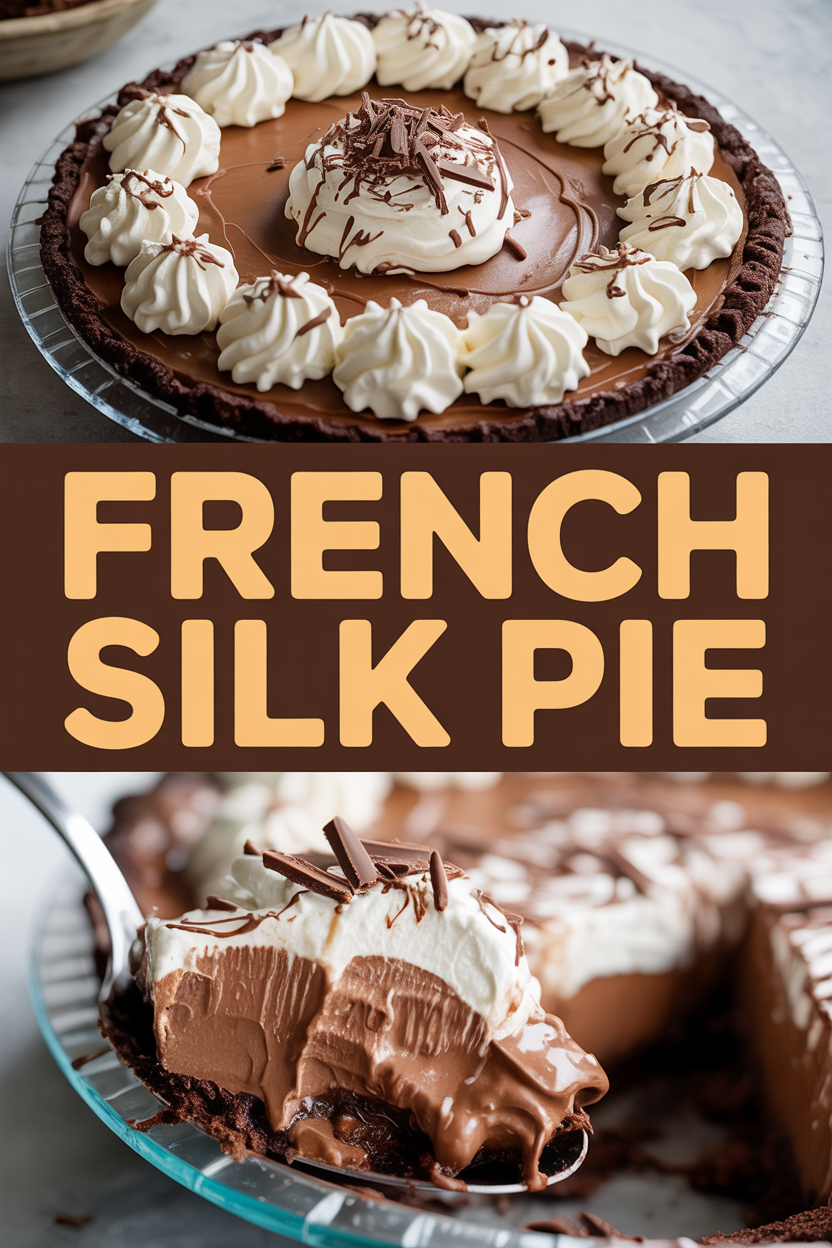
Spoon the filling into the cooled crust and smooth the top. Cover and chill the pie for at least 4 hours or overnight so it firms to a sliceable, silky consistency. Before serving, whip the extra 1 cup heavy cream to soft peaks, spread or pipe it on top, and finish with chocolate shavings and a pinch of sea salt. Slice with a warm, dry knife for clean edges.
Pro Tips
- Use pasteurized eggs to avoid raw-egg worries. If you can’t get them, gently cook the eggs with sugar to 160°F before adding—stability and safety!
- Let the melted chocolate cool to warm, not hot. Hot chocolate kills the air you worked into the butter.
- Chill the mixing bowl and beaters for the whipped cream—cold metal whips cream faster and steadier.
- For easier slicing, chill the pie until firm and run a warm knife under hot water, wipe dry, then slice between dips.
Common Mistakes to Avoid
- Skipping preheating: Classic rookie move. It changes texture and bake time.
- Overmixing: Leads to dense or chewy results. Mix until just combined.
- Guessing cook time: Always use visual cues or a timer, not just vibes.
- Overcrowding pans: Give your food some breathing room to crisp properly.
Alternatives & Substitutions
- Swap the chocolate crust for a graham cracker crust for a milder, sweeter base—good if kids eat it.
- Use dairy-free butter and coconut cream to make a dairy-free version; expect a slight coconut undertone and softer set.
- Make it gluten-free by using gluten-free chocolate cookies for crumbs or an almond flour crust (adds nutty flavor and texture).
- Replace heavy cream with full-fat Greek yogurt for a tangier, lighter topping, but the texture shifts away from classic silk.
Variations & Tips
- Add a teaspoon of instant espresso powder to the melted chocolate for a mocha lift.
- Fold in chopped toasted hazelnuts for crunch and a Nutella vibe.
- Drizzle salted caramel between the crust and filling for a sweet-salty twist.
- Make mini tartlets in a muffin tin for individual servings—reduce chilling time to 2–3 hours.
- For a boozy adult version, add 1–2 tbsp of bourbon or coffee liqueur to the filling.
- Top with raspberries or a berry compote for bright acidity and color contrast.
FAQ (Frequently Asked Questions)
- Can I make this ahead of time?
- Yes! Make the pie up to 48 hours ahead and keep it covered in the refrigerator. For best texture, add the whipped topping and garnishes right before serving.
- Can I double the recipe?
- Sure thing. Use two 9-inch pans or a deep 9×13 pan and increase chilling time by an hour. Mixing in two batches works better for even creaming.
- Can I substitute butter with oil?
- Technically yes, but you’ll miss that buttery magic. Use ¾ the amount of oil and expect a slightly different mouthfeel and less structure.
- How do I know it’s done?
- The filling looks glossy and holds shape when you smooth it into the crust. After chilling, slices should hold clean edges and the filling should have a firm, mousse-like texture.
- What if I don’t have ingredient X?
- Short on chocolate? Use high-quality cocoa powder (about ¾ cup) with 2–3 tbsp melted butter to help bind. No heavy cream? Use chilled evaporated milk whipped with a little sugar, but expect a lighter texture.
How I Like to Serve It
I love this pie after a cozy dinner—pair it with black coffee or a light dessert wine. It also stands out at potlucks because people assume it took longer than it did. Serve chilled, with a scattering of sea salt and fresh berries for color. It fits holiday tables, summer picnics (if you keep it cool), and any moment that deserves a bit of indulgence.
Notes
- Store leftover pie covered in the fridge for up to 3 days. The texture softens over time but stays delightful.
- Food safety note: use pasteurized eggs or cook eggs to 160°F if you worry about raw eggs in the filling.
Final Thoughts
Closing: Now go impress someone — or just yourself — with your homemade French Silk Pie; I promise it tastes like a warm kitchen hug and gets better the longer you stare at it waiting for slices.