
I promised myself I’d only make these for special occasions, but then I made them on a Tuesday and life changed — in the best, slightly-sugary way. I love how cake pops sneak a party into your palm: little orbs of cake hugged by frosting, dipped in glossy chocolate, dotted with rainbow sprinkles. They whisper “treat” before anyone even takes a bite. This recipe keeps things simple and forgiving, perfect for a beginner (or a busy grown-up who still wants confetti in their life). Expect buttery smells, a little sticky dough on your fingertips, and the satisfying *plop* when a pop hits a glass to set upright.
Quick Facts
- Yield: Serves 24 (about 24 cake pops)
- Prep Time: 40 minutes (active + chilling)
- Cook Time: 25 minutes (baking the cake)
- Total Time: ~65 minutes
Why This Recipe is Awesome
These cake pops taste like bite-sized hugs. The interior stays soft and moist while the chocolate shell snaps with a satisfying little crack. They look fancy but require zero special skills — if you can mix a cake and roll dough into balls, you’re basically a pastry wizard. Bonus: kids love helping, and they make birthdays, potlucks, and gloomy Tuesdays instantly happier. It’s so easy even your oven can’t mess it up.
Ingredients
For the Main Dish:
- 1 1/2 cups all-purpose flour
- 1 cup granulated sugar
- 1/2 cup (1 stick) unsalted butter, softened
- 2 large eggs, room temperature
- 1/2 cup whole milk
- 2 tsp baking powder
- 1 tsp vanilla extract
- Pinch of salt
- 3/4 cup store-bought frosting (vanilla or chocolate) or homemade buttercream
- 24 lollipop sticks or wooden skewers
- 12 oz chocolate candy melts or chocolate chips + 1 tbsp vegetable shortening or coconut oil
- Sprinkles, crushed nuts, or toasted coconut for decorating (optional)
For the Sauce / Garnish (if applicable):
- Optional drizzle: 2–3 tbsp white chocolate melted for contrast
How I Make It
Step 1:
Preheat the oven to 350°F. In a bowl, beat the softened butter and sugar until pale and slightly fluffy — you should hear the mixer hum and smell that warm butter sweetness. Add the eggs one at a time, then stir in the vanilla. Whisk together the flour, baking powder, and salt in another bowl, then add to the butter mix alternating with milk until a smooth batter forms.
Step 2:
Spoon the batter into an 8-inch or 9-inch round pan and bake for about 25 minutes, until a toothpick comes out with a few moist crumbs. The kitchen will smell like vanilla and warm cake — that’s your cue to get excited. Let the cake cool completely; cooling makes crumbling cleaner and easier. If you rush, the crumbs turn into a gloopy mess instead of friendly crumbs.
Step 3:
Crumble the cooled cake into a large bowl. Add 3/4 cup frosting a little at a time and mix with a fork or your hands until you reach a texture that holds together when pressed — think soft cookie dough. If it gets too wet, sprinkle in a few extra crumbs. Scoop tablespoon-sized portions and roll into neat 1-inch balls. Place them on a baking sheet lined with parchment and chill in the fridge for at least 30 minutes. Cold balls stick to sticks better and keep their shape.
Step 4:
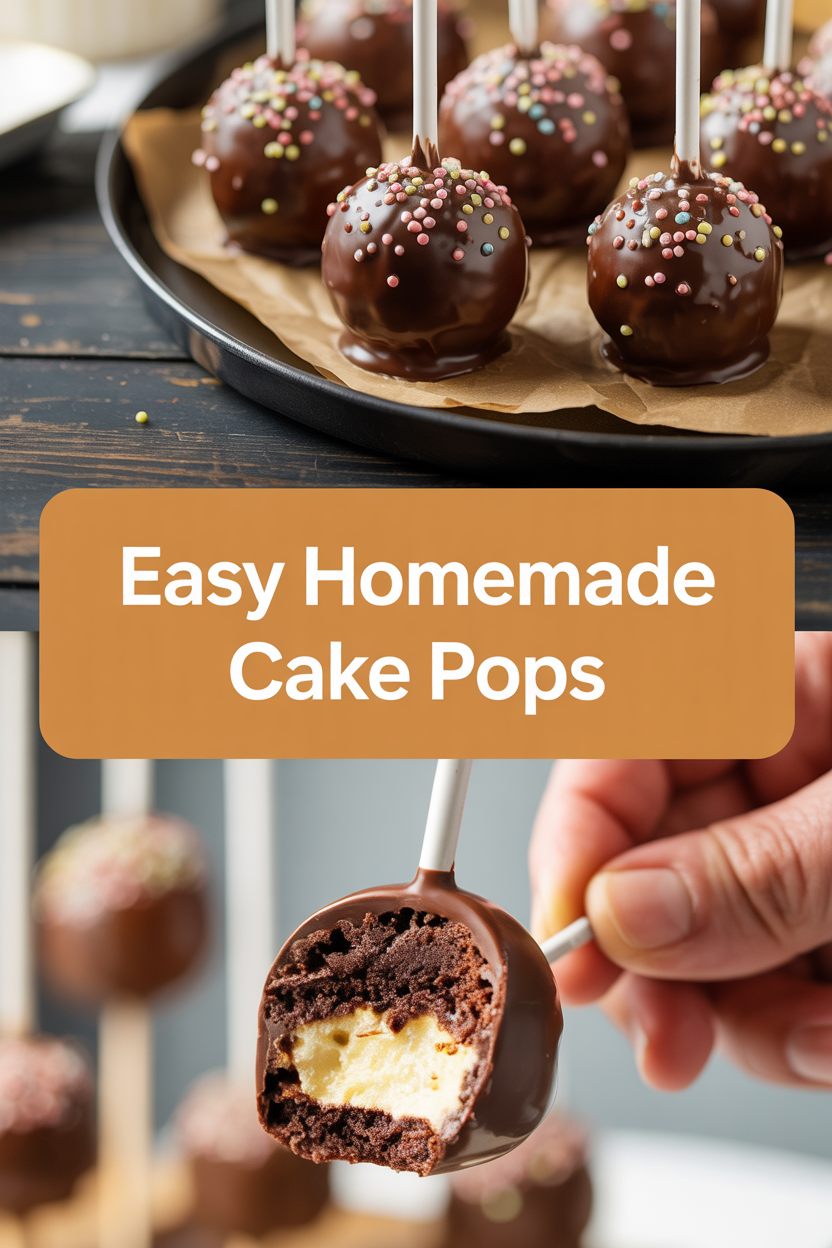
Melt the chocolate candy melts in a microwave-safe bowl in 30-second bursts, stirring between bursts until glossy and smooth. If you use chocolate chips, add 1 tbsp vegetable shortening or coconut oil to thin it to a dip-friendly consistency. Dip the tip of a lollipop stick about 1/2 inch into the melted chocolate, then insert into a chilled cake ball about halfway through (this glues the stick in place). Dip each cake ball into the chocolate, tap gently on the side of the bowl to remove excess, and stand them upright in a glass or foam block to set. When the chocolate still looks wet, add sprinkles or crushed toppings so they stick.
Step 5:
Let the pops set at room temperature or pop them in the fridge for 10–15 minutes for a firm shell. Once set, transfer to an airtight container lined with parchment. These look adorable in jars or on a platter — I love arranging them by color so they form a little rainbow on the table.
Pro Tips
- Chill the cake balls at least 30 minutes before dipping so they don’t fall off the stick when you dip.
- Use a glass with a handful of rice or a foam block to keep dipped pops upright while the chocolate sets.
- If your chocolate seizes or gets grainy, stir in a little vegetable oil or shortening, 1 tsp at a time, until smooth.
- Make these a day ahead and store them chilled in an airtight container; bring to room temperature 20 minutes before serving for best texture.
Common Mistakes to Avoid
- Skipping preheating: Classic rookie move. It changes texture and bake time.
- Overmixing: Leads to dense or chewy results. Mix until just combined.
- Guessing cook time: Always use visual cues or a timer, not just vibes.
- Overcrowding pans: Give your food some breathing room to crisp properly.
Alternatives & Substitutions
- Use a store-bought cake or a box cake mix if you’re short on time — texture stays great and flavors like chocolate or red velvet make terrific pops.
- Swap butter for coconut oil for a dairy-free version; expect a slight coconut note.
- Try gluten-free flour or a gluten-free cake mix to make these gluten-free — the texture stays soft but slightly crumblier.
- Replace frosting with cream cheese for a tangy pop, or use a thick peanut butter for nutty flavor (watch for allergies).
Variations & Tips
- Birthday-party pops: add bright colored candy melts and rainbow sprinkles.
- Flavor twist: fold in 1 tsp lemon zest or 1 tbsp instant espresso for grown-up flavor.
- Chocolate-on-chocolate: use chocolate cake + white chocolate coating for dramatic contrast.
- Adult version: mix a tablespoon of liqueur into the frosting for boozy pops (serve responsibly).
- Textural twist: roll some pops in crushed Oreos or toasted coconut instead of sprinkles.
- Healthy-ish: use a denser banana or pumpkin cake and swap frosting for Greek yogurt mixed with a touch of honey (store chilled).
FAQ (Frequently Asked Questions)
- Can I make this ahead of time?
- Yes! Make the cake and cake balls a day ahead, store chilled in an airtight container, and dip right before your event or the night before. Once dipped, store in the fridge up to 4 days.
- Can I double the recipe?
- Sure thing. Use two pans to bake at once and chill cake balls in batches. You might need a bigger workspace and a second bowl for melting chocolate in rotation.
- Can I substitute butter with oil?
- Technically yes, but you’ll miss that buttery magic. Use ¾ the amount of oil and expect a slightly different crumb and flavor.
- How do I know it’s done?
- Look for a cake that springs back slightly and shows golden edges. A toothpick should come out with a few moist crumbs — not wet batter. For the pops, the coating should set glossy and firm to the touch.
- What if I don’t have ingredient X?
- Out of frosting? Mix 4 tbsp softened butter with 1 cup powdered sugar and 1 tsp vanilla for quick buttercream. No candy melts? Use chocolate chips plus 1 tbsp oil or shortening.
How I Like to Serve It
I love these at a kid’s birthday with paper napkins and cold milk, but they shine at bridal showers too — arrange them in a pretty vase for an edible centerpiece. For a cozy movie night, serve a few with coffee or hot cocoa. In summer, chill them a bit longer for a refreshing, slightly firmer bite.
Notes
- Store cake pops in an airtight container in the fridge up to 4 days. Bring to room temp 15–20 minutes before serving for best flavor.
- If you use fillings with eggs (like some frostings), keep pops chilled and consume within a few days.
Final Thoughts
Closing: Now go impress someone — or just yourself — with your homemade masterpiece! These little pops bring big smiles and a tiny, edible celebration to any ordinary day.