
I promise I didn’t plan to turn my kitchen into a candy-coated science lab, but here we are — making Easter cake pops like a cheerful holiday ninja. I love how these tiny spheres feel mischievously tiny in your hand, then explode with cake-and-frosting comfort in one bite. They smell like sweet vanilla and buttercream, and when the candy shell snaps, you get that satisfying little sound that makes me grin every time. These are fun to assemble with kids, forgiving if things get a little messy, and ridiculously cute on an Easter platter. Ready for pastel colors, sprinkles, and a little kitchen chaos?
Quick Facts
- Yield: Serves 12–16 (makes ~18 cake pops)
- Prep Time: 35 minutes
- Cook Time: 20 minutes
- Total Time: 1 hour 25 minutes
Why This Recipe is Awesome
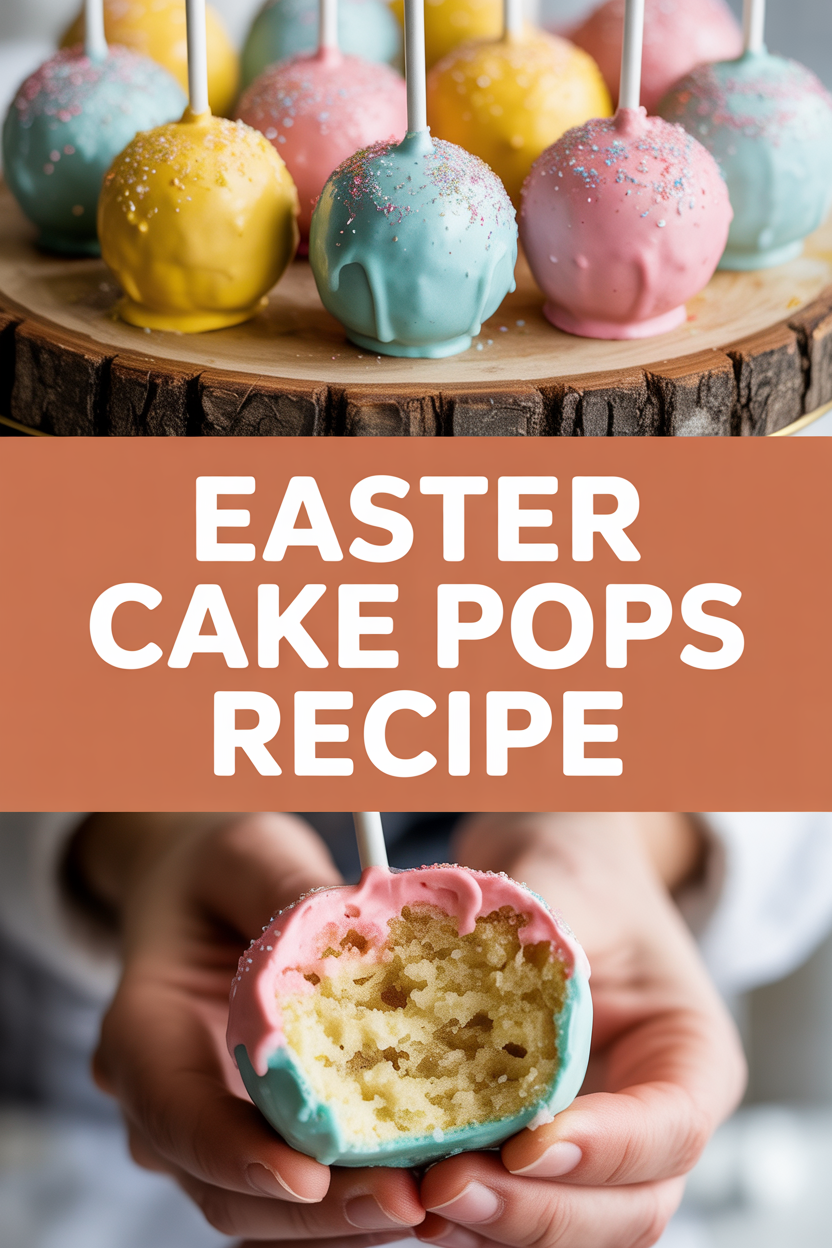
This recipe uses simple pantry staples and gives you irresistible, bite-sized treats that look like you spent hours fussing — when you really spent only a little time and a lot of joy. The interior stays tender and moist thanks to the frosting binder, while the candy coating adds a crisp snap. They come in adorable pastel colors and take well to sprinkles and little edible details. It’s so easy even your oven can’t mess it up — and cleanup? Minimal. Who doesn’t love a dessert that doubles as edible party decor?
Ingredients
For the Main Dish:
- 1 box (15.25 oz) yellow cake mix (or your favorite flavor)
- 3 large eggs
- 1/2 cup vegetable oil
- 1 cup water
- 1 cup store-bought vanilla frosting (or homemade buttercream)
- 12–18 oz candy melts or white chocolate wafers (for coating)
- 1–2 tbsp vegetable shortening (optional, helps thin candy melts)
- Pastel food coloring (gel works best)
- Sprinkles, nonpareils, or edible glitter for decorating
- 18 lollipop sticks or cake pop sticks
- Styrofoam block or a cardboard box for drying (optional)
For the Sauce / Garnish (if applicable):
- Assorted sprinkles and small chocolate candies for garnish
How I Make It
Step 1:
I preheat the oven to 350°F. In a mixing bowl, I whisk the yellow cake mix, eggs, oil, and water until smooth — the batter smells like warm vanilla and sunshine. I pour it into a greased 9×13 pan and bake for 18–22 minutes, until a toothpick comes out mostly clean. Tip: don’t overbake; you want a tender cake that crumbles easily.
Step 2:
I let the cake cool to room temperature, then crumble it into a large bowl with my hands. The texture should look like coarse crumbs with soft chunks. I add the 1 cup frosting and stir with a spoon until the mixture holds together when squeezed — think pliable cookie dough. If it feels too dry, I add a teaspoon of frosting at a time. Pro tip: use chilled cake for neater balls.
Step 3:
I scoop the mixture with a small cookie scoop (about 1½ tbsp) and roll into smooth balls between my palms. The surface should feel slightly tacky but not greasy. I place the balls on a parchment-lined baking sheet and chill them in the fridge for 30 minutes so they firm up — this prevents them from falling off the sticks later.
Step 4:
While the balls chill, I melt the candy melts in a microwave-safe bowl in 15–20 second bursts, stirring between bursts until glossy and smooth. If it looks too thick, I stir in 1 tsp vegetable shortening. I dip the tip of a stick into the melted candy, then push it about halfway into a chilled cake ball. That little glue trick really helps. I hold the pot like a painter’s palette and dip each pop, tapping gently to remove excess coating. The kitchen smells faintly of sweet chocolate and vanilla as the shells set.
Step 5:
I add sprinkles or drizzles while the coating stays wet, then stick the finished pops upright into a Styrofoam block to dry. They take about 10–15 minutes to set at room temperature, longer if your house runs cool. Once set, I store them in an airtight container in the fridge for up to 3 days (they taste best within 48).
Pro Tips
- Warm the candy melts gently and stir often — overheating makes them grainy.
- If cake balls crack when you insert the stick, chill them a bit longer. Cold centers stay put.
- Use gel food coloring for vibrant pastels without changing the candy consistency.
- Stash extras in the freezer on a tray, then transfer to a bag for up to 1 month; thaw 10 minutes before serving.
Common Mistakes to Avoid
- Skipping preheating: Classic rookie move. It changes texture and bake time.
- Overmixing: Leads to dense or chewy results. Mix until just combined.
- Guessing cook time: Always use visual cues or a timer, not just vibes.
- Overcrowding pans: Give your food some breathing room to crisp properly.
Alternatives & Substitutions
- Use a boxed chocolate cake mix for a richer flavor; it slightly changes the color but keeps the method identical.
- Swap store-bought frosting for 1 cup homemade cream cheese frosting for a tangy filling (adds richness).
- For dairy-free: use dairy-free frosting and vegan candy melts; check labels for hidden milk solids.
- For gluten-free: use a gluten-free cake mix — texture changes little if you follow the mix directions.
Variations & Tips
- Kid-Friendly: Let little hands dip and sprinkle — line a tray for a controlled candy-flinging zone.
- Adult Twist: Mix 1–2 tbsp of espresso powder into the frosting for mocha cake pops.
- Nutty: Roll pops in finely chopped toasted almonds or pistachios for crunch.
- Seasonal: Use pastel candy melts and edible flowers for an elegant Easter centerpiece.
- Creative Twist: Make a “surprise center” by pressing a small chocolate candy or jellybean into the center before chilling.
- Healthy-ish: Use a light yogurt frosting and darker chocolate coating for less sweetness.
FAQ (Frequently Asked Questions)
- Can I make this ahead of time?
- Yes! You can bake the cake and crumble it up a day ahead, store in an airtight container, and mix with frosting when ready. Fully assembled pops keep in the fridge for up to 3 days or freeze for up to 1 month on a tray, then transfer to a bag once solid.
- Can I double the recipe?
- Sure thing. Use two baking pans or two batches in the oven and double your chilling space; you’ll need more bowls and a larger drying area so the pops don’t touch.
- Can I substitute butter with oil?
- Technically yes, but you’ll miss that buttery magic. Use ¾ the amount of oil if swapping in other recipes; for cake mix follow the box guidance.
- How do I know it’s done?
- Look for a golden edge on the cake and a toothpick that comes out with a few moist crumbs (not raw batter). For pops, coating should set glossy and firm but not cold — a gentle snap tells you they’re ready.
- What if I don’t have ingredient X?
- No biggie. If you lack candy melts, use good-quality chocolate chips plus a teaspoon of shortening to smooth. If you lack store frosting, mix 1/2 cup softened butter with 1 1/2 cups powdered sugar and 1 tsp vanilla as a quick fix.
How I Like to Serve It
I arrange these on a pastel platter with fresh spring flowers for an Easter brunch centerpiece. They pair perfectly with a mug of strong coffee or a lightly sweetened iced tea. I also tuck a few into cellophane bags as party favors — they make great take-home treats after an egg hunt. Warm weather? Keep them chilled and serve right from the fridge for a refreshing bite.
Notes
- Store finished pops in an airtight container in the fridge for up to 3 days; let sit 10 minutes before eating for best texture.
- If planning to transport, freeze them solid first and pack in a cooler to prevent sweating.
Final Thoughts
Closing: Now go impress someone — or just yourself — with these cheerful Easter cake pops. They make every morning feel like a celebration!