
Here’s a little chef’s secret I whisper to dinner guests who ask how I make dessert look fancy with zero drama: you can build a spectacular chocolate cake out of Oreos. I stumbled onto this shortcut during a frantic birthday morning when the store-bought cake fell apart and the pantry offered only a sleeve of cookies and a shrug. The result felt like culinary sleight-of-hand — crunchy cookie bits, fudgy crumb, and a smell that makes the whole house stop whatever it’s doing. Today I’ll show you the simplest, most reliable way I turn a pack of **Oreos** into a moist, chocolatey cake that people actually fight over. Bonus: no complicated tempering, no weird equipment — just good chocolate vibes.
Quick Facts
- Yield: Serves 8
- Prep Time: 15 minutes
- Cook Time: 30–35 minutes
- Total Time: 50 minutes
Why This Recipe is Awesome
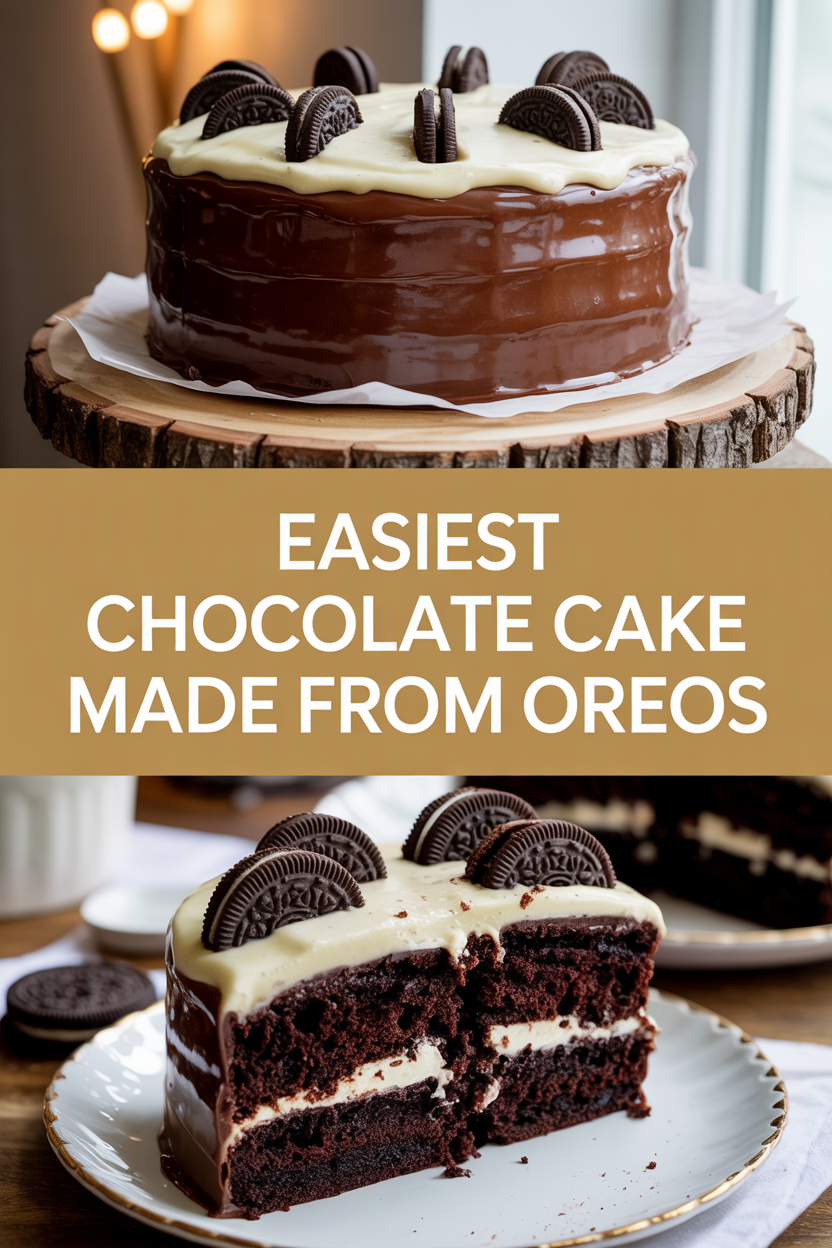
This cake uses crushed **Oreos** as a shortcut to deep chocolate flavor and crunchy texture — no fancy cocoa powders or multiple bowls required. It browns with slightly crispy edges, stays tender in the middle, and smells like chocolate heaven while it bakes. It’s so easy even your oven can’t mess it up, and it looks impressive with a simple frosting or a dusting of cookie crumbs. Texturally, you get little pockets of cream and cookie crunch against a soft, cakey backdrop — pure comfort with a playful twist.
Ingredients
For the Main Dish:
- 2 cups crushed **Oreos** (about 18–22 cookies, including filling)
- 1 cup all-purpose flour
- 1 cup granulated sugar
- 1/2 cup unsweetened cocoa powder
- 1 tsp baking powder
- 1/2 tsp baking soda
- 1/2 tsp fine salt
- 2 large eggs, room temperature
- 1 cup buttermilk (or 1 cup milk + 1 tbsp lemon juice, let sit 5 minutes)
- 1/2 cup unsalted butter, melted (or 3/8 cup neutral oil — see substitutions)
- 1 tsp vanilla extract
- 4 oz semi-sweet chocolate chips (optional for extra fudginess)
For the Sauce / Garnish (optional):
- Simple cream cheese frosting: 8 oz cream cheese, 1/4 cup butter, 1 1/2–2 cups powdered sugar, 1 tsp vanilla — fold in 1 cup crushed Oreos.
- Or serve with whipped cream and extra cookie crumbs.
How I Make It
Step 1:
I preheat the oven to 350°F and grease a 9-inch round pan (or line it with parchment). I pulse whole cookies in a food processor to get 2 cups of fairly fine crumbs — some bigger chunks give nice texture, so don’t go ultra-powdery unless you like uniform crumb. The kitchen fills with that unmistakable chocolate-vanilla cookie scent the moment the crumbs come together.
Step 2:
In a large bowl I whisk together the flour, sugar, cocoa, baking powder, baking soda, and salt. Then I stir in the crushed Oreos so the crumbs coat with dry mix and won’t sink to the bottom. This little trick keeps the texture even and prevents clumping.
Step 3:
In a separate bowl I beat the eggs lightly, then add the buttermilk, melted butter, and vanilla. I pour the wet mix into the dry and stir until everything comes together — don’t overmix. If I want extra fudginess, I fold in the chocolate chips here; they melt into gooey pockets while baking. At this point the batter smells rich and glossy, with the cookie aroma turning deep and toasty.
Step 4:
I scrape the batter into the pan and smooth the top. I bake for 30–35 minutes, rotating the pan halfway if my oven runs hot. Watch for a slightly springy center and a few moist crumbs clinging to a toothpick — you want it tender, not dry. Crusty edges and a firm but yielding center tell me it’s ready.
Step 5:
I let the cake cool 15 minutes in the pan, then turn it out onto a rack to cool completely before frosting. If I frost while warm, the frosting slides off like a chocolate lava pool — tempting, but messy. I finish with a rustic smear of cream cheese frosting and a shower of crushed Oreos for crunch. Slice and listen for that satisfying fork scrape against crumb — music.
Pro Tips
- Use room-temperature eggs and buttermilk so the batter emulsifies easily and bakes evenly.
- Pulse the Oreos to mostly fine crumbs but leave some chunks for pleasing texture.
- If you don’t have buttermilk, mix 1 cup milk with 1 tbsp lemon juice and rest 5 minutes — it brightens the crumb.
- Swap melted butter for oil at ¾ the amount (see FAQ) to keep the cake moist if you prefer.
Common Mistakes to Avoid
- Skipping preheating: Classic rookie move. It changes texture and bake time.
- Overmixing: Leads to dense or chewy results. Mix until just combined.
- Guessing cook time: Always use visual cues or a timer, not just vibes.
- Overcrowding pans: Give your food some breathing room to crisp properly.
Alternatives & Substitutions
- Use crushed gluten-free chocolate sandwich cookies and a gluten-free 1-to-1 flour to make this gluten-free; texture gets slightly crumblier.
- Replace butter with neutral oil at ¾ the amount (see FAQ); the cake becomes a touch denser but stays moist.
- For dairy-free, use almond or oat milk + 1 tbsp lemon juice for buttermilk and a dairy-free butter or coconut oil.
- If you want a stronger chocolate backbone, add 2 tbsp instant espresso powder to the wet mix — it brightens chocolate without tasting like coffee.
Variations & Tips
- Add chopped nuts (walnuts or pecans) for an unexpected crunch.
- Stir in chopped peanut butter cups for a peanut-butter-chocolate mashup.
- Make cupcakes: bake 20–22 minutes at 350°F and watch closely for doming.
- Make a trifle: cube the cooled cake, layer with pudding and whipped cream, and scatter cookie crumbs on top.
- Toss in a handful of white chocolate chips for contrast and visual pop.
- Use mint Oreos for a refreshing, adult twist — pair with a simple chocolate glaze.
FAQ (Frequently Asked Questions)
- Can I make this ahead of time?
- Yes! Bake the cake, cool completely, and store it covered in the fridge for up to 3 days. Freeze layers wrapped tightly for up to 2 months; thaw in the fridge overnight and bring to room temperature before serving. Reheat single slices briefly in the microwave for 10–15 seconds if you like a warm bite.
- Can I double the recipe?
- Sure thing. Use two 9-inch pans or a 9×13 pan and increase bake time slightly (for a 9×13 expect 35–40 minutes). Check doneness with a toothpick and visual cues.
- Can I substitute butter with oil?
- Technically yes, but you’ll miss that buttery magic. Use ¾ the amount of oil in place of butter (so for 1/2 cup butter use 3/8 cup oil).
- How do I know it’s done?
- Look for slightly crisp edges and a center that springs back gently when you press. A toothpick inserted in the middle should come out with moist crumbs, not wet batter.
- What if I don’t have ingredient X?
- Out of Oreos? Use any chocolate sandwich cookie or even graham crackers + cocoa for a different profile. No buttermilk? Use milk + lemon juice as noted above.
How I Like to Serve It
I serve this cake with a big scoop of vanilla ice cream and a cup of strong coffee for casual weekends. For potlucks, I slice it into thin wedges and arrange on a platter with extra cookie crumbs — it disappears fast. In summer, a dollop of whipped cream and fresh berries lightens the richness. This cake fits cozy nights, birthday improv saves, and anytime you need a quick, crowd-pleasing dessert.
Notes
- Store leftover cake covered in the fridge for up to 3 days; bring to room temperature before serving for best texture.
- If you ever cook meat, remember safe internal temps — e.g., 165°F for poultry.
Final Thoughts
Closing: Now go impress someone — or just yourself — with your homemade Oreo chocolate cake masterpiece!