
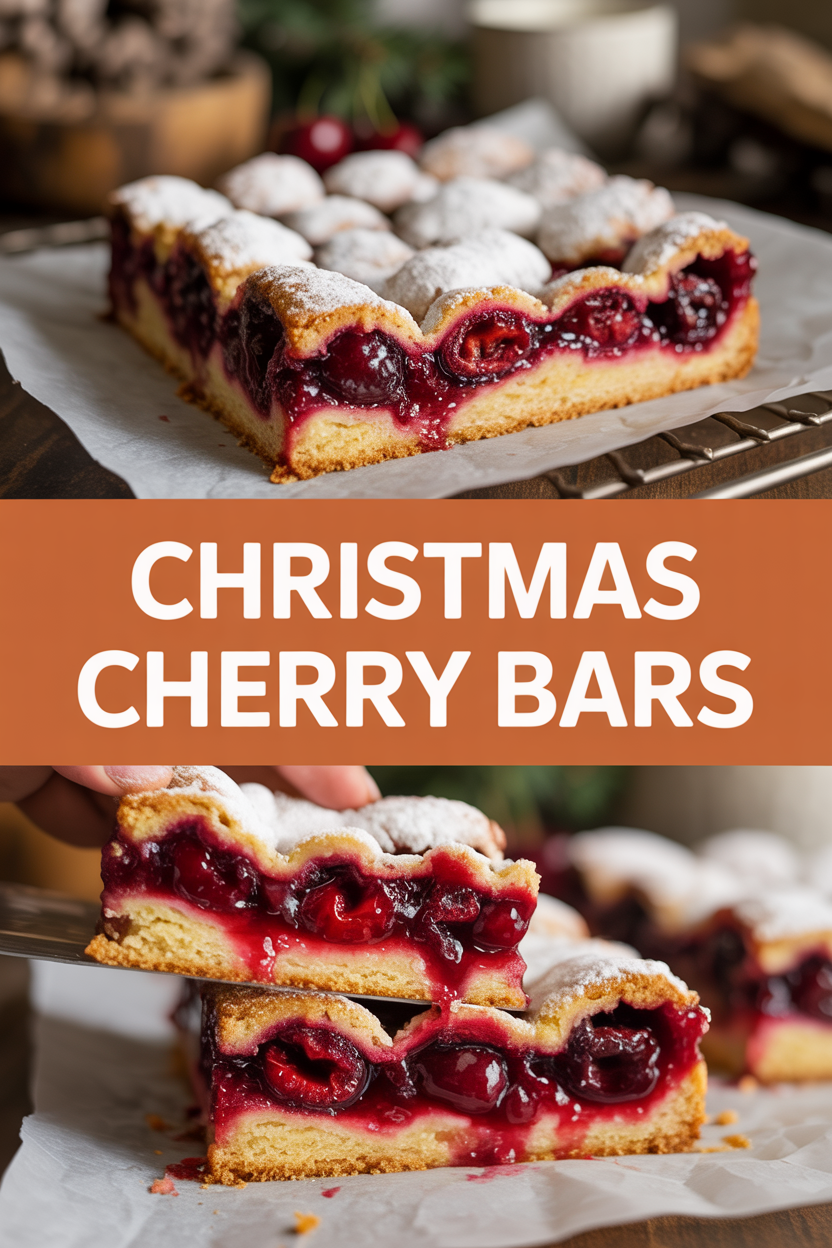
When I smell warm cherries and butter I get transported straight back to my grandma’s tiny kitchen, where she’d hum and pull a tray of sticky-sweet bars from the oven like a magician. She always let me lick the wooden spoon — the cherry syrup dripped down my wrist and I was convinced I’d found the meaning of life. These Christmas Cherry Bars borrow that exact kind of comfort: a buttery, golden crust, a glossy tart cherry layer, and a crumbly streusel that sings when you bite into it. They feel festive without fuss, and they fill the house with that cinnamon-laced, baking-sugar kind of scent that makes everyone wander into the kitchen. Trust me, making these becomes a new tiny tradition in no time.
Quick Facts
- Yield: Serves 16
- Prep Time: 20 minutes
- Cook Time: 35 minutes
- Total Time: 55 minutes
Why This Recipe is Awesome
These bars hit the sweet spot: crisp, buttery edges, a tart and jammy cherry center, and a crumbly top that crunches just right. They look fancy on a holiday dessert tray but require no pastry skills — it’s practically foolproof. They smell like Christmas and taste like something you’d happily serve to guests or hoard on the couch. It’s so easy even your oven can’t mess it up (well, unless it’s on the fritz).
Ingredients
For the Main Dish:
- 2 1/2 cups all-purpose flour
- 1 cup granulated sugar
- 1/2 cup light brown sugar, packed
- 1 tsp baking powder
- 1/2 tsp fine sea salt
- 1 1/4 cups (10 oz) unsalted butter, cold and cut into cubes
- 1 large egg
- 1 tsp vanilla extract
- 1/2 tsp almond extract (optional — it pairs beautifully with cherries)
- 1 (21 oz) can cherry pie filling OR 3 cups frozen tart cherries thawed
- 2 tbsp cornstarch (only if using frozen cherries)
- 2 tbsp granulated sugar (only if using frozen cherries)
For the Sauce / Garnish (if applicable):
- 1 cup powdered sugar
- 2–3 tsp milk (or cream)
- 1/4 tsp vanilla extract
- Zest of 1 orange (optional, for bright flavor)
- Chopped toasted pecans or white chocolate shavings (optional garnish)
How I Make It
Step 1:
Preheat the oven to 350°F and line a 9×13-inch pan with foil or parchment, leaving an overhang for easy removal. I love the smell of butter hitting warm air — it’s like an invite to the whole house. In a large bowl whisk together 2 1/2 cups flour, both sugars, 1 tsp baking powder, and 1/2 tsp salt.
Step 2:
Cut the cold unsalted butter into the dry mix using a pastry cutter, two forks, or your fingertips until the mixture looks like coarse crumbs with pea-sized bits. Toss in the egg, 1 tsp vanilla, and 1/2 tsp almond extract and stir until it begins to hold together. Reserve about two-thirds of the crumb mixture for the base and press it firmly into the bottom of the pan — a flat bottom gives you those satisfying, crisp edges.
Step 3:
If you use canned pie filling, spoon the whole jar evenly over the warm base. If you use frozen cherries, combine the thawed cherries with 2 tbsp cornstarch and 2 tbsp sugar in a skillet, cook over medium heat until glossy and thick (about 4–6 minutes), then spread over the crust. The kitchen will scent like bright cherries and warm sugar — irresistible.
Step 4:
Crumble the reserved topping over the cherries so you have clumps and finer crumbs — that texture contrast is the best part. Bake at 350°F for 18–22 minutes, until the top turns golden and you see the filling bubble at the edges. Watch for golden edges; that’s your cue.
Step 5:
Cool the bars in the pan for at least 30 minutes (this lets the filling set so they cut cleanly). Whisk the powdered sugar, milk, and vanilla into a quick glaze and drizzle over cooled bars, then finish with orange zest or chopped pecans if you like. Lift from the pan using the foil overhang, slice into bars, and listen for that crumbly tug when you pull a piece free.
Pro Tips
- Keep the butter cold until you cut it in — that yields flaky, crumbly bits instead of a dense slab.
- If your bars brown too quickly, tent them with foil halfway through baking to avoid burning while the filling finishes bubbling.
- Press the bottom crust firmly and evenly — an uneven base leads to uneven bars.
- Use tart cherries or add a splash of lemon juice to canned filling for a fresher pop.
Common Mistakes to Avoid
- Skipping preheating: Classic rookie move. It changes texture and bake time.
- Overmixing: Leads to dense or chewy results. Mix until just combined.
- Guessing cook time: Always use visual cues or a timer, not just vibes.
- Overcrowding pans: Give your food some breathing room to crisp properly.
Alternatives & Substitutions
- Use a gluten-free 1:1 flour blend for a gluten-free version — expect slightly crumblier texture.
- Swap butter for coconut oil (1:1) to make it dairy-free; the flavor shifts but it still bakes well.
- Replace canned filling with fresh cranberries cooked with sugar for a tart, festive twist.
- Use almond flour (replace up to half the flour) for a nuttier flavor and denser crumb.
Variations & Tips
- Add 1 tsp cinnamon and 1/4 tsp nutmeg to the dry mix for warm holiday spice.
- Stir 1/2 cup chopped dark chocolate into the topping for a chocolate-cherry duet.
- Mix in 1/2 cup chopped toasted pecans to the crumble for extra crunch.
- Make mini bars in a muffin tin for grab-and-go treats — reduce bake time to 12–15 minutes.
- For an adult twist, macerate cherries in 1–2 tbsp bourbon for 20 minutes before spreading (skip if serving kids).
- Try a white chocolate drizzle instead of powdered-glaze for sweeter, festive bars.
FAQ (Frequently Asked Questions)
- Can I make this ahead of time?
- Yes! Bake the bars and store in an airtight container at room temperature for up to 2 days or refrigerate up to 5 days. Warm slightly in a low oven or microwave before serving for that just-baked feel.
- Can I double the recipe?
- Sure thing. Use two pans or a larger sheet pan; watch the bake time since thickness changes — thinner bars need less time, thicker need more.
- Can I substitute butter with oil?
- Technically yes, but you’ll miss that buttery magic. Use ¾ the amount of oil.
- How do I know it’s done?
- Look for a golden top, bubbling filling at the edges, and a firm but slightly springy center. If the top browns too fast, tent with foil and keep baking until the fill bubbles.
- What if I don’t have ingredient X?
- No drama. No almond extract? Use vanilla. No cornstarch? Toss a tablespoon of flour into the frozen cherries instead. No powdered sugar for glaze? Dust with a little granulated sugar before serving.
How I Like to Serve It
I serve these warm with a scoop of vanilla ice cream or a dollop of whipped cream for holiday dessert. They also travel well to potlucks and pair beautifully with mulled wine or a hot cup of coffee on a snowy morning. For a cozy cookie-plate swap, cut them smaller — they make great stocking treats.
Notes
- Store leftover bars in an airtight container at room temperature for 2 days or refrigerated for up to 5 days. Reheat briefly to revive the crumble texture.
- This is a dessert — no meat temps to worry about, so just enjoy the sweet aromas.
Final Thoughts
Closing: These Cherry Bars make holiday baking simple, nostalgic, and delicious — now go impress someone, or just yourself, with your homemade masterpiece!