
The kitchen smelled like warm peanut butter and melted chocolate the minute I pulled out the pan — the kind of smell that drags you in from the rain and makes you sit at the counter with sticky fingers. When my family made these squares, we called them “rainy-day glue” because the marshmallow makes everything hold together with a cheerful, chewy hug. I still make them when I crave something nostalgic and easy: gooey marshmallow, nutty peanut butter, crispy cereal, and a glossy chocolate cap that snaps just right. These bars come together fast, don’t need an oven, and they vanish even faster — consider this your new go-to for potlucks, school treats, or a comforting midnight snack.
Quick Facts
- Yield: Serves 12
- Prep Time: 15 minutes
- Cook Time: 5 minutes (melting/stirring)
- Total Time: 45 minutes (including 30 minutes chilling)
Why This Recipe is Awesome
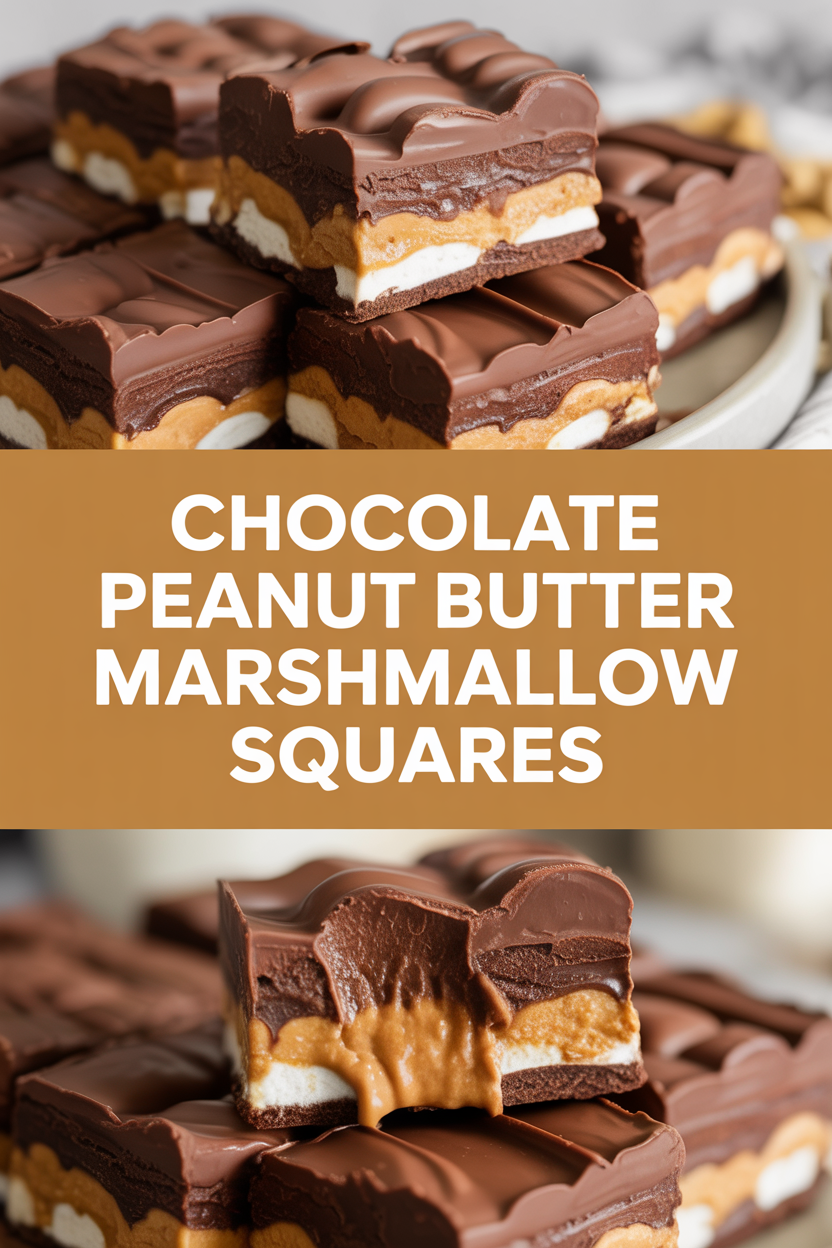
It’s the perfect mix of textures: pillowy **marshmallow**, creamy **peanut butter**, crunchy **Rice Krispies**, and a silky **chocolate** top. It’s no-bake, quick, and forgiving — honestly, it’s so easy even your oven can’t mess it up. The aroma of peanut butter and toasted cereal fills the room while you work, and the first bite gives you that crack of chocolate followed by a chewy, nostalgic center. What’s not to love?
Ingredients
For the Main Dish:
- 4 tbsp unsalted butter
- 10 oz mini marshmallows (about 4 cups)
- 1 cup creamy peanut butter (not natural — the smooth stuff helps bind)
- 6 cups Rice Krispies cereal
- 1 tsp vanilla extract
- Pinch of fine sea salt
- Nonstick spray or a little extra butter for the pan
For the Chocolate Top:
- 12 oz semi-sweet chocolate chips (or chopped chocolate)
- 2 tbsp peanut butter (for shine and stretch)
- Flaky sea salt, optional, for sprinkling
How I Make It
Step 1:
Line a 9×13-inch pan with parchment and spray or butter it lightly. In a large, heavy-bottomed pot over low heat, melt 4 tbsp butter until it foams. Add the mini marshmallows and stir continuously with a silicone spatula. You’ll hear a quiet little sizzle and watch the marshmallows collapse into a glossy mass — that’s your cue that the magic is happening.
Step 2:
Turn off the heat, then stir in 1 cup peanut butter and 1 tsp vanilla until smooth and shiny. If the peanut butter seems stiff, give it 10–15 seconds in the microwave to loosen before adding; this helps it emulsify with the marshmallows. Add a pinch of salt to brighten the flavor.
Step 3:
Pour the 6 cups Rice Krispies into the pot and stir quickly but gently until every flake gets coated in the marshmallow-peanut butter mixture. You want full coverage but don’t overmix — work fast before the marshmallow firms up. The mixture will smell like toasted cereal and warm peanuts.
Step 4:
Using a buttered spatula or lightly buttered hands, press the mixture evenly into the prepared pan. Press firmly enough so the bars hold together, but not so hard that they turn dense — I press in long, smoothing strokes until the surface evens out and you see a slight shine.
Step 5:
Make the chocolate cap by microwaving the 12 oz chocolate chips with 2 tbsp peanut butter in a microwave-safe bowl in 20–30 second bursts, stirring between each burst until glossy. Or use a double boiler. Pour the chocolate over the bars and smooth with an offset spatula. Sprinkle flaky sea salt if you like contrasts. Chill the pan in the fridge for 30 minutes until the chocolate sets, then cut into squares.
Pro Tips
- Use fresh marshmallows — old, stale marshmallows won’t melt smoothly and can make the texture grainy.
- Press the mixture with a piece of parchment on top to avoid sticky hands and get a smooth finish.
- If your chocolate seizes (looks grainy), stir in 1 tsp neutral oil or a dab more peanut butter to bring it back to glossy life.
- For clean cuts, run a sharp knife under hot water, dry it, then slice. Heat helps the chocolate snap cleanly.
Common Mistakes to Avoid
- Skipping preheating: Classic rookie move. It changes texture and bake time.
- Overmixing: Leads to dense or chewy results. Mix until just combined.
- Guessing cook time: Always use visual cues or a timer, not just vibes.
- Overcrowding pans: Give your food some breathing room to crisp properly.
Alternatives & Substitutions
- Swap Rice Krispies for gluten-free crisp rice cereal to make these gluten-free.
- Use almond or cashew butter for a nutty twist — expect a slightly milder flavor and thinner texture.
- Make them dairy-free by using vegan butter and dairy-free dark chocolate; the texture stays chewy and dreamy.
- If you want nut-free bars, use sunflower seed butter and swap out the chocolate for allergy-friendly baking chips.
Variations & Tips
- Add 1 cup chopped roasted peanuts to the cereal for extra crunch and salty contrast.
- Stir in 1/2 cup mini chocolate chips into the cereal mix for chocolate all the way through.
- Drizzle white chocolate over the set top for a pretty marbled effect and extra sweetness.
- Mix in 1/2 cup crushed pretzels for a salty-sweet bar that packs great texture.
- Make mini cups by pressing the mixture into muffin tins and topping with chocolate — portable and adorable.
FAQ (Frequently Asked Questions)
- Can I make this ahead of time?
- Yes! Make the bars up to 2 days ahead and keep them in an airtight container at room temperature. For longer storage, refrigerate up to 7 days. Bring to room temperature before serving for the best chew.
- Can I double the recipe?
- Sure thing. Use two 9×13 pans or one larger pan and increase chilling time slightly. Don’t double the pot size — melt in batches if your pot gets crowded.
- Can I substitute butter with oil?
- Technically yes, but you’ll miss that buttery magic. Use ¾ the amount of neutral oil (like avocado or light olive oil) if you must, and expect a slightly different mouthfeel.
- How do I know it’s done?
- You’ll know the bars are ready when the chocolate top snaps cleanly and the marshmallow base holds together when you lift a corner. The surface should look glossy and firm after chilling.
- What if I don’t have ingredient X?
- If you don’t have mini marshmallows, use about 10 oz of marshmallow fluff (heat gently) or regular marshmallows chopped. No peanut butter? Try sunbutter or almond butter for a similar texture.
How I Like to Serve It
I love these squares with an ice-cold glass of milk or a steaming mug of coffee. They work as a weekend treat for picky kids, a potluck crowd-pleaser, or a sleepy midnight snack. Slice them small for bake sales or stack them tall on a dessert plate next to vanilla ice cream for an indulgent finish. They feel homey in winter and picnic-friendly in summer.
Notes
- Store in an airtight container at room temperature for up to 3 days, or refrigerate for up to 7 days. Warm a slice in the microwave for 7–10 seconds if you want melty chocolate and gooey center.
- Not applicable here, but if you ever add meat to a dish, follow safe temps like 165°F for poultry.
Final Thoughts
Closing: Now go impress someone — or just yourself — with your homemade, chocolatey, peanut-buttery masterpiece. These squares always bring a little comfort, a little crunch, and a whole lot of smiles.