
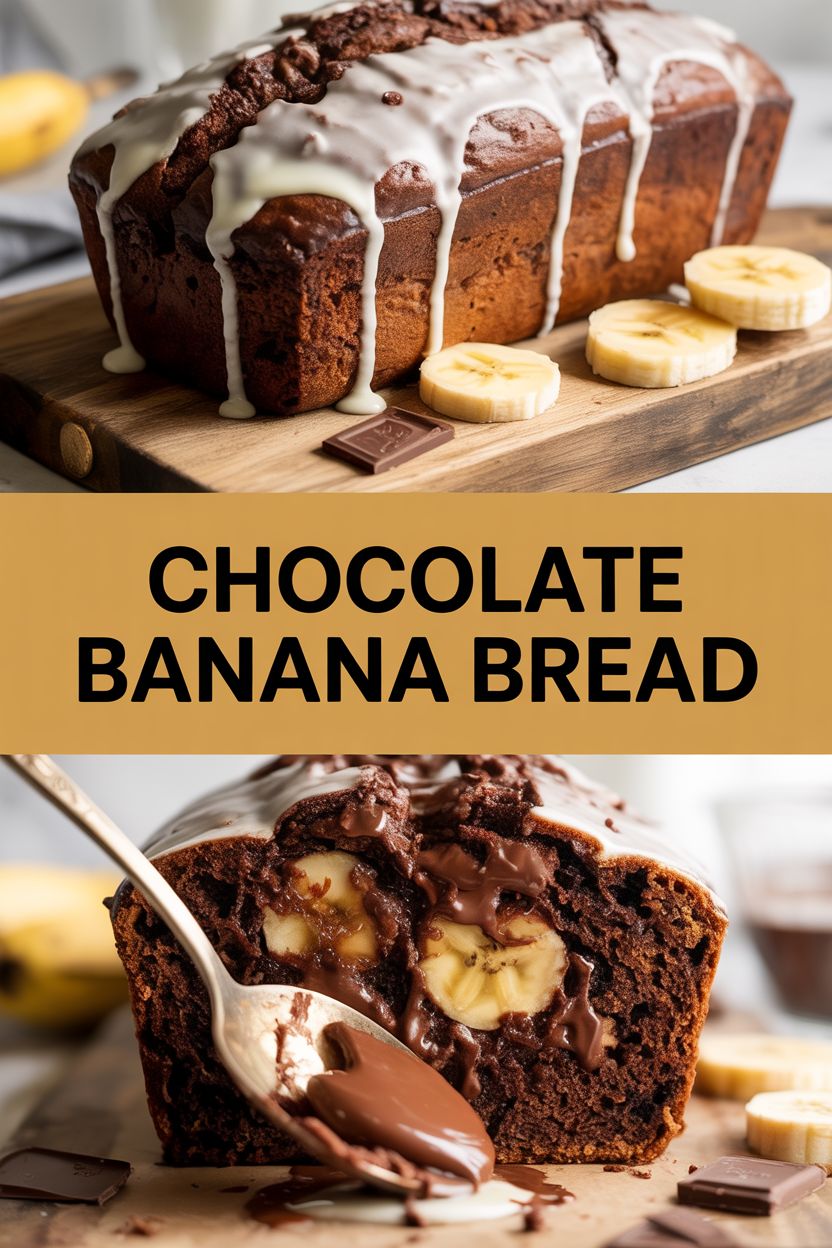
There’s nothing more comforting than the smell of banana bread baking when the afternoon light slants through the kitchen — it takes me straight back to rainy Saturdays and my mom’s tiny oven ticking like a metronome. I love how the chocolate deepens the sweetness of overripe bananas and gives the loaf that slightly fudgy crumb that begs for a thick slice. This recipe fixes the common banana-bread problem of being either dry or brick-like; instead, you get a tender, chocolatey loaf with crisp, caramelized edges and melty chips in every bite. Seriously, the house will smell like a bakery, and you’ll find yourself slicing off “just one more” before it cools.
Quick Facts
- Yield: Serves 8 (1 standard loaf)
- Prep Time: 15 minutes
- Cook Time: 60 minutes (approx.)
- Total Time: 75 minutes
Why This Recipe is Awesome
This Chocolate Banana Bread hits the sweet spot between cake and quick bread — tender, moist interior with slightly crisp, chocolate-speckled edges. It tastes cozy and grown-up at the same time: banana sweetness, a deep cocoa backbone, and pockets of gooey chocolate. It’s forgiving, uses pantry staples, and comes together with minimal effort. Who doesn’t love a loaf that practically bakes itself while you clean up the counter and drink coffee?
Ingredients
For the Main Dish:
- 1 3/4 cups all-purpose flour
- 1/3 cup unsweetened cocoa powder
- 1 tsp baking soda
- 1/2 tsp baking powder
- 1/2 tsp fine salt
- 3/4 cup packed light brown sugar
- 2 large eggs, room temperature
- 3 very ripe bananas (about 1 1/4 cups mashed)
- 1/2 cup (1 stick) melted unsalted butter, slightly cooled
- 1/4 cup plain yogurt or sour cream
- 1 tsp vanilla extract
- 1 tsp instant coffee or espresso powder (optional — boosts chocolate)
- 3/4 cup semisweet chocolate chips, plus extra for topping
- 1/2 cup chopped walnuts or pecans (optional)
For the Sauce / Garnish (if applicable):
- Optional dusting of powdered sugar, a drizzle of melted chocolate, or a smear of butter when warm.
How I Make It
Step 1:
Preheat your oven to 350°F. Grease and line a 9×5-inch loaf pan with parchment, leaving an overhang for easy lifting. In a large bowl, whisk together the flour, cocoa powder, baking soda, baking powder, and salt. I like to sift the cocoa and flour quickly so there are no lumps — the batter looks beautifully chocolatey and smooth when you’re done.
Step 2:
In another bowl, mash the bananas until mostly smooth with a few small lumps for texture. Whisk in the brown sugar, eggs, melted butter, yogurt, vanilla, and espresso powder if using. You’ll smell that warm banana-and-butter aroma — pure comfort. Pour this wet mixture into the dry ingredients and fold gently with a spatula until just combined. Don’t overmix; a few streaks of flour are fine.
Step 3:
Fold in the chocolate chips and optional nuts. The batter should be thick but scoopable — like glossy, dark cookie dough. Scrape it into your prepared pan and sprinkle a few extra chocolate chips on top. That glossy top will brown and the chips will melt into little pools as it bakes.
Step 4:
Bake at 350°F for about 55–65 minutes, or until the edges look set, the top has a gentle crack, and a toothpick inserted near the center comes out with a few moist crumbs (not wet batter). You’ll hear the oven hum and smell the chocolate deepen as it bakes. If the top browns too quickly, tent with foil after 40 minutes.
Step 5:
Let the loaf cool in the pan for 10–15 minutes, then lift it out using the parchment and cool on a rack. The center will set as it cools, so resist the urge to slice hot unless you want molten chocolate on your cutting board (though that’s a delicious hazard). Serve sliced with butter, a smear of peanut butter, or a scoop of vanilla ice cream for dessert.
Pro Tips
- Use very ripe bananas (black-speckled). They mash easily and taste sweeter, which reduces added sugar needs.
- Don’t overmix after adding flour. Fold until the batter looks uniform — a few streaks are okay.
- If you only have oil, swap ¾ of the butter amount with vegetable oil for moistness; the flavor will shift slightly.
- Check at 55 minutes and again every 5–7 minutes after that. Ovens vary — trust the visual cues (golden edges, cracked top).
Common Mistakes to Avoid
- Skipping preheating: Classic rookie move. It changes texture and bake time.
- Overmixing: Leads to dense or chewy results. Mix until just combined.
- Guessing cook time: Always use visual cues or a timer, not just vibes.
- Overcrowding pans: Give your food some breathing room to crisp properly.
Alternatives & Substitutions
- Swap the butter for coconut oil or neutral vegetable oil (use ¾ the butter amount if swapping to oil). The loaf stays moist, but butter adds richer flavor.
- For dairy-free, use coconut yogurt or a dairy-free yogurt and replace butter with coconut oil.
- For gluten-free, use a 1:1 gluten-free flour blend that contains xanthan gum. Texture will be slightly different — a touch denser.
- Use mashed sweet potato or pumpkin (equal volume) for a fall twist — the cocoa still shines through.
Variations & Tips
- Add 1/2 cup peanut butter chips for a peanut-butter-and-chocolate vibe — kid-approved.
- Stir in 1/2 cup shredded coconut and swap nuts for a tropical twist.
- Make mini loaves or muffins: bake at 350°F for 18–22 minutes for muffins, 30–40 minutes for mini loaves.
- For extra fudginess, fold in 2 oz chopped dark chocolate into the batter just before pouring into the pan.
- Create a swirl: drop tablespoons of Nutella across the batter and swirl lightly with a knife for pockets of hazelnut goodness.
FAQ (Frequently Asked Questions)
- Can I make this ahead of time?
- Yes! Bake the loaf, let it cool completely, then wrap tightly and store at room temperature for up to 3 days or in the fridge for up to 5 days. For longer storage, freeze slices in a zip-top bag for up to 3 months and toast or microwave to reheat.
- Can I double the recipe?
- Sure thing. Use two loaf pans or a large 9×13 pan (reduce bake time slightly and check for doneness earlier). If using two pans, rotate them halfway through for even baking.
- Can I substitute butter with oil?
- Technically yes, but you’ll miss that buttery magic. Use ¾ the amount of oil.
- How do I know it’s done?
- Look for golden edges, a slightly cracked top, and a toothpick with moist crumbs (not wet batter). The loaf should feel springy when you press the top lightly.
- What if I don’t have ingredient X?
- No brown sugar? Use 3/4 cup granulated sugar plus a tablespoon of molasses. No yogurt? Use sour cream or an equal amount of milk with a splash of lemon juice.
How I Like to Serve It
I love slicing a warm piece and slathering it with a little salted butter while the chocolate still shimmers. It pairs beautifully with an Americano or cold milk — great for breakfast, an afternoon pick-me-up, or a cozy dessert. Bring it to a potluck and watch it disappear; it fits quiet weeknights and weekend brunches equally well.
Notes
- Store wrapped at room temperature for up to 3 days, or freeze slices for easy mornings.
- If reheating, microwave a slice for 12–15 seconds to revive that fresh-baked warmth.
Final Thoughts
Closing: Go bake this — the smell alone will make your kitchen feel like home, and the first bite will make the rest of your day a little sweeter.