
When I think of my grandmother’s kitchen, I smell vanilla and something sweet bubbling on the stove—usually cherries for pie. I learned early that dessert means love, and this cherry-topped cheesecake stole the spotlight at every family picnic. My grandma taught me to press the crust with the heel of my hand and to whisper “good luck” as I slid the pan into the oven—classic kitchen superstitions, yes, but they worked. This recipe blends that old-school comfort with a few modern tricks I picked up (hello, water bath) so your cheesecake comes out creamy, crack-free, and crowned with glossy cherries that pop in your mouth like tiny bursts of summer.
Quick Facts
- Yield: Serves 8–10
- Prep Time: 30 minutes
- Cook Time: 60–75 minutes
- Total Time: ~5 hours (includes 4 hours chilling)
Why This Recipe is Awesome
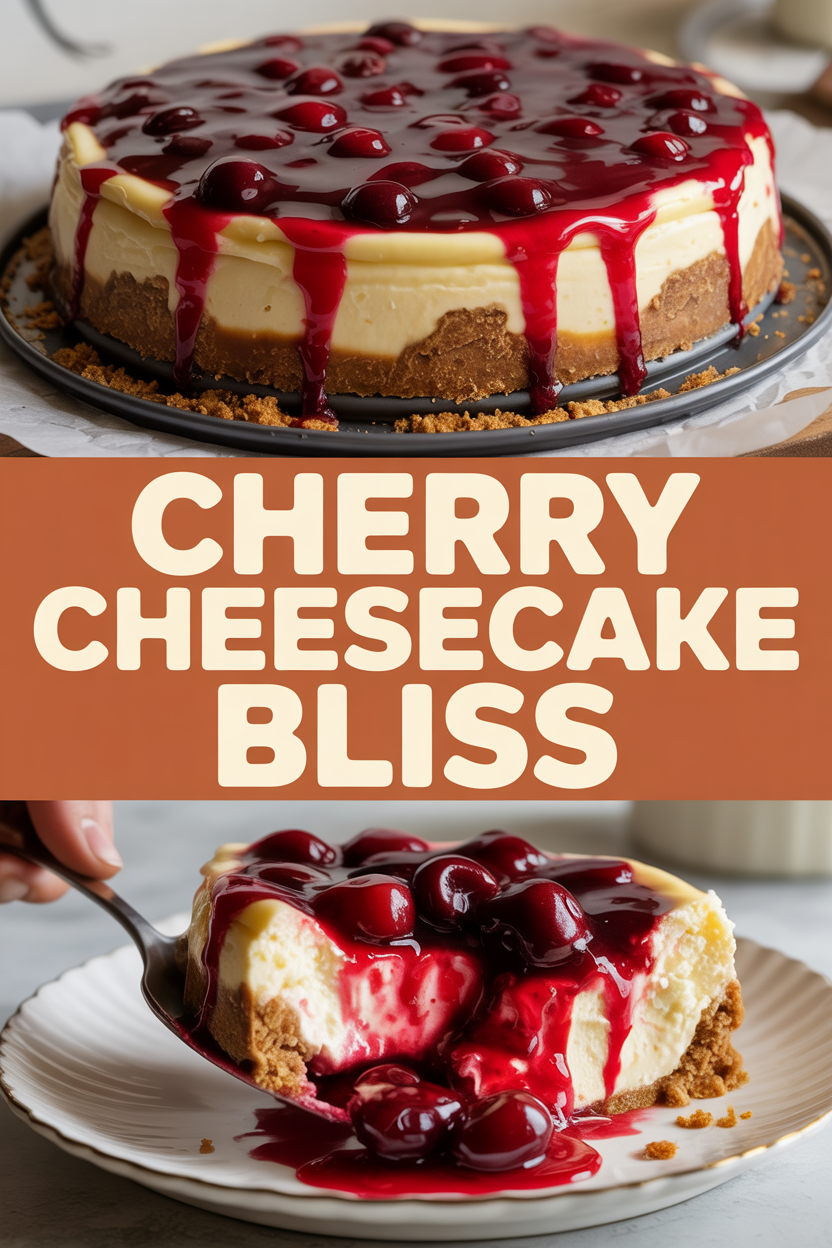
This cheesecake tastes rich and tangy with a buttery graham crust and a silky, dense filling that melts on your tongue. The cherry topping adds a bright, slightly tart contrast and a glossy finish that looks fancy but takes almost no effort. It’s so dependable even your oven can’t mess it up—especially with the water bath trick. Expect creamy texture, a hint of lemon brightness, and that satisfying sound of a fork scraping through luxurious layers.
Ingredients
For the Main Dish:
- For the crust: 1 1/2 cups **graham cracker crumbs** (about 10 full crackers), 1/4 cup granulated sugar, 6 tbsp **unsalted butter**, melted
- For the filling: 32 oz **cream cheese** (4 blocks), room temperature; 1 cup granulated sugar; 3 large **eggs**, room temperature; 1 cup **sour cream**; 2 tsp **vanilla extract**; 2 tbsp all-purpose flour; 1 tbsp fresh lemon juice; 1 tsp lemon zest
For the Sauce / Garnish (Cherry Topping):
- 3 cups **cherries**, pitted (fresh or frozen)
- 1/2 cup granulated sugar
- 1 tbsp cornstarch mixed with 2 tbsp cold water
- 1 tbsp fresh lemon juice
- Optional: 1 tsp **vanilla extract** or a splash of almond extract
How I Make It
Step 1:
Preheat the oven to 325°F and prepare a 9-inch springform pan by wrapping its outside bottom with heavy-duty foil (the water bath will thank you). Combine the **graham cracker crumbs**, 1/4 cup sugar, and melted **butter** in a bowl. Press the mixture firmly into the pan’s bottom and slightly up the sides using the bottom of a measuring cup. You want a compact, even layer that smells warm and buttery.
Step 2:
Beat the room-temperature **cream cheese** with 1 cup sugar in a stand mixer or with a hand mixer until creamy and smooth—scrape the bowl a few times to avoid lumps. Add the **eggs** one at a time, mixing just until combined; overdoing it traps air and invites cracks. Stir in the **sour cream**, **vanilla**, lemon juice, zest, and flour until the batter looks glossy and velvety.
Step 3:
Pour the filling onto the crust and smooth the top with a spatula. Place the springform pan into a large roasting pan, then pour hot (not boiling) water into the roasting pan around the springform until it reaches about halfway up the pan sides—this creates a gentle steam bath that bakes the cheesecake evenly. Slide it into the oven and bake for 60–75 minutes, until the edges set and the center jiggles like a soft pudding.
Step 4:
Turn the oven off and crack the door open, leaving the cheesecake inside for 30 minutes to cool slowly—this prevents big cracks. Then lift the cheesecake out of the water bath and cool completely on a rack for another hour. Chill the cake uncovered in the fridge for at least 4 hours, though overnight gives the best texture and flavor.
Step 5:
While the cheesecake chills, make the cherry topping: Heat the **cherries** and 1/2 cup sugar in a saucepan over medium heat until the fruit releases juices and the sugar dissolves. Stir in the cornstarch slurry and lemon juice; simmer until the sauce thickens and turns glossy—about 2–3 minutes. Cool slightly, then spoon the topping over the chilled cheesecake. Garnish with a few whole cherries or a sprinkle of lemon zest. Slice with a hot, clean knife for neat pieces (run under hot water and wipe between cuts).
Pro Tips
- Warm ingredients beat together more smoothly—bring the **cream cheese** and **eggs** to room temperature before starting.
- Line the springform pan with parchment under the crust for easier serving and cleaner slices.
- Use the water bath to stop cracking. If you forget the foil wrap, place a shallow pan of water on a lower rack instead.
- For extra shine, brush the cherry topping with a thin layer of warmed apricot jam when it cools slightly.
Common Mistakes to Avoid
- Skipping preheating: Classic rookie move. It changes texture and bake time.
- Overmixing: Leads to dense or chewy results. Mix until just combined.
- Guessing cook time: Always use visual cues or a timer, not just vibes.
- Overcrowding pans: Give your food some breathing room to crisp properly.
Alternatives & Substitutions
- Use crushed digestive biscuits or vanilla wafers instead of **graham crackers**—the flavor shifts slightly sweeter.
- Swap **sour cream** for full-fat plain Greek yogurt for a tangy note and slightly lighter texture.
- Make it dairy-free: use dairy-free cream cheese and coconut yogurt; expect a hint of coconut flavor and a softer set.
- Gluten-free option: use gluten-free graham crumbs or almond flour crust—texture becomes nuttier and denser.
Variations & Tips
- Swap cherries for raspberries or blueberries for seasonal flair.
- Stir 1/4 cup sour cherry jam into the topping for an ultra-glossy, jammy finish.
- Add 2 tbsp cocoa powder to the crust for a chocolate twist.
- Make mini cheesecakes in a muffin tin for single-serve treats—reduce bake time to ~25–30 minutes.
- For boozy cherries, simmer the fruit in 1 tbsp bourbon or kirsch while making the sauce.
- Top with toasted almonds or a dusting of finely grated dark chocolate for extra texture.
FAQ (Frequently Asked Questions)
- Can I make this ahead of time?
- Yes! Bake the cheesecake a day ahead and chill it covered. Store the cherry topping separately and add it just before serving for the freshest look and flavor.
- Can I double the recipe?
- Sure thing. Use a larger pan (12-inch) or two 9-inch pans. Increase baking time slightly—check for set edges and a gently jiggly center.
- Can I substitute butter with oil?
- Technically yes, but you’ll miss that buttery magic. Use ¾ the amount of oil and expect a slightly different mouthfeel and less crisp crust.
- How do I know it’s done?
- Look for set edges and a center that jiggles like soft pudding when you gently shake the pan. The top should look matte, not wet or glossy.
- What if I don’t have ingredient X?
- No panic—swap **sour cream** with Greek yogurt or leave out lemon zest and add 1 tsp vanilla for flavor. For cornstarch, use 1 tbsp flour in the topping but cook a bit longer.
How I Like to Serve It
I serve this cheesecake chilled with a hot espresso or a glass of cold milk for contrast. It works for holiday dinners, lazy weekend desserts, or a fancy date-night finish. When friends stop by, I make mini slices and watch everyone’s eyes light up at the glossy cherry crown—pure joy in every forkful.
Notes
- Store leftover cheesecake covered in the fridge for up to 4 days. Freeze slices wrapped tightly for up to 1 month; thaw in the refrigerator before serving.
- If you include meat in a menu, follow safe cooking temps—e.g., cook poultry to 165°F. (Not directly relevant to this dessert, but good to remember for full meals.)
Final Thoughts
Closing: Now go impress someone — or just yourself — with your homemade masterpiece! Cut a generous slice, listen to the quiet hum of contentment, and savor every cherry-studded bite.