
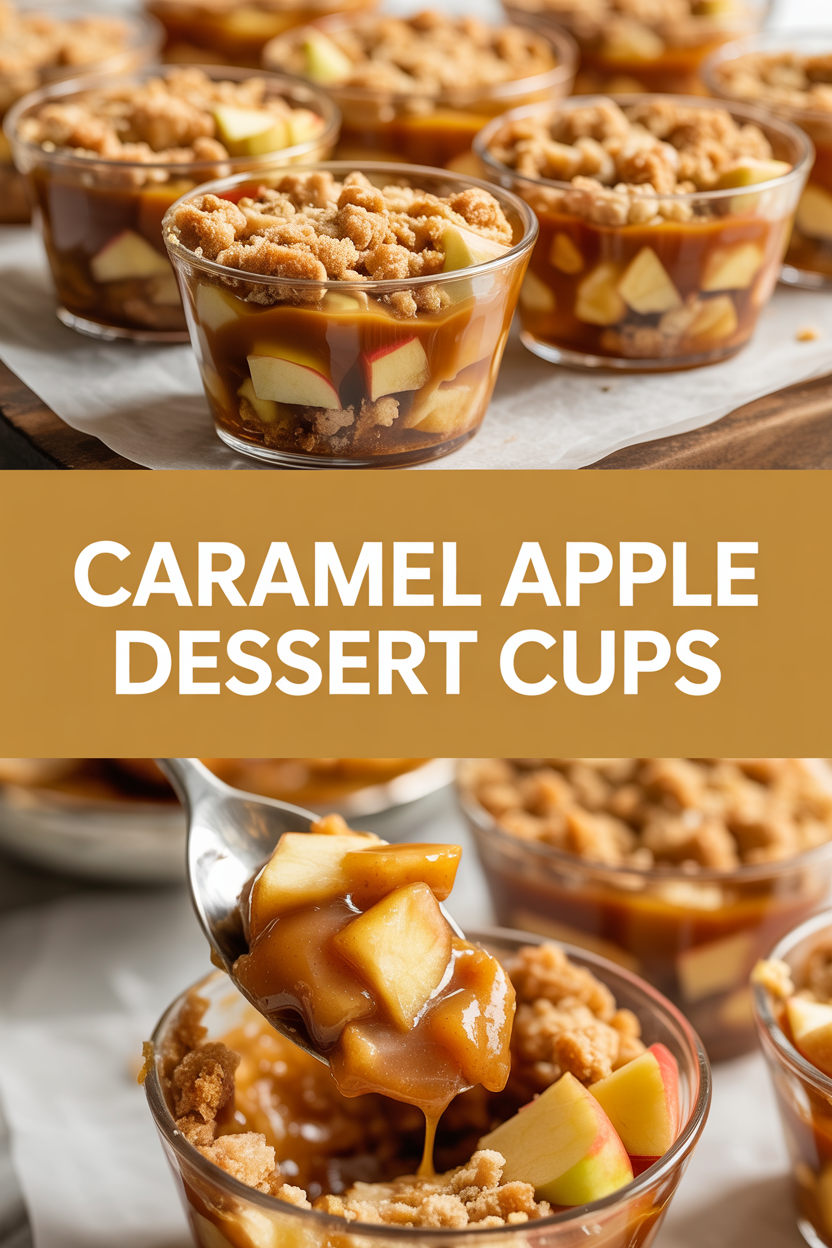
When the air turns crisp and the leaves rattle like someone whispering secrets, I reach for a bowl of apples and a skillet. This recipe feels like wrapping your hands around a warm mug — comforting, a little sticky, and impossible to resist. I first made these little Caramel Apple Dessert Cups on a rain-drummed afternoon for friends; the house filled with the smell of cinnamon and brown sugar and everyone hovered like moths. These cups give you juicy, spiced apples, a crunchy buttery crumble, and a drizzle of caramel that makes your spoon scrape the bottom of the cup with a satisfying clink. Cozy, slightly indulgent, and faster than a full pie.
Quick Facts
- Yield: Serves 6
- Prep Time: 15 minutes
- Cook Time: 25 minutes
- Total Time: 40 minutes
Why This Recipe is Awesome
These Caramel Apple Dessert Cups hit all the best notes: tender, cinnamon-spiced apple filling, a crunchy oat-butter crumble, and a glossy caramel finish. They look fancy but behave like a weeknight dessert — quick, forgiving, and crowd-pleasing. Who doesn’t love warm apples and caramel? Plus, each cup gives you a crispy rim, a soft center, and that little irresistible puddle of caramel. It’s basically autumn in a ramekin.
Ingredients
For the Main Dish:
- 3 cups peeled and diced apples (about 2 medium apples; Granny Smith or Honeycrisp work great)
- 2 tbsp fresh lemon juice
- 1/3 cup brown sugar, packed
- 1 tbsp cornstarch
- 1 tsp ground cinnamon
- 1/8 tsp ground nutmeg (optional)
- 1 tsp vanilla extract
- 1 cup old-fashioned rolled oats
- 1/2 cup all-purpose flour
- 1/3 cup brown sugar (for crumble)
- 6 tbsp cold butter, cubed
- Pinch of salt
- 6 small ramekins or oven-safe dessert cups (about 6–8 oz each)
For the Sauce / Garnish (if applicable):
- 1/2 cup heavy cream
- 4 tbsp unsalted butter
- 1/2 cup packed brown sugar
- Pinch of flaky sea salt (optional)
- Vanilla ice cream, whipped cream, or chopped pecans for serving (optional)
How I Make It
Step 1:
I preheat the oven to 350°F and set a rack in the center. While the oven warms, I toss the diced apples with lemon juice, brown sugar, cornstarch, cinnamon, nutmeg, and vanilla in a bowl. The apples should smell bright, tangy, and warmly spiced — like a bakery window on a crisp morning.
Step 2:
I spoon the apple mixture into six ramekins, dividing evenly so each cup gets juicy fruit and syrup. If any apple pieces look too large, I cut them down so each bite stays tender and even. Don’t overfill; leave about 1/2 inch at the top for the crumble.
Step 3:
For the crumble, I pulse oats, flour, brown sugar, and a pinch of salt in a bowl, then work in the cold cubed butter with my fingertips until the mix looks like coarse crumbs with some pea-sized bits. I sprinkle that golden, crumbly goodness over the apples — that contrast of crunchy and soft will sing in your mouth. If you like, press a few oat clusters gently into the top for extra texture.
Step 4:
I place the ramekins on a baking sheet (for easier handling) and bake at 350°F for 20–25 minutes, until the crumble turns golden and the apple juices bubble around the edges. You’ll hear a soft sizzle and smell caramelizing sugars and warm cinnamon — that’s your cue that magic happens. If the tops brown too fast, tent lightly with foil after 15 minutes.
Step 5:
While the cups bake, I make a quick caramel: warm heavy cream, butter, and brown sugar in a small saucepan over medium heat, stirring until glossy and slightly thickened — about 4–6 minutes. Let it cool a bit so it thickens further. When the dessert cups come out, I let them rest for 5 minutes, then drizzle with the warm caramel and finish with a pinch of flaky sea salt and a scoop of vanilla ice cream if I’m feeling extra indulgent.
Pro Tips
- Use firm apples like Granny Smith for tartness or Honeycrisp for sweeter bites; I often mix both for balance.
- Keep your butter cold for the crumble so you get big, crunchy clusters rather than a sandy topping.
- If your ramekins vary in size, rotate the baking sheet halfway through so all cups brown evenly.
- Make the caramel ahead and rewarm gently; it keeps in the fridge for up to 1 week.
Common Mistakes to Avoid
- Skipping preheating: Classic rookie move. It changes texture and bake time.
- Overmixing: Leads to dense or chewy results. Mix until just combined.
- Guessing cook time: Always use visual cues or a timer, not just vibes.
- Overcrowding pans: Give your food some breathing room to crisp properly.
Alternatives & Substitutions
- Swap the all-purpose flour in the crumble for an equal amount of almond flour for a gluten-free option (texture will be slightly softer).
- Use coconut oil instead of butter for dairy-free; the flavor will shift but the topping still crisps nicely.
- Replace heavy cream in the caramel with canned coconut milk for a dairy-free caramel; simmer a little longer to thicken.
- For a lighter version, use Greek yogurt instead of ice cream as a topping — tangy and delicious.
Variations & Tips
- Add 1/4 cup chopped pecans or walnuts to the crumble for nutty crunch.
- Stir 1/4 cup dried cranberries into the apples for a tart-sweet pop.
- Make mini versions in muffin tins for party-friendly bites.
- Try a maple-caramel twist: swap half the brown sugar in the caramel for pure maple syrup.
- For a boozy adult version, stir 1 tbsp bourbon into the caramel just before serving.
FAQ (Frequently Asked Questions)
- Can I make this ahead of time?
- Yes! Assemble the cups and refrigerate (unbaked) up to 24 hours, then bake straight from the fridge — add a few extra minutes to the bake time. Store leftovers in the fridge for up to 3 days and rewarm in a 350°F oven for 8–10 minutes.
- Can I double the recipe?
- Sure thing. Use two baking sheets and rotate them halfway through baking so everything browns evenly. If you double, mix filling and crumble in large bowls to keep things efficient.
- Can I substitute butter with oil?
- Technically yes, but you’ll miss that buttery magic. Use ¾ the amount of oil.
- How do I know it’s done?
- Look for a golden brown crumble and bubbling apple juices at the edges. The apples should be tender when pierced with a fork but still hold their shape.
- What if I don’t have ingredient X?
- No apples? Use pears the same way. No cornstarch? Use 1 tbsp of flour to thicken the filling instead.
How I Like to Serve It
I love serving these warm with a scoop of vanilla ice cream and a drizzle of the caramel sauce — the contrast of hot and cold makes everyone sigh. They work for cozy weeknight desserts, fall dinners, or your next potluck. Pair with a cup of strong coffee or chai tea for extra comfort. They fit autumn best, but honestly, I make them whenever I crave sticky-sweet nostalgia.
Notes
- Store leftovers in an airtight container in the fridge for up to 3 days. Reheat in a 350°F oven for best texture.
- Caramel keeps in the fridge up to 1 week; rewarm gently on the stove or in short bursts in the microwave, stirring between intervals.
Final Thoughts
Closing: Now go make these little cups of cozy — they’ll warm your kitchen and your soul, and you’ll eat them with a grin and sticky fingers. Impress someone — or just yourself — with this homemade, heartwarming treat!