
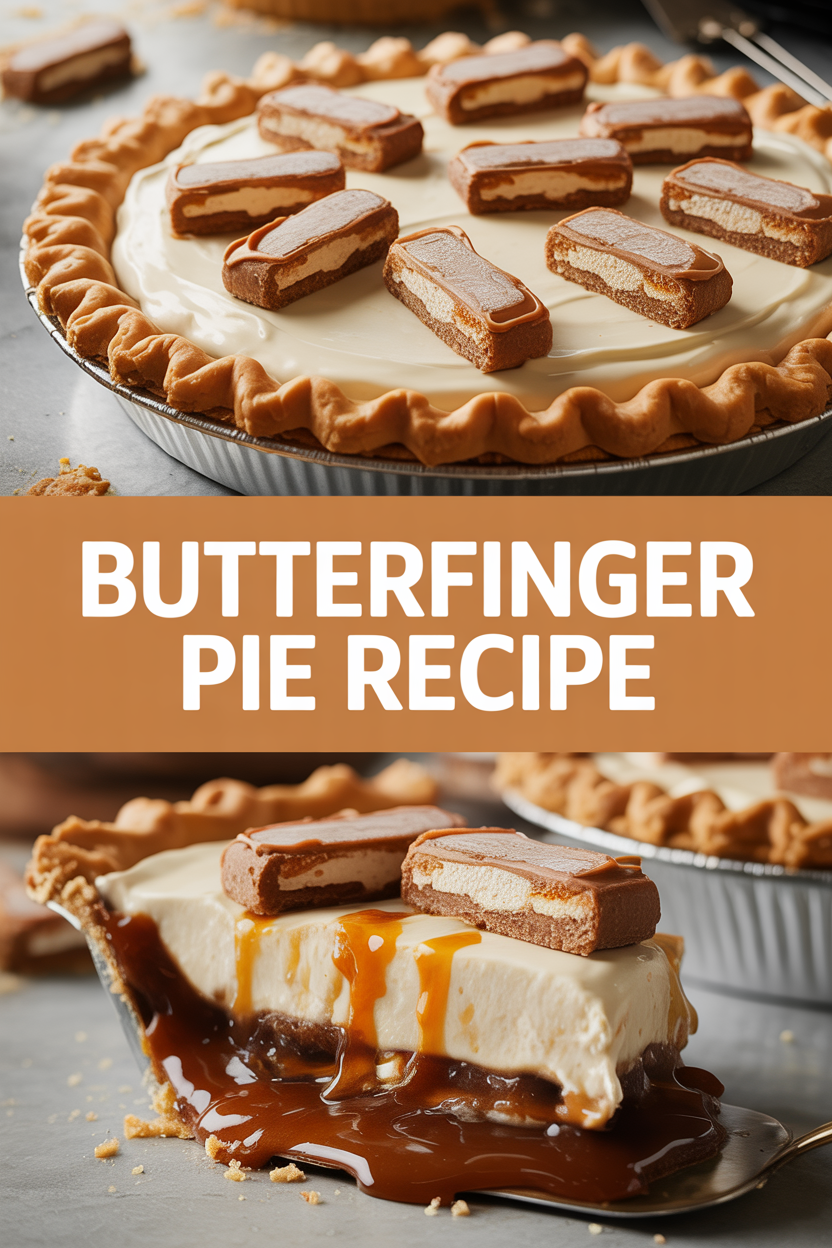
Okay, full disclosure: I have a dangerous relationship with candy bars, and the Butterfinger always wins. Picture this — Sunday afternoon, pajamas, and I very seriously cradle a chilled, crunchy-sweet pie that cracks like a crisp fall leaf when I cut a slice. This recipe started as a “use-up-the-candy-bars” experiment and wound up as my go-to crowd-pleaser. It tastes like peanut-buttery toffee crossed with a silky mousse, and it comes together with almost zero drama. If you love crunchy texture, caramel-ish peanut butter flavor, and a pie that gets cheers at potlucks, we’re about to become best kitchen friends.
Quick Facts
- Yield: Serves 8
- Prep Time: 20 minutes
- Cook Time: 0 minutes (no-bake)
- Total Time: 4 hours 20 minutes (includes chilling)
Why This Recipe is Awesome
This pie hits the jackpot: creamy, crunchy, and unapologetically sweet. The filling feels like a whipped peanut-butter cloud with shards of candy for surprise crunch in every bite. It’s ridiculously simple — no tempering chocolate, no tricky dough — and it looks impressive on a dessert table. Seriously, it’s so easy even your oven will feel left out.
Ingredients
For the Main Dish:
- 1 (9-inch) pre-made chocolate cookie crust (or graham cracker crust if you prefer)
- 8 oz cream cheese, room temperature
- 1 cup creamy peanut butter (prefer natural for cleaner flavor)
- 1 cup powdered sugar, sifted
- 1 cup heavy whipping cream, cold
- 1 (8 oz) tub frozen whipped topping, thawed (or 1 cup extra whipped cream)
- 8–10 fun-size Butterfinger bars, roughly chopped (about 6 oz)
- 2 tbsp butter, melted (optional, for extra silkiness)
- 1 tsp vanilla extract
- Pinch of flaky sea salt (balances the sweetness)
For the Sauce / Garnish (if applicable):
- Optional drizzle: 1/3 cup chocolate chips + 1 tsp vegetable oil melted together
- Extra chopped Butterfinger or chopped peanuts for topping
How I Make It
Step 1:
Grab your mixer and bowl. Beat the cream cheese until smooth and creamy (no lumps), about 1–2 minutes. Add the peanut butter, powdered sugar, vanilla, and melted butter if using. Whip until the mixture looks glossy and holds soft peaks. The room smells like peanut-butter heaven — that’s your cue to smile.
Step 2:
In a separate chilled bowl, whip the heavy cream to medium-stiff peaks; you should hear a gentle swoosh and see soft, billowy peaks when you lift the whisk. Fold about two-thirds of the whipped cream into the peanut butter mixture with a rubber spatula. Use gentle strokes so the filling stays light and airy — overmixing knocks the fluff out.
Step 3:
Fold in the thawed whipped topping (or remaining whipped cream) and most of the chopped Butterfinger, saving a handful for the top. The contrast between the mousse-like filling and the crunchy candy pieces creates that addictive texture — you want those little shards dispersed, not clumped. Taste and add a pinch of flaky sea salt if it needs balance.
Step 4:
Spoon the filling into the pre-made crust, smoothing the top with an offset spatula. Scatter the reserved candy pieces and chopped peanuts, then drizzle the optional melted chocolate in a lazy zigzag. Tap the pie gently on the counter to settle the filling. Cover tightly and chill in the fridge for at least 4 hours, preferably overnight. The center should set and the edges will firm up — a slight jiggle in the middle tells you it’s perfect.
Step 5:
When it’s time to serve, run a thin knife around the edge for clean slices. Cut with a sharp, warm knife (dip in hot water and wipe dry between cuts) to get neat pieces. Listen for that satisfying little crack when the crust meets the knife, and enjoy the crunchy chorus of Butterfinger bits and creamy filling.
Pro Tips
- Use cold whipping cream and chill the bowl for firmer peaks faster — it saves time and gives better structure.
- If your Butterfinger pieces clump, dust them lightly with a teaspoon of powdered sugar to help them distribute evenly in the filling.
- For a firmer slice, freeze the pie for 30–45 minutes before slicing; serve within an hour to keep the best texture.
- Don’t skip the pinch of sea salt — it makes the sweetness sing instead of scream.
Common Mistakes to Avoid
- Skipping preheating: Classic rookie move. It changes texture and bake time.
- Overmixing: Leads to dense or chewy results. Mix until just combined.
- Guessing cook time: Always use visual cues or a timer, not just vibes.
- Overcrowding pans: Give your food some breathing room to crisp properly.
Alternatives & Substitutions
- Use almond butter or sunflower seed butter for a nut-free twist — flavor shifts slightly but texture stays great.
- Swap the pre-made crust for a gluten-free cookie crust to make the whole pie gluten-free (affects texture slightly).
- Replace heavy cream with full-fat coconut cream for a dairy-free version; the pie will taste a touch tropical.
- For a lighter version, use 6 oz cream cheese and increase whipped topping to keep volume but cut richness.
Variations & Tips
- Chocolate Lovers: Mix 1/3 cup melted dark chocolate into the filling for a mocha-Butterfinger vibe.
- Salted Caramel: Drizzle salted caramel over the top before serving for oozy, salty-sweet layers.
- Mini Pies: Make in tart pans for portable, party-ready portions.
- Spicy Twist: Add 1/8 tsp cayenne to the filling for a surprising kick that complements the candy’s toffee notes.
- Kid-Friendly: Use chopped peanut-free candy (like crushed pretzel sticks) for school-safe treats.
- Adult Upgrade: Add 1–2 tbsp of bourbon to the filling for a grown-up kick that pairs beautifully with chocolate.
FAQ (Frequently Asked Questions)
- Can I make this ahead of time?
- Yes! Assemble the pie up to 24 hours ahead and keep it covered in the fridge. The flavors intensify overnight. For longer storage, freeze the pie wrapped tightly for up to 1 month and thaw in the fridge overnight before serving.
- Can I double the recipe?
- Sure thing. Use two 9-inch pans or one deep-dish pan. Chill time stays roughly the same, but a deeper pie may need an extra hour to fully set.
- Can I substitute butter with oil?
- Technically yes, but you’ll miss that buttery magic. Use ¾ the amount of neutral oil if you must, and expect a slight texture change.
- How do I know it’s done?
- Look for a firm edge and a slightly wobbly center after chilling. The filling should hold shape on the plate and the crust should feel set when you press it lightly.
- What if I don’t have ingredient X?
- Swap powdered sugar with a little more whipped topping for sweetness, or use chopped Heath bars or chopped peanuts if you run out of Butterfingers.
How I Like to Serve It
I love serving this chilled with a cold glass of milk for the kids or coffee for the adults. It shines at potlucks and birthday parties — the crunchy candy always draws a crowd. For a summer finish, add a scoop of vanilla ice cream and an espresso shot for an affogato-style twist. In winter, a warm mug of hot cocoa makes a cozy pairing.
Notes
- Store leftovers in the fridge, covered, up to 3 days. For the best crunch, add extra candy on top just before serving.
- No meat here, so no safe-cooking temps to worry about — just chill for at least 4 hours for best texture.
Final Thoughts
Closing: Go make this pie and enjoy every crunchy, creamy bite — then come back and tell me who swooned first.