
Okay, picture this: I once tried to make an ice cream cake with more enthusiasm than planning and ended up with something that looked like the aftermath of a delicious snowball fight. Yes, I learned the hard way that layers matter—and that chocolate melts faster than my dignity when guests arrive early. This Buster Bar Ice Cake fixes all that chaos. It’s basically a no-fuss, no-bake dream that stacks crunchy chocolate crumbs, crunchy peanuts, and chopped candy bars into frozen harmony. If you love cold, creamy vanilla, sticky chocolate drizzle, and the satisfying snap of a candy bar in every bite, we’re about to become best friends in the freezer aisle.
Quick Facts
- Yield: Serves 8
- Prep Time: 20 minutes
- Cook Time: 0 minutes (plus freezing)
- Total Time: 4 hours 20 minutes (including 4 hours freeze)
Why This Recipe is Awesome
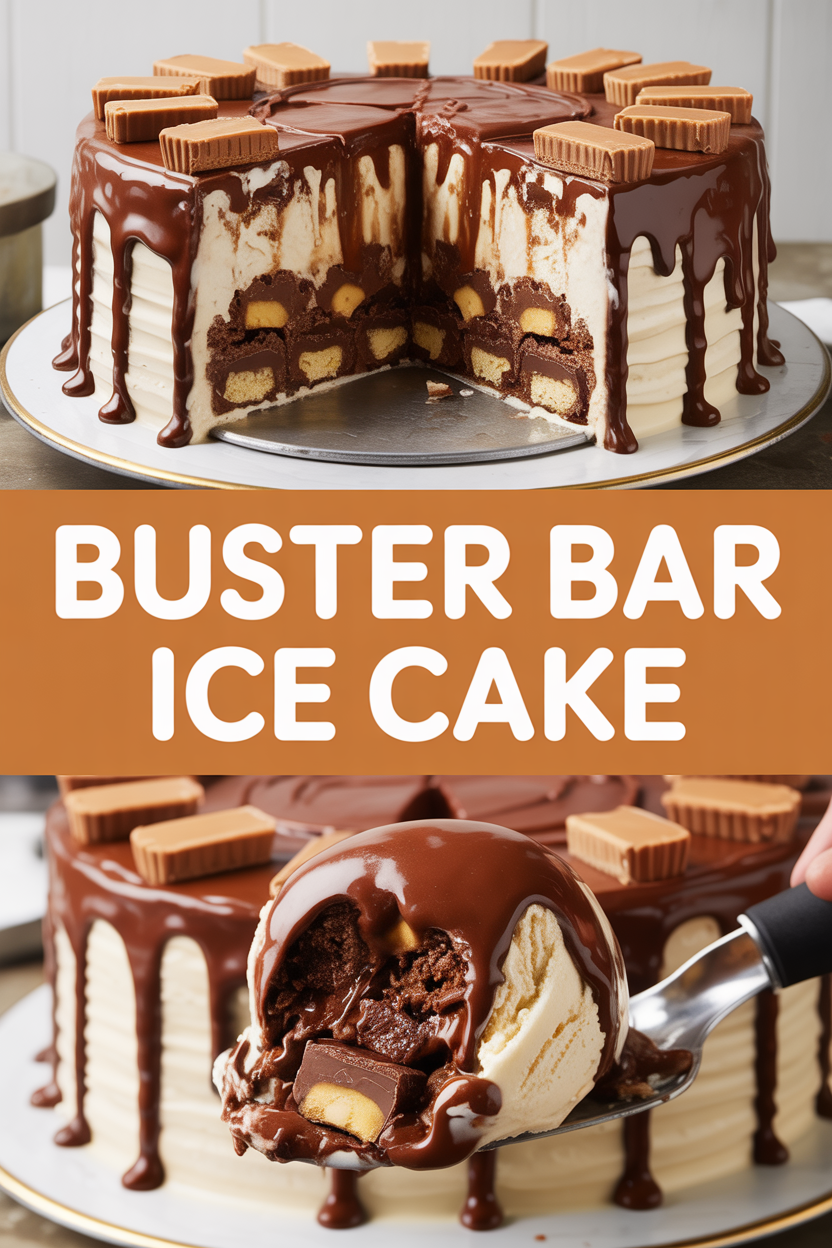
It’s a lazy-day dessert that still looks impressive. You get crunchy crumbs, creamy frozen center, gooey chocolate ribbons, and chopped candy blitzed into each forkful. It’s so easy even your oven will feel left out. The texture contrast—crisp base, silky ice cream, chewy candy—keeps your teeth entertained. Also, it freezes into neat slices, so it’s perfect for hot-weather parties or emergency dessert needs.
Ingredients
For the Main Dish:
- 1 1/2 cups crushed chocolate wafer cookies (about 12 cookies)
- 4 tbsp unsalted butter, melted
- 1/2 cup chopped roasted peanuts (optional for extra crunch)
- 1.5 quarts good-quality vanilla ice cream, slightly softened
- 6 Buster Bars or similar chocolate-peanut-caramel candy bars, chopped into small pieces (about 6–8 oz)
- 1/2 cup hot fudge or chocolate sauce, room temperature
- 1/4 cup caramel sauce (optional)
- Whipped cream for topping (store-bought or 1 cup heavy cream whipped)
For the Sauce / Garnish (if applicable):
- Extra chopped peanuts and a drizzle of extra chocolate or caramel for serving
How I Make It
Step 1:
Line a 9×5-inch loaf pan with plastic wrap, leaving a big overhang so you can lift the cake out later. I like to press a second strip down the long sides so the whole thing pops out in one go. Mix the crushed chocolate wafer cookies with the melted butter until the crumbs hold together like wet sand. Press this mixture into the bottom of the pan to form a firm crust—think compact, not concrete. The crust should smell like chocolate and butter and make a satisfying thud when you press it.
Step 2:
Scoop the slightly softened vanilla ice cream into a bowl and stir it until it loosens but doesn’t melt into soup. Fold in half the chopped Buster Bars and half the peanuts so you get candy pockets in the cake. Spoon about half the ice cream over the crust and smooth it with a spatula. You want an even layer that reaches the edges; the cake looks better and slices cleaner that way.
Step 3:
Drizzle half the hot fudge and optional caramel over the ice cream. Use a skewer or knife to swirl the sauces gently—don’t overdo it or the whole thing will marble into a sad brown soup. Add the rest of the ice cream, then sprinkle the remaining chopped Buster Bars and peanuts on top. Press them in lightly so they freeze into the surface and don’t fall off when you slice.
Step 4:
Fold the plastic wrap over the top and slide the pan into the freezer. Freeze for at least 4 hours or overnight until firm. You’ll know it’s ready when the center feels solid and the sides pull away a bit from the pan. When you remove it, let it sit at room temp for 5 minutes for cleaner slicing—too long and the ice cream will ooze; not enough and your knife will fight you.
Step 5:
Lift the cake out using the plastic overhang. Unwrap and top with a generous dollop of whipped cream, an extra drizzle of chocolate or caramel, and a scattering of chopped peanuts. Slice with a sharp knife dipped in hot water and wiped dry between cuts for neat pieces. Serve immediately and savor that satisfying crunch followed by creamy chill.
Pro Tips
- Press the crust firmly so it doesn’t crumble when you slice—use the bottom of a measuring cup for even pressure.
- If you don’t have Buster Bars, use chopped chocolate-covered peanut-caramel bars or Heath bars; slightly different textures but same party effect.
- Slice cleanly by warming your knife under hot water and wiping it dry between cuts—this gives restaurant-style slices.
- For softer slices, let the cake sit 3–5 minutes at room temp before cutting. Don’t wait longer or the layers will start to merge.
Common Mistakes to Avoid
- Skipping preheating: Classic rookie move. It changes texture and bake time.
- Overmixing: Leads to dense or chewy results. Mix until just combined.
- Guessing cook time: Always use visual cues or a timer, not just vibes.
- Overcrowding pans: Give your food some breathing room to crisp properly.
Alternatives & Substitutions
- Use chocolate sandwich cookies for a more chocolatey crust; swap butter with coconut oil for a dairy-free option (slightly looser crust).
- Swap vanilla ice cream with chocolate, coffee, or salted caramel to change the flavor profile—each will shift sweetness and depth.
- For a gluten-free version, use gluten-free chocolate wafers and ensure the candy bars are GF certified.
- Dairy-free idea: use a coconut milk-based ice cream and dairy-free chocolate sauce—expect a slightly coconutty finish.
Variations & Tips
- Make a mini version in a loaf pan for two—freeze only 2–3 hours for best texture.
- Stir in mini marshmallows for a rocky-road twist.
- Add a layer of crushed shortbread for a buttery contrast to the chocolate crust.
- Make it boozy: fold 1–2 tbsp of bourbon into the softened ice cream for grown-up flair.
- Turn it tropical by adding chopped dried banana chips and a swirl of dulce de leche.
- Top with sea salt for a salty-sweet punch—always a crowd-pleaser.
FAQ (Frequently Asked Questions)
- Can I make this ahead of time?
- Yes! Assemble the whole cake and freeze for up to 1 week. Wrap tightly in plastic then foil to prevent freezer burn. Remove 5–10 minutes before serving to make slicing easier.
- Can I double the recipe?
- Sure thing. Use a 9×13-inch pan and expect an extra hour or two of freezing time to firm up fully.
- Can I substitute butter with oil?
- Technically yes, but you’ll miss that buttery magic. Use ¾ the amount of oil and chill the crust a little longer to firm it up.
- How do I know it’s done?
- You’ll know by feel and sight: the center feels solid to the touch, the sides pull slightly from the pan, and the surface holds its shape when you press gently. If you see liquid pooling, it needs more freeze time.
- What if I don’t have ingredient X?
- Swap the candy bars for any chocolate-peanut-caramel bar or even chopped chocolate chips and toffee bits. If you lack peanuts, use chopped almonds or skip nuts entirely—still delicious.
How I Like to Serve It
I slice this for backyard barbecues, birthday shindigs, or Tuesdays when dessert feels necessary. Pair with strong coffee or a cold stout for adults, or just hand everyone a fork and let chaos ensue. In summer it feels like a frozen party; in winter I bring it out for a nostalgic treat that reminds everyone of ice cream truck summers.
Notes
- Store leftover slices in an airtight container in the freezer for up to 1 week.
- Reheat knives under hot water before slicing for clean edges; no meat temps apply here, but keep freezer at 0°F for safety.
Final Thoughts
Closing: Now go impress someone — or just yourself — with your homemade masterpiece!