
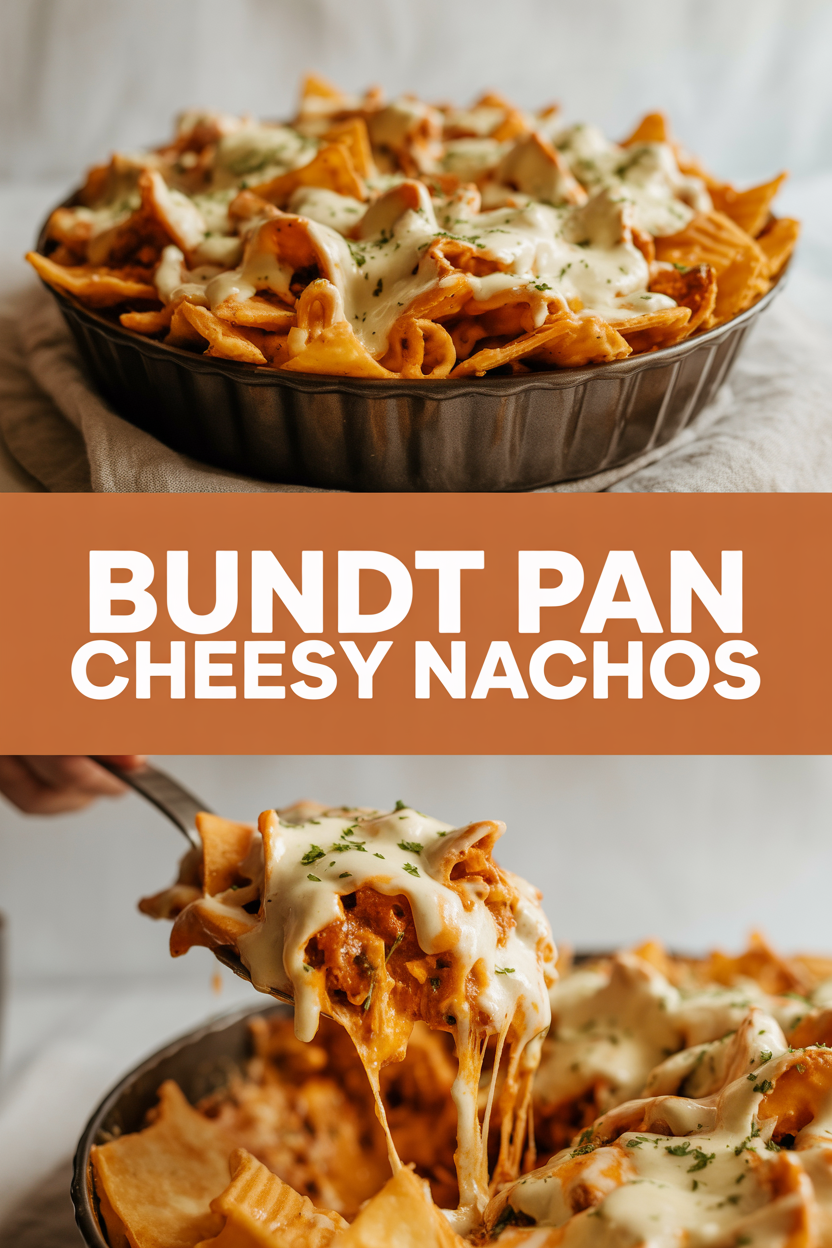
Okay, listen up: nachos just got a glow-up. I couldn’t be more excited to show you how a humble bundt pan turns messy, finger-sticky nachos into a showstopping cheesy ring that cries out for a selfie before the first crunchy bite. I love how the melted cheese peeks out like lava between golden chips and how the aroma of toasted tortillas and warm spices fills the kitchen — you’ll hear that satisfying snap when you lift a wedge. This recipe feels like a party trick and a weeknight lifesaver rolled into one. If you like bold flavors, gooey stretches of cheese, and easy, impressive plating, you’re about to become everyone’s favorite host (or dinner hero for yourself).
Quick Facts
- Yield: Serves 6–8
- Prep Time: 15 minutes
- Cook Time: 12–15 minutes
- Total Time: 27–30 minutes
Why This Recipe is Awesome
This recipe turns ordinary nachos into a fun, shareable centerpiece. The bundt pan crisps every chip edge, traps pockets of molten cheese, and creates a ring that looks fancy but actually comes together fast. Texturally, you get crunchy chips, gooey cheese, and bright, fresh toppings — all at once. It’s so easy even your oven can’t mess it up, and it makes cleanup simpler than a sheet pan avalanche. Who doesn’t love a crispy, cheesy edge that stretches with every pull?
Ingredients
For the Main Dish:
- 10–12 oz tortilla chips (about 6 cups)
- 1 lb shredded cheese mix (4 oz sharp cheddar + 12 oz Monterey Jack or Pepper Jack)
- 1 lb cooked seasoned ground beef or shredded rotisserie chicken
- 2 tbsp taco seasoning (store-bought or homemade)
- 1 cup canned black beans, rinsed and drained
- 1 cup canned diced tomatoes with green chiles, drained
- 2 tbsp butter or oil (for greasing the pan)
- Optional: 2–3 sliced jalapeños, 1/2 cup sliced black olives
For the Sauce / Garnish (if applicable):
- 1 cup sour cream or plain Greek yogurt (for drizzling)
- 1 cup chunky salsa
- 1/2 cup guacamole or sliced avocado
- 1/2 cup chopped green onions and a handful of chopped cilantro
- Fresh lime wedges for squeezing
How I Make It
Step 1:
Preheat your oven to 375°F. I grease a 10–12 cup bundt pan well with butter or spray with nonstick oil so the nacho ring releases cleanly. Toss your cooked beef or chicken with the taco seasoning and a splash of water to keep it juicy. Pile a single layer of chips into the pan, letting some overlap for structure — you want crunchy pockets and cheesy seams.
Step 2:
Sprinkle a generous handful of the shredded cheese over the chips, then scatter some of the black beans, tomatoes, and meat. Repeat layers until you use most of your chips and cheese, finishing with a very generous layer of cheese so the top crisps and browns. Press gently with your hands so chips nestle together but don’t crush them — you want gaps for molten cheese to pool.
Step 3:
Bake for 12–15 minutes until the cheese looks bubbly and the edges of chips turn golden. You’ll smell a toasty, buttery tortilla aroma and hear tiny crackles as chips crisp. If you like a deeper toast, broil 1–2 minutes but watch it closely so it doesn’t burn.
Step 4:
Let the pan rest for 5 minutes. This helps the cheese set just enough so the ring holds when you flip it. Run a butter knife around the edge if anything tucks in. Place a large serving plate over the pan and invert quickly but confidently — the crunchy nacho ring should release in one glorious piece. If it sticks, give it another minute and try again; patience pays off.
Step 5:
Top the ring with dollops of guacamole, spoonfuls of salsa, a drizzle of sour cream, and sprinkle green onions and cilantro. Squeeze lime over the top for a bright pop. Cut or pull into wedges and listen to that satisfying crunch. Serve immediately so everyone can enjoy the perfect contrast of molten cheese and crisp edges.
Pro Tips
- Grease the bundt pan really well (butter gives the best flavor) so the ring releases cleanly; I also sometimes line the bottom with a circle of parchment for extra insurance.
- Don’t over-layer the pan; keep the stack to about 3–4 layers so heat reaches the center and cheese melts evenly.
- If using raw chicken, cook it first and bring it to 165°F internal temp before adding to the layers.
- For ultra-crispy chips, give the filled bundt a quick 1–2 minute broil at the end — but stand by the oven and watch the top like a hawk.
Common Mistakes to Avoid
- Skipping preheating: Classic rookie move. It changes texture and bake time.
- Overmixing: Leads to dense or chewy results. Mix until just combined.
- Guessing cook time: Always use visual cues or a timer, not just vibes.
- Overcrowding pans: Give your food some breathing room to crisp properly.
Alternatives & Substitutions
- Swap ground beef for crumbled tofu or tempeh for a vegetarian option — add extra taco seasoning for oomph.
- Use dairy-free shredded cheese to go vegan; expect slightly different melt and texture but still delicious.
- Switch sour cream for plain Greek yogurt for tang and a protein boost.
- Swap butter with oil if needed (see FAQ); if you choose oil, use ¾ the amount and expect a slightly different flavor.
Variations & Tips
- Spicy: Add pickled jalapeños and use Pepper Jack for the cheese mix.
- Kid-friendly: Skip jalapeños, use mild cheddar, and add sweet corn kernels for fun bites.
- Tex-Mex twist: Add a layer of refried beans and sprinkle cotija cheese on top after baking.
- Seafood: Use seasoned cooked shrimp in place of beef for a fancy summer ring.
- Breakfast nacho ring: Use scrambled eggs, breakfast sausage, and a cheddar blend for brunch.
- Creative twist: Make a breakfast sweet version with cinnamon chips, mascarpone, and fresh berries (totally unexpected and fun).
FAQ (Frequently Asked Questions)
- Can I make this ahead of time?
- Yes! Assemble the ring in the bundt pan, cover tightly, and refrigerate up to 24 hours. Bake when ready, adding a few extra minutes if cold. Reheat leftovers in a 350°F oven until warm and crisp.
- Can I double the recipe?
- Sure thing. Use two bundt pans or a large tube pan and adjust bake time by a few minutes — start checking at the original cook time.
- Can I substitute butter with oil?
- Technically yes, but you’ll miss that buttery magic. Use ¾ the amount of oil and expect a slightly different flavor and browning.
- How do I know it’s done?
- You’ll see bubbly cheese, golden edges, and smell toasty tortillas. The center should feel set when you gently tap the top.
- What if I don’t have ingredient X?
- Swap in what you have: salsa for diced tomatoes, canned chicken for fresh, or any shredded cheese blend you enjoy. Tortilla chips can be replaced with broken pita chips for a different crunch.
How I Like to Serve It
I love serving this at game nights with cold beers or a bright margarita. It shines on a picnic table at summer cookouts and makes a fun centerpiece for casual dinner company. For weeknights, I pair wedges with a simple green salad and let everyone customize toppings — kids love the hands-on part. It feels celebratory whether you host a crowd or eat it solo on the couch with a movie.
Notes
- Store leftovers covered in the fridge up to 3 days. Reheat in a 350°F oven until crisp.
- Cook chicken to 165°F internal temperature for safety.
Final Thoughts
Closing: Now go impress someone — or just yourself — with your homemade cheesy masterpiece!