
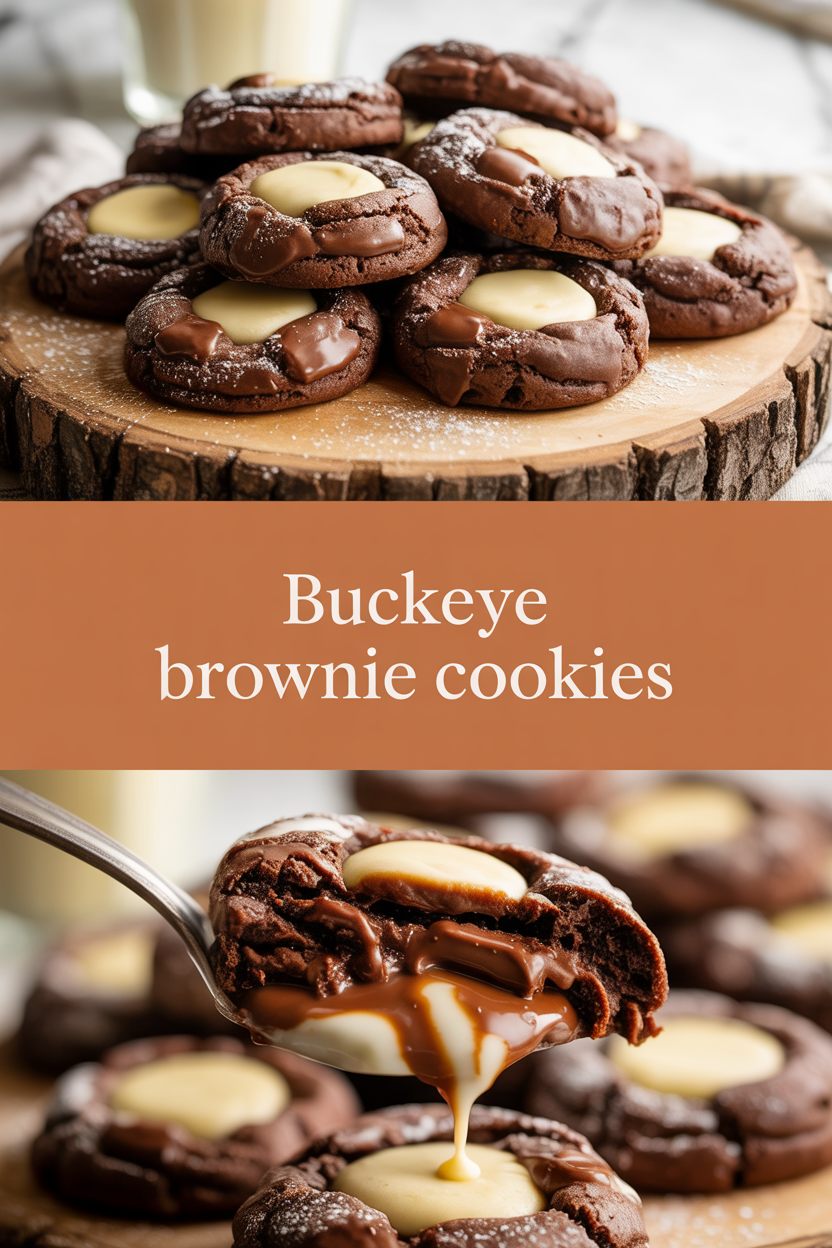
Chef’s secret time: tuck this one in your back pocket for when you want brownie intensity in cookie form. I stumbled on this trick while experimenting with too-soft brownies — melt the butter, use less flour, and treat each cookie like a mini brownie pan. The result? Dense, fudgy centers with crisp, crackly edges that smell like melted chocolate and rainy afternoons. The real kicker: a little peanut butter “buckeye” surprise pressed into the warm center turns these into oozy, buttery pockets of nostalgia. I’ll show you the shortcut for an irresistible filling so you don’t have to temper chocolate or roll tiny truffles unless you want to — though you absolutely can.
Quick Facts
- Yield: Serves 24 (about 24 cookies)
- Prep Time: 15 minutes
- Cook Time: 10–12 minutes per batch
- Total Time: 30–40 minutes
Why This Recipe is Awesome
This recipe gives you brownie flavor with cookie convenience — fudgy middle, slightly crisp edges, and a chewy bite in between. It’s so easy even your oven can’t mess it up. Who doesn’t love a cookie that smells like cocoa and butter as it bakes? The peanut butter “buckeye” center makes each cookie feel like a tiny celebration. Plus, they travel well for parties, and they look fancy with almost zero effort.
Ingredients
For the Main Dish:
- 1/2 cup (1 stick) unsalted butter, melted and slightly cooled
- 3/4 cup granulated sugar
- 1/4 cup packed brown sugar
- 1 large egg, room temperature
- 1 tsp pure vanilla extract
- 3/4 cup all-purpose flour
- 1/2 cup unsweetened cocoa powder
- 1 tbsp cornstarch (for tenderness)
- 1/2 tsp baking powder
- 1/2 tsp fine salt
- 1 cup semi-sweet chocolate chips (or chopped chocolate)
- Optional: flaky sea salt for finishing
For the Sauce / Garnish (optional):
- Quick peanut-butter “buckeye” filling: 1/2 cup creamy peanut butter, 3/4 cup powdered sugar, 1 tbsp unsalted butter, softened — mix until smooth (or use 24 mini peanut butter cups for speed)
- 1/2 cup chocolate chips, melted for drizzling (optional)
How I Make It
Step 1:
Preheat your oven to 350°F. Line a baking sheet with parchment or a silicone mat. In a medium bowl, whisk the melted butter, granulated sugar, and brown sugar until glossy — the sugars dissolve into the butter and you’ll smell that warm, buttery sweetness right away. Add the egg and vanilla and whisk until smooth.
Step 2:
In another bowl, whisk together the flour, cocoa powder, cornstarch, baking powder, and salt. Fold the dry mix into the wet mix with a spatula until just combined — don’t overwork it. Stir in the chocolate chips. The dough will be thick and glossy, like brownie batter.
Step 3:
Scoop rounded tablespoons of dough (I use a #40 cookie scoop) about 2 inches apart on the prepared sheet. The dough will spread a bit but stay domed. Bake for 10–12 minutes until the edges set and the centers still look slightly jiggly — you want that fudgy core. Your kitchen will smell like chocolate heaven.
Step 4:
Right when the cookies come out, press a small well into each cookie with the back of a spoon. If you use the quick filling, spoon about 1 tsp into each well; if you prefer mini peanut butter cups, press one on top of each warm cookie and they’ll sink in slightly and soften. The contrast between the warm cookie and cool peanut butter is delightful.
Step 5:
Let the cookies cool on the sheet for 5–8 minutes to set the base, then transfer to a wire rack. If you want a glossy finish, drizzle with melted chocolate or sprinkle flaky sea salt. Serve slightly warm for melty centers, or room temperature for firmer, sliceable cookies.
Pro Tips
- Use melted butter for that fudgy brownie texture; don’t skip it. If you chill the dough, let it come close to room temp before scooping so it spreads properly.
- If you like ultra-fudgy centers, pull the cookies at the shorter end of the bake time — 10 minutes instead of 12 — they’ll finish as they cool.
- Swap in mini peanut butter cups to save time. Press them onto warm cookies so they melt a touch and seal into the center.
- For extra shine on your drizzle, melt chocolate with a teaspoon of neutral oil or a bit of coconut oil.
Common Mistakes to Avoid
- Skipping preheating: Classic rookie move. It changes texture and bake time.
- Overmixing: Leads to dense or chewy results. Mix until just combined.
- Guessing cook time: Always use visual cues or a timer, not just vibes.
- Overcrowding pans: Give your food some breathing room to crisp properly.
Alternatives & Substitutions
- Nut-free: use sunflower seed butter instead of peanut butter; it tastes surprisingly similar and keeps the texture.
- Gluten-free: replace all-purpose flour with a 1:1 gluten-free flour blend — cookie texture stays fudgy, but watch bake time closely.
- Dairy-free: use vegan butter and dairy-free chocolate chips. Flavor stays rich, but expect a slightly different melt.
- Reduce sugar: cut granulated sugar to 1/2 cup if you prefer less sweet; the brownie flavor still comes through.
Variations & Tips
- Add a teaspoon of instant espresso powder to the dry mix for deeper chocolate flavor (adult-level complexity!).
- Stir in chopped toasted pecans or walnuts for crunch and nuttiness.
- Make them peanut-butter-less by swirling melted Nutella or almond butter into the center.
- Turn them into bars: press the full dough into an 8×8 pan and bake for 18–22 minutes, then add the buckeye filling before chilling.
- Make them festive: top with rainbow sprinkles or crushed pretzels for a sweet-salty twist.
- Create a salted-buckeye: sprinkle flaky sea salt on top right after the chocolate sets for contrast.
FAQ (Frequently Asked Questions)
- Can I make this ahead of time?
- Yes! Bake and store cooled cookies in an airtight container for up to 3 days at room temp, or freeze for up to 3 months. If filled, freeze unfilled cookies and add the fresh peanut butter filling when you thaw.
- Can I double the recipe?
- Sure thing. Bake in batches on two sheets or rotate sheets halfway through baking. If you double, you may need a second mixing bowl and an extra minute or two per batch depending on your oven load.
- Can I substitute butter with oil?
- Technically yes, but you’ll miss that buttery magic. Use ¾ the amount of oil (so 6 tbsp instead of 8 tbsp) and expect slightly different texture and flavor.
- How do I know it’s done?
- Look for set, slightly crisp edges and a center that still jiggles a little when you nudge the sheet. The cookies continue to firm as they cool; err on the side of underbaking for fudgy results.
- What if I don’t have ingredient X?
- No panic. No cocoa? Use 6 oz of semi-sweet chocolate melted and reduce chips accordingly. No cornstarch? Use an extra tablespoon of flour for a slightly firmer cookie.
How I Like to Serve It
I serve these with a big mug of coffee or a glass of cold milk — they pair like old friends. They work for holiday cookie plates, casual cookie swaps, or sneaking a warm one while you read on the couch. For parties, arrange them on a platter with a small bowl of extra peanut butter for dunking. In winter, they feel cozy; in summer, they still disappear at picnics.
Notes
- Store in an airtight container at room temperature for up to 3 days, or freeze for up to 3 months. Thaw at room temp and rewarm briefly in a 350°F oven for 3–4 minutes if you like them warm.
- No meat here, so no internal safe-temp notes. Just enjoy!
Final Thoughts
Closing: Now go impress someone — or just yourself — with your homemade Buckeye Brownie Cookies. Make a double batch; trust me, they vanish fast.