
I promise you, I did not grow up chewing bubblegum like it was a food group — but I did grow up fascinated by pink desserts that smelled like Saturday mornings. This recipe came from that goofy kitchen curiosity: what if fudge went to a bubblegum-themed birthday party and came back wearing a cloud? It’s playful, very pink, and honestly a little ridiculous in the best way. If you like fluffy textures, sweet nostalgic flavor, and a dessert that makes people grin before they even taste it, this Bubblegum Cloud Fudge is your jam. It’s fast, no-fuss, and perfect for kids’ parties or whenever you need a sugar-sparkle pick-me-up.
Quick Facts
- Yield: Serves 16
- Prep Time: 15 minutes
- Cook Time: 10 minutes (mostly melting)
- Total Time: 145 minutes (includes 2 hours chilling)
Why This Recipe is Awesome
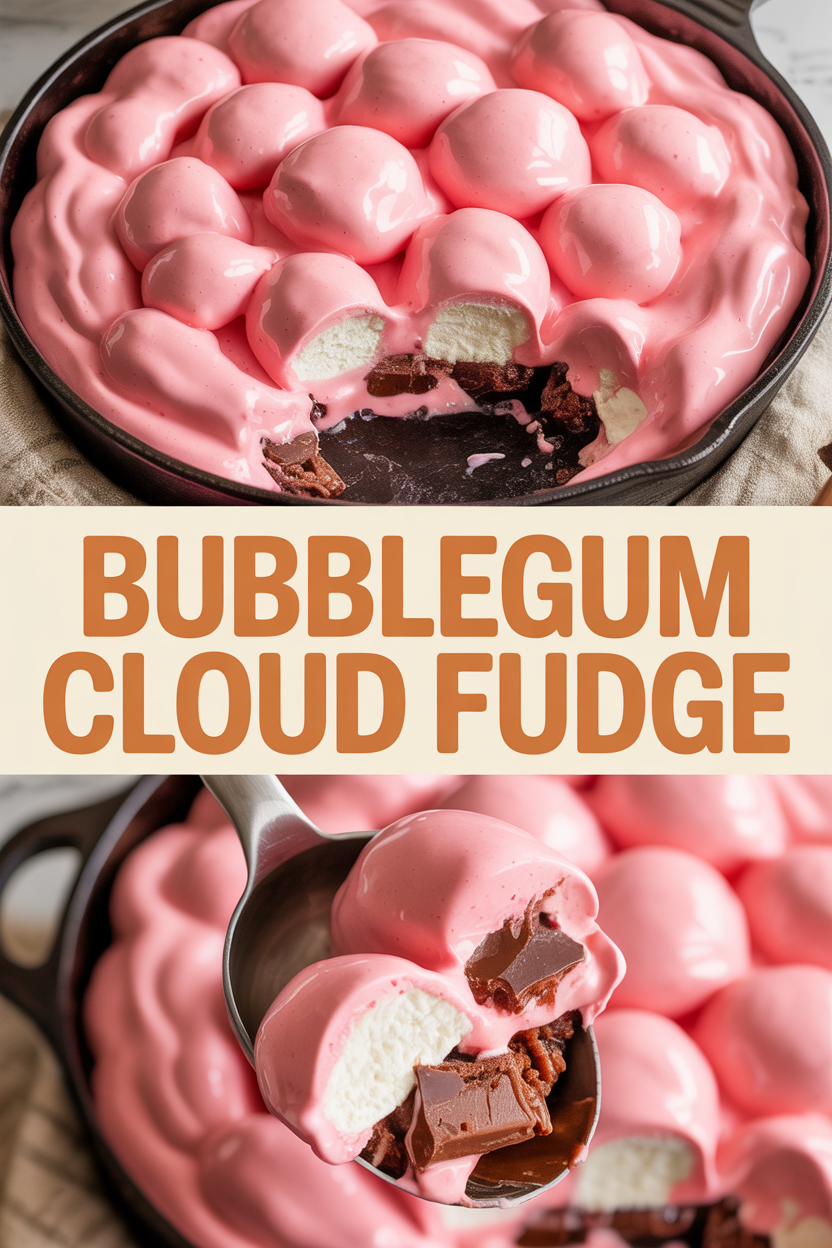
This fudge tastes like a pastel daydream and feels like biting into a soft, chewy cloud. It’s creamy from the white chocolate, airy from the marshmallow fluff, and pops with that unmistakable nostalgic bubblegum flavor. It’s so easy even your blender can’t mess it up, and it sets up firm enough to cut into neat squares while still being pillowy on the tongue. Make this when you want a fun, show-stopping treat that doubles as a conversation starter.
Ingredients
For the Main Dish:
- 2 cups white chocolate chips or chopped white baking chocolate
- 1 (14 oz) can sweetened condensed milk
- 1/4 cup unsalted butter
- 1 cup marshmallow fluff (marshmallow creme)
- 1 tsp bubblegum extract (or 1 tsp vanilla + 1/4 tsp banana extract)
- 1/2 tsp pure vanilla extract
- Pinch of salt
- 2–3 drops gel pink food coloring (adjust for color)
- Optional: 1/4 cup chopped bubblegum-flavored candies or pink sanding sugar for topping
For the Sauce / Garnish (if applicable):
- Sprinkle with extra pink sanding sugar or drizzle with melted white chocolate for a glossy top.
How I Make It
Step 1:
Line an 8×8-inch pan with parchment paper, letting the edges hang over for easy removal. In a medium, heavy-bottomed saucepan over low heat, combine the white chocolate chips, 1 can sweetened condensed milk, and 1/4 cup unsalted butter. Stir constantly with a heatproof spatula so the chocolate melts smoothly and doesn’t stick. You want glossy, silky liquid — think satin ribbons of white chocolate. Keep the heat gentle; scorched white chocolate smells sharp and grainy.
Step 2:
Once the chocolate melts, remove the pan from heat and immediately whisk in the 1 cup marshmallow fluff until it blends and creates a slightly airy texture. Add the 1 tsp bubblegum extract, 1/2 tsp vanilla, and a pinch of salt. Stir until the mixture becomes toothsome and fluffy. Add 2–3 drops gel pink food coloring and fold until you have a soft cotton-candy pink. Taste and adjust the bubblegum extract by small increments — that flavor gets assertive fast.
Step 3:
Pour the fudge batter into the prepared pan. Use an offset spatula to smooth the top — if you love texture, swirl the top with a spoon for cloud-like peaks. Sprinkle with chopped bubblegum candies or pink sanding sugar for sparkle. At this point, the kitchen smells like sweet vanilla clouds and that nostalgic bubblegum candy — I always breathe in and smile.
Step 4:
Chill the pan in the refrigerator for at least 2 hours, or until the fudge firms up and the edges pull slightly away from the parchment. I like to press a piece of plastic wrap gently on the surface after 1 hour to prevent any drying if my fridge air runs dry. When the fudge feels set and gives a slight spring when pressed, it’s ready to cut.
Step 5:
Lift the fudge from the pan using the parchment overhang and slice into 16 squares with a sharp knife. For clean cuts,Warm the knife under hot water, dry it, and slice — wiping between cuts keeps lines tidy. Arrange on a plate and watch the smiles start. Serve chilled or at cool room temperature.
Pro Tips
- Use gel food coloring for vibrant pink with less liquid — a tiny dab goes a long way.
- Keep heat low while melting the white chocolate; high heat makes it seize and turn grainy.
- If you can’t find bubblegum extract, mix 1 tsp vanilla + 1/4 tsp banana extract for a similar nostalgic vibe.
- For cleaner slices, chill the pan until very firm, then warm the knife under hot water between cuts.
Common Mistakes to Avoid
- Skipping preheating: Classic rookie move. It changes texture and bake time.
- Overmixing: Leads to dense or chewy results. Mix until just combined.
- Guessing cook time: Always use visual cues or a timer, not just vibes.
- Overcrowding pans: Give your food some breathing room to crisp properly.
Alternatives & Substitutions
- Swap white chocolate for dairy-free white chocolate chips to make it dairy-free — texture stays similar but flavor softens.
- Replace marshmallow fluff with 1 cup finely chopped marshmallows melted gently; the fudge will be slightly chewier.
- Use coconut milk sweetened condensed milk (available canned) for a dairy-free version; expect a light coconut note.
- For a gluten-free safe treat, check all labels (most ingredients here are naturally gluten-free), and avoid candy toppings with gluten-containing starches.
Variations & Tips
- Make it sparkly: fold in rainbow nonpareils for a circus-themed fudge (add after removing from heat).
- Chocolate swirl: melt 1/4 cup dark chocolate and ripple through the pan before chilling for a marbled look.
- Adult twist: stir in 1 tbsp cream liqueur (like Frangelico) for grown-up party fudge.
- Mini marshmallow-studded: press a handful of mini marshmallows onto the top before chilling for extra cloud texture.
- Kid-friendly: add tiny edible eyes and make each square a bubblegum creature at birthday parties.
FAQ (Frequently Asked Questions)
- Can I make this ahead of time?
- Yes! Make it up to 3 days ahead and store airtight in the refrigerator. Bring to cool room temperature before serving so flavors open up.
- Can I double the recipe?
- Sure thing. Use a 9×13-inch pan and increase chill time slightly. Keep stirring time the same; work in batches if your pot is small.
- Can I substitute butter with oil?
- Technically yes, but you’ll miss that buttery magic. Use ¾ the amount of neutral oil, and expect a slightly different mouthfeel.
- How do I know it’s done?
- When the fudge sets, it should feel firm to the touch and slice cleanly. The surface will lose its wet sheen and the edges will pull away from the pan slightly.
- What if I don’t have ingredient X?
- If you lack bubblegum extract, use vanilla + a tiny bit of banana or fruit extracts. No marshmallow fluff? Melt mini marshmallows into the warm chocolate mixture until smooth.
How I Like to Serve It
I often plate a few fancy squares with coffee or a cold milk glass for kids’ parties. It makes a fantastic topping on simple cupcakes (press a cube into the frosting) or cut into small bite-size pieces for dessert tables. In summer, I keep it chilled and serve it with tart raspberries to balance the sweetness.
Notes
- Store airtight in the refrigerator for up to 5 days. Freeze up to 1 month in a sealed container, thaw in the fridge before serving.
- This recipe doesn’t include meat, so no safe cooking temp applies here — just keep your fridge at 40°F or below for storage safety.
Final Thoughts
Closing: Go ahead — whip up a batch, admire the ridiculous pink, and watch people light up. Now go impress someone — or just yourself — with your homemade masterpiece!