
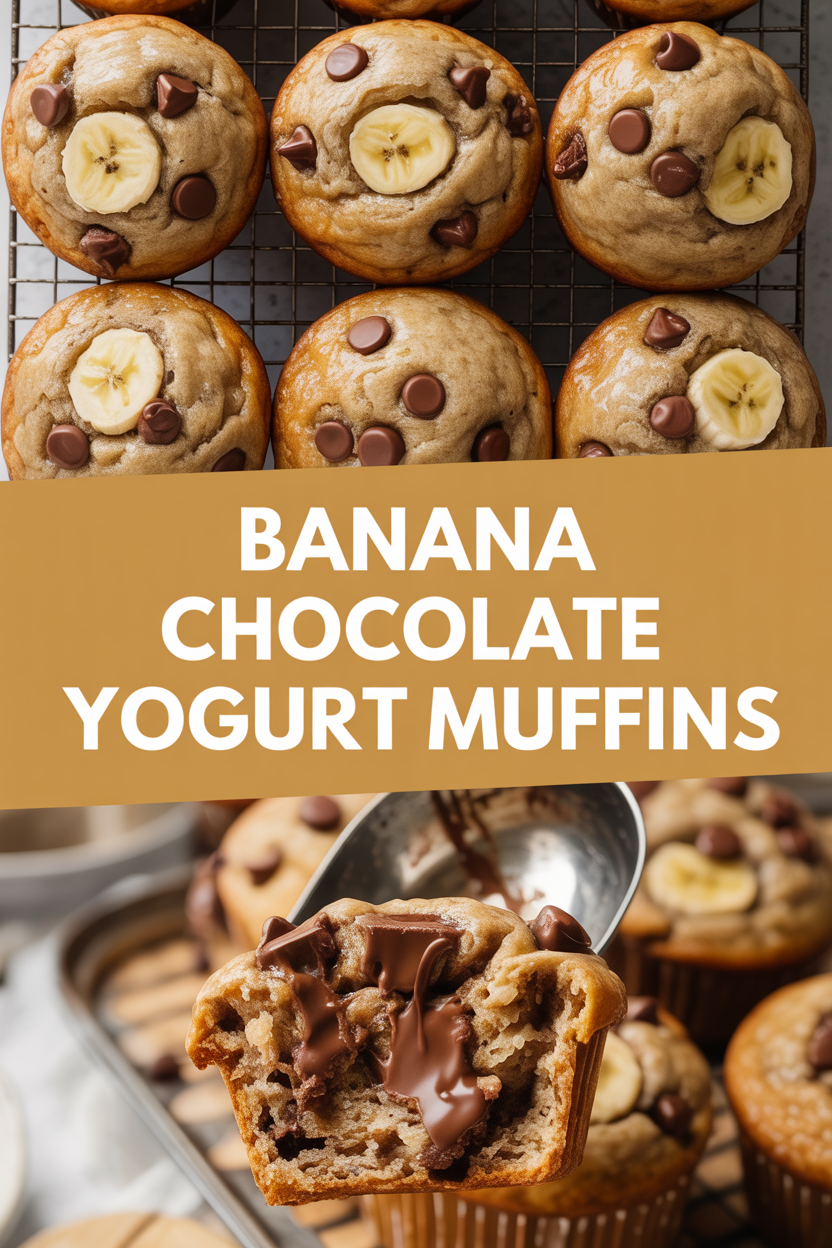
I promise I don’t usually try to bribe people with baked goods, but these Banana Chocolate Yogurt Muffins are dangerously good — and yes, I will use them to win favors. I threw together this recipe on a sleepy Sunday morning when three overripe bananas and a tub of yogurt stared at me like they’d both committed to a life of muffins. The result tastes like a cozy hug with a chocolate smile: tender crumb, little pockets of molten chocolate, and a hint of tang from the **yogurt** that keeps them from being cloying. They smell like warm caramel and cocoa, and you’ll hear gentle cracks as the tops finish baking — music to any baker’s ears.
Quick Facts
- Yield: Serves 12 muffins
- Prep Time: 15 minutes
- Cook Time: 18–22 minutes
- Total Time: 35–40 minutes
Why This Recipe is Awesome
These muffins give you the best parts of banana bread — soft, banana-scented crumb and caramelized edges — but in a quicker, grab-and-go muffin form. The **Greek yogurt** keeps them moist and gives a subtle tang that balances the sweet chocolate. They bake up with golden domes and slightly crisp tops; who doesn’t love crispy edges with a tender center? And honestly, they’re so forgiving that even if your bananas look more like mush than fruit, they still turn out great. It’s so easy even your oven can’t mess it up.
Ingredients
For the Main Dish:
- 1 1/2 cups all-purpose flour
- 1/2 cup granulated sugar
- 1/4 cup brown sugar, packed
- 1 tsp baking powder
- 1/2 tsp baking soda
- 1/2 tsp fine salt
- 2 large very ripe bananas, mashed (about 1 cup)
- 1/2 cup plain Greek yogurt
- 1 large egg, room temperature
- 1/3 cup unsalted butter, melted and slightly cooled (or 1/4 cup neutral oil)
- 1 tsp vanilla extract
- 3/4 cup semi-sweet chocolate chips (or chopped chocolate)
- Optional: 2 tbsp chopped walnuts or pecans
For the Sauce / Garnish (if applicable):
- Optional: extra chocolate chips for sprinkling, a light dusting of powdered sugar, or a drizzle of melted chocolate.
How I Make It
Step 1:
I start by preheating the oven to 375°F and lining a 12-cup muffin tin with paper liners or giving it a light spray. In a large bowl I whisk together the dry ingredients: flour, sugars, baking powder, baking soda, and salt. The dry mix smells faintly sweet and powdery, like the promise of warm baked things.
Step 2:
In a separate bowl I mash the bananas until mostly smooth (leave a few small lumps for texture) and stir in the Greek yogurt, egg, melted butter, and vanilla until glossy. The yogurt adds a creamy sheen and the batter smells buttery and sweet. Pour the wet into the dry and fold gently with a spatula — stop when you still see a few streaks of flour. Overmixing makes muffins tough; I always tell myself “streaks are okay.”
Step 3:
Fold in 3/4 cup chocolate chips and the optional nuts. The batter will be thick and ribbon-y. Spoon it into the muffin cups, filling each about 3/4 full; I like to press a couple of extra chocolate chips on top so they melt into shiny puddles on the domes. Slide the tray into the oven and bake for 18–22 minutes, rotating once halfway through if your oven runs hot. You’ll smell rich banana and warm chocolate about 10 minutes in — that’s when my kitchen starts to cheer.
Step 4:
Check doneness by inserting a toothpick near the center; it should come out with a few moist crumbs, not raw batter. The tops should blush golden and give a tiny crack when tapped. If you leave them an extra minute or two, you’ll get crispier edges — great for dunking in coffee. Let the muffins rest in the pan for about 5 minutes, then transfer them to a rack to cool slightly so the centers set but still stay tender.
Step 5:
Once they’re cool enough to handle, enjoy warm or at room temperature. Sprinkle with powdered sugar or drizzle melted chocolate if you’re feeling fancy. These freeze beautifully — I like to freeze singles for lunchbox emergencies, then zap one in the microwave for 20–30 seconds when I want a quick treat.
Pro Tips
- Use very ripe bananas — the brown-speckled kind tastes much sweeter and gives more banana flavor.
- If you substitute oil for butter, use 1/4 cup oil instead of 1/3 cup butter to prevent greasiness.
- Don’t overfill muffin cups; they rise better and develop prettier tops when filled about 3/4 full.
- For evenly sized muffins, use a 3-tablespoon cookie scoop — it keeps your bake time consistent.
Common Mistakes to Avoid
- Skipping preheating: Classic rookie move. It changes texture and bake time.
- Overmixing: Leads to dense or chewy results. Mix until just combined.
- Guessing cook time: Always use visual cues or a timer, not just vibes.
- Overcrowding pans: Give your food some breathing room to crisp properly.
Alternatives & Substitutions
- Use whole wheat pastry flour for a nuttier flavor; the muffins will be a touch denser and more wholesome.
- Swap semi-sweet chips for dark chocolate for deeper cocoa flavor, or milk chocolate for kid-friendly sweetness.
- Dairy-free option: use coconut or almond yogurt and swap butter for neutral oil; expect a slight change in texture and a hint of coconut or nuttiness.
- Gluten-free option: use a 1:1 gluten-free flour blend and add 1/4 tsp xanthan gum if the blend lacks it; texture stays moist but a bit crumbly.
Variations & Tips
- Nut-free: omit nuts and add 2 tbsp sunflower seeds for crunch.
- Peanut butter swirl: drop 1 tsp peanut butter on top of each muffin and swirl with a toothpick before baking.
- Chocolate banana oat: replace 1/4 cup flour with rolled oats for chew and fiber.
- Mini muffins: bake at 350°F for 10–12 minutes for bite-sized treats — perfect for parties.
- Creative twist: fold in 1/2 cup chopped dried cherries for a sweet-tart contrast to the chocolate.
FAQ (Frequently Asked Questions)
- Can I make this ahead of time?
- Yes! Bake the muffins and store them in an airtight container at room temperature for up to 2 days or in the fridge for up to 5 days. Freeze cooled muffins for up to 2 months; thaw and warm in the microwave for 20–30 seconds.
- Can I double the recipe?
- Sure thing. Use two muffin tins or bake in batches. If you double, keep the same bake time per tin; don’t crowd the oven.
- Can I substitute butter with oil?
- Technically yes, but you’ll miss that buttery magic. Use ¾ the amount of oil.
- How do I know it’s done?
- You’ll see golden tops with a slight crack and a toothpick will come out with moist crumbs (not raw batter). The muffins should spring back when gently pressed.
- What if I don’t have ingredient X?
- No panic: swap Greek yogurt for sour cream or plain yogurt (same amount). If you lack baking powder, use 1/4 tsp baking soda plus 1/2 tsp cream of tartar per teaspoon of baking powder needed.
How I Like to Serve It
I love these muffins warm with a smear of butter and a big mug of coffee for lazy weekend mornings. They work great for lunchboxes alongside apple slices, or sliced in half and toasted for a quick breakfast sandwich with a smear of peanut butter. For a casual brunch, serve on a platter with fresh berries and yogurt — they brighten the table and please both kids and grown-ups.
Notes
- Store leftover muffins in an airtight container for up to 5 days in the fridge or freeze for up to 2 months. Reheat frozen muffins in the microwave for 20–30 seconds.
- These are not meat dishes, so no safe cooking temperature note needed here — just bake until the centers set.
Final Thoughts
Closing: Go make a batch and let your kitchen smell like a hug — then share (or don’t). Now go impress someone — or just yourself — with your homemade masterpiece!