
Alright, I’m going to be honest — there’s something downright magical about biting into baked teriyaki chicken that’s just been pulled from the oven, with that golden, caramelized crust teasing your taste buds. The sweet and salty glaze bubbles as it sticks to the chicken, and the kitchen instantly fills with a mouthwatering aroma that makes it impossible to wait. This isn’t just any dinner; it’s a little celebration right at home, and the best part? It’s so simple you’ll wonder why you haven’t made it sooner. Trust me, once you try this baked teriyaki chicken with its crispy edges and juicy center, it’ll soon become your go-to recipe for weeknights or impressing guests without breaking a sweat.
Quick Facts
- Yield: Serves 4
- Prep Time: 10 minutes
- Cook Time: 25 minutes
- Total Time: 35 minutes
Why This Recipe is Awesome
This baked teriyaki chicken hits all the right notes — crispy, golden edges meet a sticky, flavorful sauce that’s equal parts sweet and savory. It’s ridiculously easy to pull together, so even if you’re juggling a million things, your oven’s got your back. Plus, the texture game is on point: tender, juicy chicken underneath that crave-worthy crust. No fancy ingredients, just pure deliciousness. Honestly, it’s so good, you’ll be sneaking bites before it even cools down.
Ingredients
For the Main Dish:
- 4 boneless, skinless chicken thighs (about 1.5 lbs)
- 1 tbsp vegetable oil (or any neutral oil)
- Salt and black pepper, to taste
For the Teriyaki Sauce:
- ½ cup low-sodium soy sauce
- ¼ cup brown sugar (packed)
- 2 tbsp honey
- 2 tsp rice vinegar (or apple cider vinegar)
- 1 clove garlic, minced
- 1 tsp fresh ginger, grated (or ½ tsp ground ginger)
- 1 tbsp cornstarch mixed with 2 tbsp cold water (slurry)
How I Make It
Step 1:
First things first — preheat your oven to a sizzling 425°F. Meanwhile, pat your chicken dry with paper towels (this makes all the difference for a crisp crust) and season both sides with a pinch of **salt and black pepper**. Place them on a plate and set aside.
Step 2:
In a skillet over medium heat, warm up **1 tbsp vegetable oil** until shimmering but not smoking. Toss the chicken thighs in, skin side down if you have skin on, and let them sizzle for about 3–4 minutes until those edges turn golden brown and irresistible. You’ll start smelling that toasty aroma — so good! Flip and sear the other side for just another 2 minutes. This step locks in moisture and starts that gorgeous crust forming. Don’t rush; patience pays off here.
Step 3:
While the chicken’s searing, whisk together your **soy sauce, brown sugar, honey, rice vinegar, garlic, and ginger** in a small saucepan. Turn the heat to medium-low and let the sauce gently bubble. After about 4 minutes, stir in your **cornstarch slurry** to thicken it up — watch as it transforms into a shiny, sticky glaze that’ll make your mouth water. When it coats the back of your spoon, it’s ready!
Step 4:
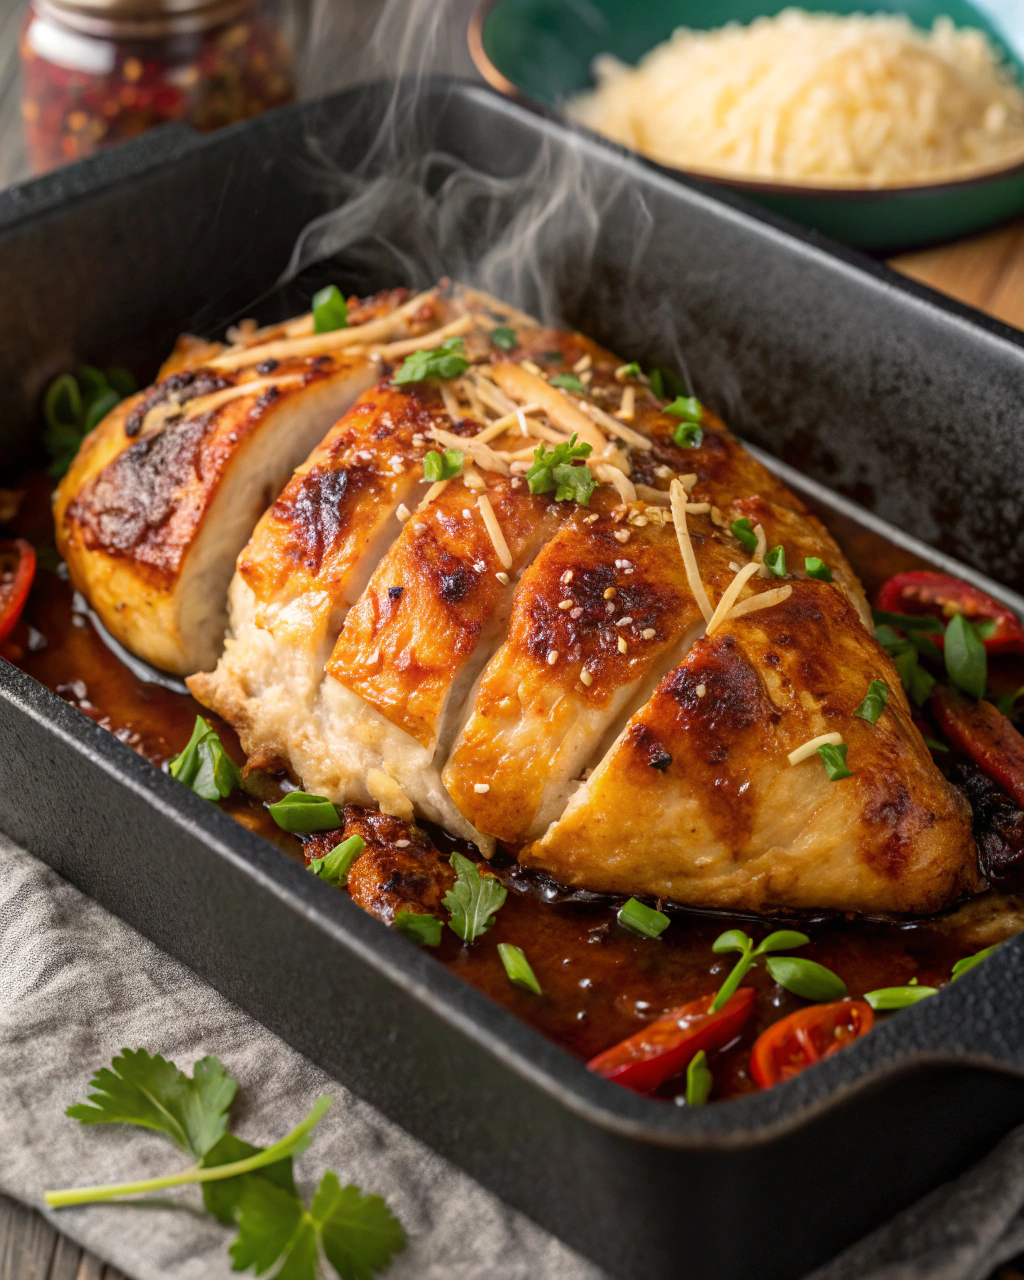
Transfer the seared chicken thighs into a baking dish and pour that luscious teriyaki sauce over the top, making sure each piece is well coated. Pop the dish into your preheated 425°F oven and bake for about 15-20 minutes. You’re looking for the sauce to bubble and thicken even more, and for the chicken to reach an internal temperature of **165°F** — juicy, tender, and sticky-sweet.
Step 5:
Once out of the oven, let the chicken rest for 5 minutes so the juices redistribute (and the sauce settles into that perfect glossy layer). Sprinkle with some chopped green onions or sesame seeds for a little extra flair — optional but highly recommended. Serve it up with steamed rice or crunchy veggies and get ready for compliments.
Pro Tips
- Dry chicken skin or thighs thoroughly before searing — moisture is the enemy of crispiness.
- Use a cast-iron skillet if you have one; it gets hotter and gives a better sear.
- If you want extra sticky sauce, reserve a bit before baking and brush on after cooking for double the glaze!
- Letting the chicken rest after baking makes it juicier, so don’t skip it.
Common Mistakes to Avoid
- Skipping preheating: Classic rookie move. It changes texture and bake time.
- Not drying chicken: This makes searing soggy instead of crisp.
- Overcrowding pans: Give your food some breathing room to crisp properly.
- Guessing cook time: Always use visual cues or a timer, not just vibes.
Alternatives & Substitutions
- Swap chicken thighs for chicken breasts (just reduce baking time—they cook faster).
- Use tamari or coconut aminos for a gluten-free soy sauce alternative.
- For a dairy-free option, this recipe is naturally free of dairy — yay!
- Substitute honey with maple syrup or agave nectar for a vegan twist.
Variations & Tips
- Add a splash of sriracha or chili flakes for a spicy kick.
- For a kid-friendly version, reduce the garlic and ginger slightly.
- Try marinating the chicken an hour before baking for deeper flavor.
- Add toasted sesame seeds and thinly sliced red chili peppers for a restaurant vibe.
- Swap chicken for firm tofu slices, pressing first, for a vegetarian meal.
FAQ (Frequently Asked Questions)
- Can I make this ahead of time?
- Absolutely! Prepare and sear the chicken, then store it covered in the fridge for up to 24 hours. When ready, bake with sauce as directed. Leftovers reheat beautifully in the oven or air fryer to keep that crust crisp.
- Can I double the recipe?
- Definitely. Just use a larger baking dish or two pans to avoid crowding, and keep an eye on bake time — it might need a few extra minutes.
- Can I substitute butter with oil?
- This recipe uses oil upfront for searing, so no butter needed here! But if you prefer butter for flavor, use ¾ the amount and watch for browning quickly.
- How do I know it’s done?
- Look for a bubbly, thickened sauce coating the chicken, golden edges, and juicy texture. The chicken should register an internal temp of 165°F for safe eating.
- What if I don’t have rice vinegar?
- Apple cider vinegar or even a mild white wine vinegar works fine — just use the same amount to keep the flavor balanced.
How I Like to Serve It
I love serving this baked teriyaki chicken over fluffy jasmine rice or sticky white rice to soak up all the sauce. Steamed broccoli or snap peas add a refreshing crunch, and a cold glass of crisp white wine or ginger tea pairs perfectly. It makes a fantastic weeknight dinner that feels special without a lot of fuss, but it’s also great for potlucks or casual weekend gatherings. Plus, this dish warms you up on a chilly night or brightens up a summer dinner with its sticky-sweet goodness.
Notes
- Store leftovers in an airtight container in the fridge for up to 3 days — reheat in the oven at 350°F to retain crispiness.
- Always cook chicken to an internal temperature of 165°F for safety.
Final Thoughts
Now go impress someone — or just yourself — with your homemade masterpiece!