
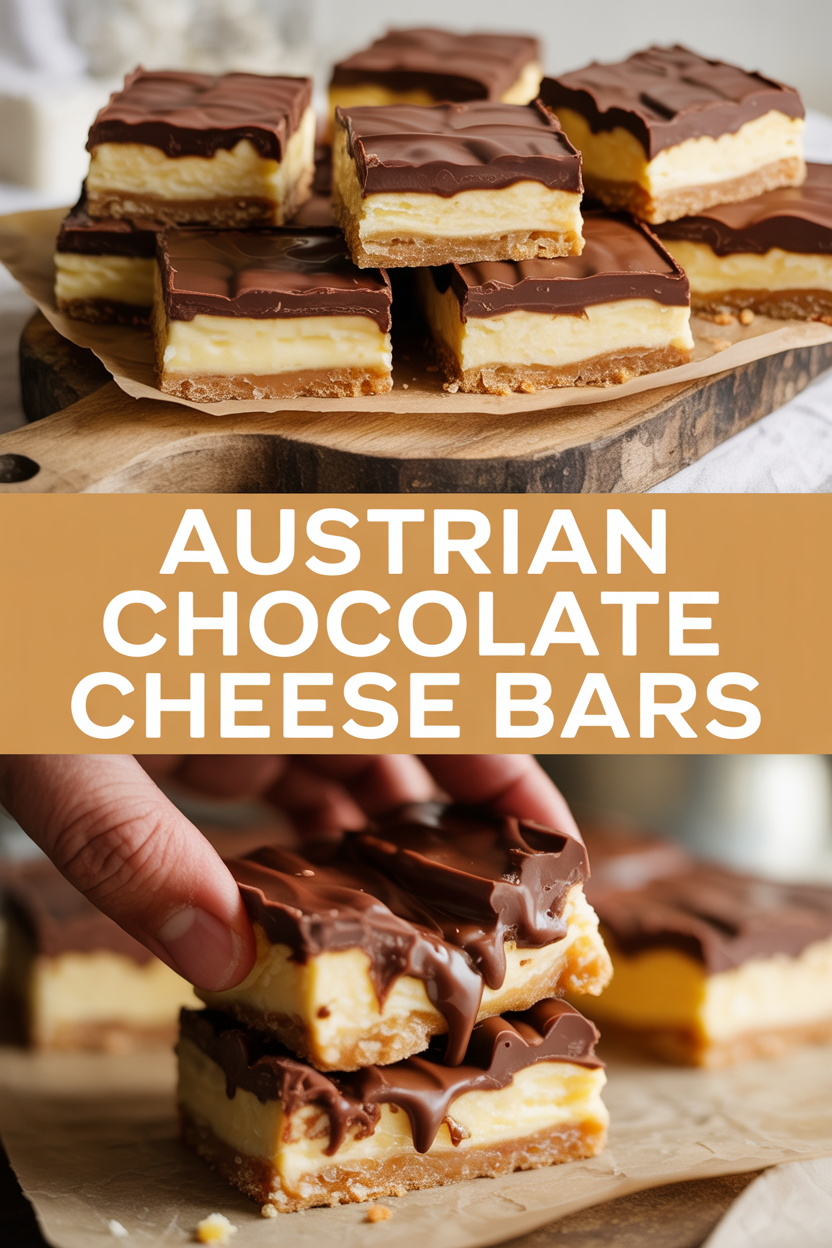
Cozy kitchen alert: this recipe smells like a Sunday afternoon in my childhood living room — the kind where the radio hummed softly and someone always hovered near the oven waiting for a taste. I learned to make these Austrian Chocolate Cream Cheese Bars from a family friend who folded chocolate into cream cheese like it was the most natural thing in the world. The crust comes out nutty and tender, the filling stays silky and slightly tangy, and the top sets with a glossy, chocolatey sheen that makes everyone reach for a fork before the bars cool. These bars warm the hands and the mood — perfect with a mug of coffee and a soft blanket.
Quick Facts
- Yield: Serves 12
- Prep Time: 20 minutes
- Cook Time: 35 minutes
- Total Time: 55 minutes
Why This Recipe is Awesome
Why make these? Because they deliver a buttery, slightly crumbly chocolate crust with a silky, tangy chocolate-cream-cheese center that contrasts like a dream. Texture? Creamy center, crisp edges. Taste? Deep cocoa with a gentle cream cheese tang. They feel fancy but behave like a weekday treat. Plus, they handle well in a lunchbox or at a potluck — which wins every time. It’s so easy even your oven can’t mess it up.
Ingredients
For the Main Dish:
- 1 1/4 cups all-purpose flour
- 1/2 cup unsweetened cocoa powder (plus extra for dusting)
- 1/2 cup granulated sugar
- 1/2 tsp kosher salt
- 3/4 cup (6 tbsp) unsalted butter, cold and cubed
- 8 oz cream cheese, room temperature
- 3/4 cup packed light brown sugar
- 2 large eggs
- 1 tsp pure vanilla extract
- 4 oz semi-sweet chocolate, chopped or chips
- 1/4 cup sour cream (or plain Greek yogurt)
For the Sauce / Garnish (if applicable):
- 2 tbsp heavy cream + 2 tbsp chocolate chips — melted together for a glossy drizzle (optional)
- Powdered sugar or a light dusting of extra cocoa for presentation (optional)
How I Make It
Step 1:
Preheat your oven to 350°F. Line an 8×8-inch pan with foil or parchment, leaving a little overhang to lift the bars out later. I toss the flour, cocoa, granulated sugar, and salt in a bowl, then cut in the cold butter with a pastry cutter or two forks until the mix looks like coarse crumbs. Press most of this mixture into the bottom of the pan to form a firm crust — save a couple of tablespoons for a crumble topping. That first press always feels satisfying, like tucking the edges of a blanket around a pie.
Step 2:
Beat the cream cheese with the brown sugar until smooth and sigh-inducing, about 1–2 minutes. Add the eggs one at a time and stir in the vanilla. Melt the chopped chocolate gently in a microwave-safe bowl in 20-second bursts, stirring between bursts, until shiny and smooth. Fold the melted chocolate and the sour cream into the cream cheese mixture until silky. Tip: if the chocolate is too hot, the cream cheese can get lumpy — let it cool slightly first.
Step 3:
Pour the chocolate-cream-cheese filling over the crust and spread it evenly with a spatula. Sprinkle the reserved crust crumbs on top for a rustic look and a little crunch. Slide the pan into the oven and bake at 350°F for about 30–35 minutes — the center should jiggle slightly but not look raw. You’ll start to smell warm cocoa and caramelized edges about halfway through; that smell makes your oven stopwatch completely reasonable to ignore for 30 seconds.
Step 4:
Let the bars cool on a wire rack until they reach room temperature, then chill in the refrigerator for at least 2 hours to set. The chilling transforms the texture from soft to sliceable and gives those clean edges everyone loves. When you cut them, run a sharp knife under hot water and dry it between cuts for neat slices.
Step 5:
Warm the optional drizzle ingredients (chocolate chips + heavy cream) and stir until glossy, then drizzle over cold bars. Dust with powdered sugar or unsweetened cocoa if you like. Lift the bars out with the foil overhang, slice into 12 squares, and serve. These taste great chilled or at room temperature; the center stays creamy and delicious.
Pro Tips
- Chill the butter for the crust — it gives you that tender, shortbread-like crumb.
- Use room-temperature cream cheese to avoid lumps and to get a truly silky filling.
- If your filling cracks on top, don’t worry — chilling smooths the texture and fixing with a drizzle hides blemishes.
- Swap 1 tbsp instant espresso powder into the filling for a deeper chocolate flavor without tasting like coffee.
Common Mistakes to Avoid
- Skipping preheating: Classic rookie move. It changes texture and bake time.
- Overmixing: Leads to dense or chewy results. Mix until just combined.
- Guessing cook time: Always use visual cues or a timer, not just vibes.
- Overcrowding pans: Give your food some breathing room to crisp properly.
Alternatives & Substitutions
- Gluten-free: Use a 1:1 gluten-free flour blend in the crust — texture may be a touch more crumbly.
- Dairy-free: Replace butter with coconut oil and use dairy-free cream cheese; flavor shifts slightly toward coconut.
- Lower-sugar: Use a sugar substitute like erythritol for the crust and brown sugar alternative for the filling; the texture stays similar.
- Nutty crust: Replace 1/2 cup of flour with finely ground almonds for extra richness.
Variations & Tips
- Orange zest: Add 1 tsp of orange zest to the filling for a bright, festive twist.
- Nut topping: Sprinkle toasted chopped hazelnuts or almonds on top for crunch.
- Spicy chocolate: Add 1/4 tsp cinnamon and a pinch of cayenne to the filling for a warm kick.
- Almond joy version: Fold in 1/3 cup shredded coconut and top with toasted coconut flakes.
- Mini bars: Bake in a mini muffin tin for single-serve bites; reduce bake time by about 5–7 minutes.
FAQ (Frequently Asked Questions)
- Can I make this ahead of time?
- Yes! Bake the bars, cool them completely, and chill in an airtight container for up to 4 days. Freeze slices up to 1 month and thaw in the fridge overnight.
- Can I double the recipe?
- Sure thing. Use a 9×13-inch pan and expect a slightly longer bake time (about 40–45 minutes). Check the center for a gentle jiggle to know it’s done.
- Can I substitute butter with oil?
- Technically yes, but you’ll miss that buttery magic. Use ¾ the amount of oil and keep the crust firmly pressed so it holds together.
- How do I know it’s done?
- Look for set edges and a slightly jiggly center — not liquid, but a little movement when you shake the pan gently. The top may crack slightly; chilling smooths it and improves slicing.
- What if I don’t have ingredient X?
- Out of sour cream? Use plain Greek yogurt. No brown sugar? Mix granulated sugar with a tiny bit of molasses (1 tbsp molasses per 3/4 cup sugar) for that caramel note.
How I Like to Serve It
I serve these bars slightly chilled with a steaming cup of coffee or a scoop of vanilla ice cream on the side for an extra indulgent finish. They work as a cozy dessert after a weeknight dinner, or bring them to a potluck and watch them disappear. In winter they feel like a hug in dessert form; in summer, they pair surprisingly well with cold brew.
Notes
- Store leftover bars in an airtight container in the fridge for up to 4 days. Freeze for longer storage.
- No meat temps to worry about here — just patience while they chill for the cleanest slices.
Final Thoughts
Closing: Now go impress someone — or just yourself — with your homemade masterpiece!