
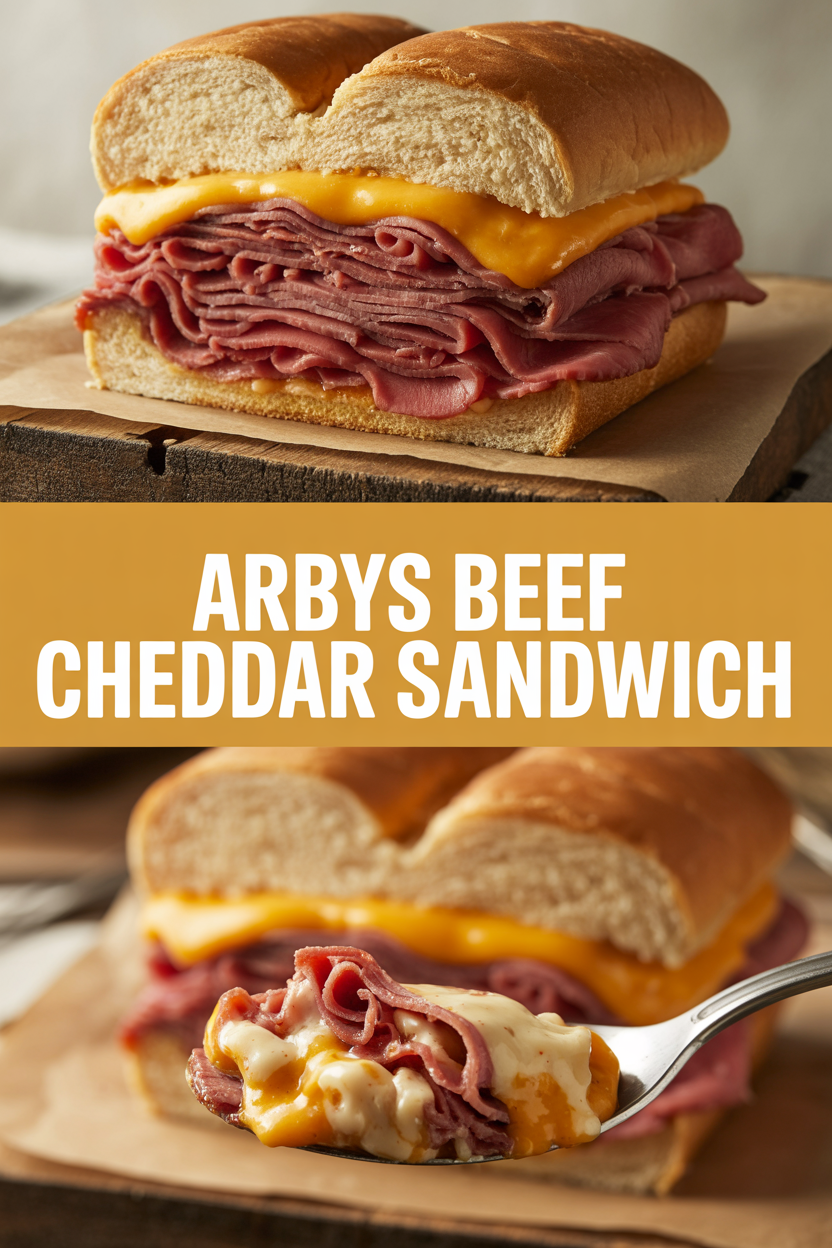
I once convinced my roommate that an entire gourmet meal lived inside a sandwich — and honestly, that claim holds up when I make this copycat Arby’s Beef & Cheddar. Picture this: thin, tender slices of **roast beef** piled high, a glossy, velvety **cheddar sauce** that oozes like sunshine, and an onion-topped roll that smells like nostalgia and slightly guilty pleasure. I’ll be honest — I stole a few tricks from fast-food science and added a couple of home-cook upgrades (hello, browned butter!). If you like melty cheese, savory beef, and a little drama when you cut into a sandwich, welcome: this is your new weekday hero.
Quick Facts
- Yield: Serves 2
- Prep Time: 10 minutes
- Cook Time: 10 minutes
- Total Time: 20 minutes
Why This Recipe is Awesome
This sandwich hits the comfort-food sweet spot: savory, slightly sweet onion roll, tender **roast beef**, and a silk-smooth **cheddar sauce** that stretches like a good hug. It delivers contrast — warm meat and sauce, slightly crisp toasted roll, and that tangy cheddar bite. It’s easy enough for a weeknight, yet luxe enough to impress guests. And seriously, who doesn’t love pulling apart a sandwich and hearing that little cheese stretch?
Ingredients
For the Main Dish:
- 8 oz thinly sliced **roast beef** (deli-style or leftover roast)
- 2 **onion rolls** (or 2 brioche/hamburger buns as substitutes)
- 1 tbsp **butter** (for toasting buns)
- Optional: 1/4 small **red onion**, thinly sliced
- Optional: 1/4 cup **crisp fried onions** or potato sticks for crunch
For the Sauce / Garnish (if applicable):
- 2 tbsp **unsalted butter**
- 2 tbsp **all-purpose flour**
- 1 cup **whole milk** (or 3/4 cup milk + 1/4 cup heavy cream for extra silk)
- 4 oz shredded **sharp cheddar cheese** (about 1 cup, packed)
- 1/4 tsp **mustard powder**
- Pinch **cayenne pepper** (optional)
- Salt and freshly ground black pepper, to taste
- Optional: 1 tsp **Worcestershire sauce** or 1 tbsp **beef au jus** for meaty depth
How I Make It
Step 1:
First, I make the cheese sauce. In a small saucepan over medium heat, I melt 2 tbsp butter until it foams and smells nutty — that little browned-butter note lifts the whole thing. I sprinkle in 2 tbsp flour and whisk for 30–45 seconds until it smells toasty. Slowly whisk in 1 cup milk, then stir until the mixture thickens, about 2–3 minutes. Turn the heat to low and whisk in 4 oz shredded sharp cheddar a handful at a time until glossy. Season with 1/4 tsp mustard powder, a pinch of cayenne, and salt and pepper. Taste and add 1 tsp Worcestershire if you want extra savory depth.
Step 2:
While the sauce comes together, I toast the rolls. I butter the cut sides with the remaining 1 tbsp butter and heat a skillet over medium-high heat. Toast the rolls cut-side down until they turn golden and make a satisfying little sizzle — about 1–2 minutes. That toasty, slightly crispy edge gives the sandwich texture and helps prevent sogginess.
Step 3:
Next, I warm the roast beef. I heat a clean skillet over medium heat, add the beef in a loose pile, and toss it for 1–2 minutes — you just want it warm and juicy, not dried out. If the beef seems dry, I splash 1 tbsp beef broth or water and stir; that keeps it tender. The kitchen fills with that meaty, irresistible aroma that makes everyone notice.
Step 4:
Assemble: I pile the warm roast beef onto the bottom bun, spoon a generous ladle of cheddar sauce over the meat, and top with thin red onion if using. For a melty finish, I place the open sandwiches on a baking sheet and **broil** them for 1–2 minutes until the sauce goes golden-bubbly. Watch closely — the broiler works fast. If you don’t want to broil, the hot beef will melt the sauce nicely too.
Step 5:
Finish by topping with the bun and adding crisp fried onions for crunch. Let the sandwich rest 1 minute so the sauce sets just enough to keep everything together. Cut in half and listen for that gratifying pull as cheese stretches. Serve immediately and try not to devour both sandwiches in a single sitting (no promises).
Pro Tips
- Use thinly sliced roast beef for the authentic melt; thicker cuts feel heavy. If you buy a roast, slice it thinly after chilling.
- If the sauce looks grainy, reduce heat and stir in a splash of milk — low heat and patience fix a lot of cheese sauce problems.
- Broil on the top rack and watch closely — cheese goes from perfect to burnt in 30 seconds.
- Make the sauce ahead and reheat gently over low heat, stirring to return it to a silky texture.
Common Mistakes to Avoid
- Skipping preheating: Classic rookie move. It changes texture and bake time.
- Overmixing: Leads to dense or chewy results. Mix until just combined.
- Guessing cook time: Always use visual cues or a timer, not just vibes.
- Overcrowding pans: Give your food some breathing room to crisp properly.
Alternatives & Substitutions
- Swap **roast beef** with thin-sliced turkey or leftover pulled pork — flavor changes but the build stays great.
- Use sliced cheddar instead of a sauce for a simpler version; you’ll lose the silk but gain speed.
- For dairy-free, use a vegan cheddar melt (store-bought), and pick a gluten-free roll; texture will vary but it still satisfies cravings.
- Swap whole milk for 2% in the sauce; it thins the sauce slightly but keeps it tasty.
Variations & Tips
- Spicy: Add 1 tsp sriracha to the cheddar sauce and top with pickled jalapeños.
- Kid-friendly: Skip the onions and use plain buns with extra cheddar sauce for a cheese-lover’s dream.
- Vegetarian twist: Replace roast beef with sliced, roasted portobello mushrooms or seitan and keep the cheddar sauce.
- Fancy: Add caramelized onions and a smear of horseradish mayo for a grown-up flavor punch.
- Crunch factor: Top with crispy fried onions or thin potato sticks for a nostalgic fast-food crunch.
- Au jus dip: Serve with warm beef broth seasoned with garlic for dunking — double comfort.
FAQ (Frequently Asked Questions)
- Can I make this ahead of time?
- Yes! Make the cheddar sauce up to 3 days ahead and store in an airtight container. Reheat gently over low heat, add a splash of milk, and whisk until smooth. Keep the rolls and beef separate and assemble right before serving for best texture.
- Can I double the recipe?
- Sure thing. Use a larger skillet to warm the beef in batches so it reheats evenly. If you broil multiple sandwiches, use two baking sheets and swap positions halfway through for even browning.
- Can I substitute butter with oil?
- Technically yes, but you’ll miss that buttery magic. Use ¾ the amount of oil.
- How do I know it’s done?
- Look for the cheese sauce to become glossy and smooth, and the toasted bun edges to turn golden. If you broil, watch for a golden-bubbly top — that’s your cue.
- What if I don’t have ingredient X?
- Short on sharp cheddar? Mix mild cheddar with 1 oz cream cheese to mimic tang and creaminess. No onion rolls? Toasted brioche or hamburger buns work great.
How I Like to Serve It
I serve this sandwich with crispy fries or a simple green salad dressed with lemon vinaigrette — the acidity cuts through the rich cheese. For dipping, I sometimes heat a small ramekin of beef au jus. It works as a cheeky weeknight main, and it shines at casual game-day spreads. In winter, the warm cheese and beef feel like a hug in sandwich form.
Notes
- Store leftover components separately: sauce in the fridge up to 3 days, beef up to 2 days. Reheat sauce gently and rewarm beef to 165°F for safety.
- If using raw-roast or home-roasted beef, slice thin and reheat to safe serving temperature; deli roast beef typically comes fully cooked.
Final Thoughts
Closing: Now go impress someone — or just yourself — with your homemade masterpiece! This Beef & Cheddar will make weeknights feel special and leftover roast feel like a superstar.