
I’ll be honest: these cookies show up at my kitchen like tiny edible excuses to procrastinate—because who plans to leave a tray of warm, chocolatey thumbprints alone? I made these once when I promised my neighbor I’d babysit her toddler and instead ended up babysitting the oven. The house filled with the smell of toasted butter and dark chocolate, and the toddler approved by sneaking three before lunch. If you like tender chocolate shortbread that cracks at the edges and cradles molten, sticky toffee in the middle, you’re in the right place. I’ll walk you through a foolproof dough, a quick stovetop toffee, and a few tricks so the centers stay glossy and not runny. Grab your mixer and your favorite mug for scooping dough—we’re making sweet mischief.
Quick Facts
- Yield: Serves 24 cookies
- Prep Time: 25 minutes (plus 30 minutes chilling)
- Cook Time: 10–12 minutes per batch
- Total Time: 67 minutes (including chilling)
Why This Recipe is Awesome
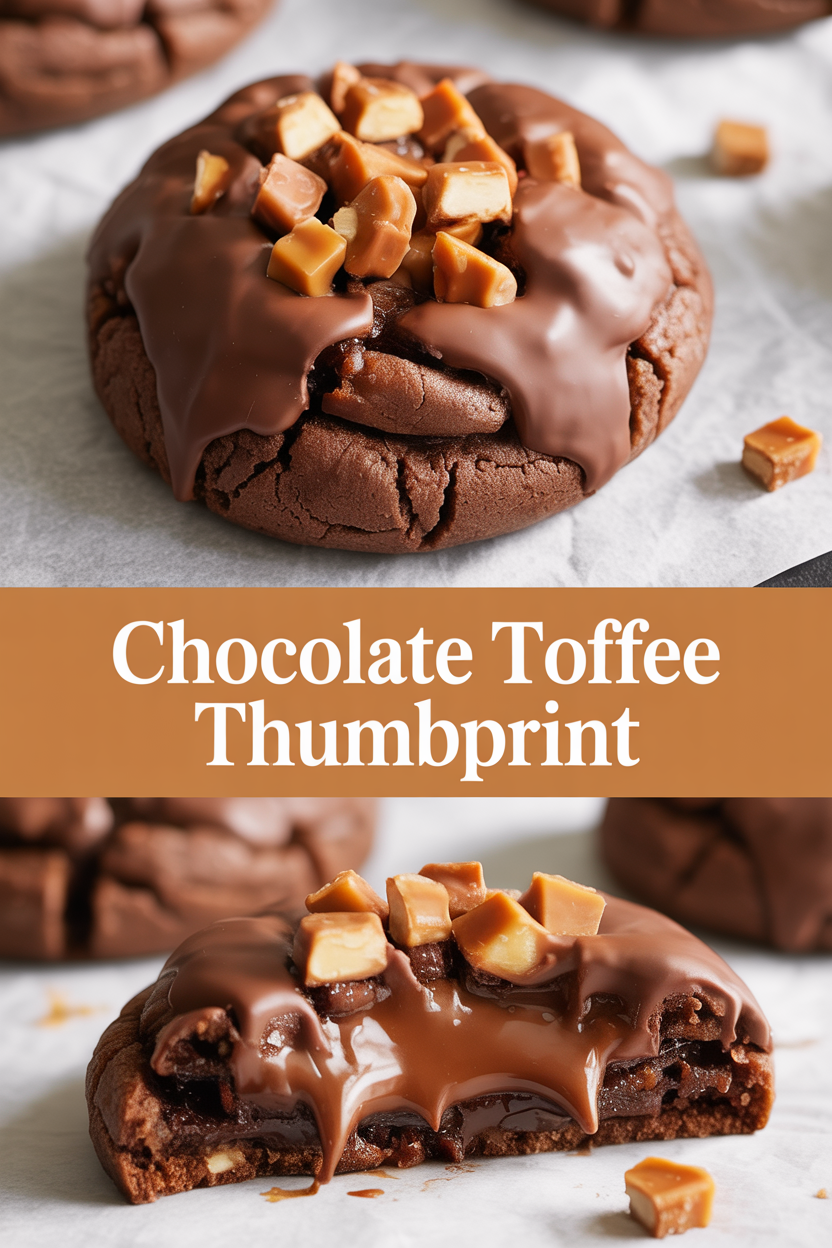
These Chocolate Toffee Thumbprints bring together tender, cocoa-scented cookies and sticky, buttery toffee. They deliver a crackly edge, soft center, and that satisfying sound when you bite through toffee—like a tiny dessert drumroll. They hold up at parties, travel well, and play nicely with coffee or milk. Plus, this recipe uses simple pantry ingredients and a quick stovetop toffee, so it feels fancy without the fuss. It’s so easy even your oven won’t mess it up.
Ingredients
For the Main Dish:
- 1 cup (2 sticks) unsalted butter, softened
- 2/3 cup granulated sugar
- 1/3 cup packed light brown sugar
- 1 large egg yolk (reserve the white for another use)
- 1 tsp vanilla extract
- 2 cups all-purpose flour
- 1/3 cup unsweetened cocoa powder
- 1/2 tsp baking powder
- 1/4 tsp fine sea salt
- 2–3 tbsp milk (only if dough feels dry)
- 1/2 cup chopped toffee bits or crushed Heath bars (optional, for texture)
For the Sauce / Garnish (if applicable):
- 1/2 cup packed light brown sugar
- 4 tbsp unsalted butter
- 2 tbsp heavy cream (add more for a looser pour)
- Pinch of sea salt
- 2 oz semi-sweet chocolate, chopped (optional, for drizzling)
How I Make It
Step 1:
I heat the oven to 350°F and line two baking sheets with parchment. In my mixer bowl I beat 1 cup butter with 2/3 cup granulated sugar and 1/3 cup brown sugar until fluffy and pale, about 2–3 minutes. The kitchen smells like toasted caramel already—swoon. I scrape down the bowl, add the egg yolk and 1 tsp vanilla, and beat just until combined.
Step 2:
In a separate bowl I whisk together 2 cups flour, 1/3 cup cocoa, 1/2 tsp baking powder, and 1/4 tsp salt. I add the dry mix to the butter mixture in two additions and stir until the dough comes together. If the dough feels crumbly, I add up to 3 tbsp milk, one tablespoon at a time. Avoid overmixing—stir until you see no dry streaks.
Step 3:
I scoop rounded tablespoons of dough (I use a small cookie scoop) onto the sheet, spacing them about 2 inches apart. Then I press my thumb or the back of a teaspoon into each mound to make a deep indentation — that pocket will hold the toffee. For tidier thumbprints, I dip my thumb in flour or lightly oil it so the dough doesn’t stick.
Step 4:
I bake the cookies for 10–12 minutes, until the edges set and the tops look matte but not dry. You’ll smell the cocoa and browned butter notes as they bake. I remove them and let them cool on the sheet for 3 minutes, then transfer to a rack to cool completely. While the cookies cool, I make the toffee filling.
Step 5:
For the quick toffee, I melt 4 tbsp butter and 1/2 cup brown sugar in a small saucepan over medium heat, stirring constantly. After about 2–3 minutes the sugar dissolves and the mixture bubbles; I carefully add 2 tbsp heavy cream and a pinch of salt and cook 1–2 more minutes until thick and glossy. I spoon about a teaspoon of warm toffee into each thumbprint. If I want a chocolate finish, I melt 2 oz chopped semi-sweet chocolate and drizzle it over the tops, then sprinkle crushed toffee bits. Let the cookies sit until the toffee firms a bit—about 20 minutes—or pop them in the fridge for 10 minutes.
Pro Tips
- Chill the dough 30 minutes if it feels too soft; chilled dough spreads less and keeps that neat thumbprint pocket.
- Use unsalted butter so you control salt—add an extra pinch if you use salted butter.
- Make the toffee slightly thicker than you think; it thins when warm and firms as it cools.
- If the centers sink after baking, don’t panic—press them again while still warm or refill with toffee once cookies cool.
Common Mistakes to Avoid
- Skipping preheating: Classic rookie move. It changes texture and bake time.
- Overmixing: Leads to dense or chewy results. Mix until just combined.
- Guessing cook time: Always use visual cues or a timer, not just vibes.
- Overcrowding pans: Give your food some breathing room to crisp properly.
Alternatives & Substitutions
- Swap all-purpose flour for a 1:1 gluten-free blend; expect a slightly crumbly texture.
- Substitute heavy cream with full-fat coconut milk for a dairy-free toffee—flavor shifts subtly coconutty.
- Use store-bought soft caramel sauce in place of stovetop toffee for a shortcut.
- For vegan cookies: replace butter with a plant-based stick butter and the egg yolk with 1 tbsp aquafaba + 1 tsp cornstarch; texture shifts slightly but still delicious.
Variations & Tips
- Add a pinch of espresso powder to the dough for an adult chocolate punch.
- Press in a small piece of dark chocolate along with toffee for a gooey chocolate-toffee core.
- Stir chopped nuts (pecans or almonds) into the toffee for crunch.
- Make mini thumbprints and use them as bite-sized party treats—perfect for cookie platters.
- Top with flaked sea salt for a salty-sweet finish that brightens the chocolate.
- Use white chocolate drizzle and cranberry bits for a festive holiday version.
FAQ (Frequently Asked Questions)
- Can I make this ahead of time?
- Yes! I bake the cookies, cool them completely, then fill with toffee just before serving. Store filled cookies in an airtight container at room temperature up to 3 days, or freeze unfilled baked cookies for up to 1 month and fill after thawing.
- Can I double the recipe?
- Sure thing. Double the ingredients and bake in batches. Use two sheet pans and rotate racks halfway through baking for even results.
- Can I substitute butter with oil?
- Technically yes, but you’ll miss that buttery magic. Use ¾ the amount of oil and expect a slightly different, less tender texture.
- How do I know it’s done?
- Look for edges that set and look slightly darker, while the center stays just matte and soft. The cookie should not look wet on top. It continues to firm as it cools.
- What if I don’t have ingredient X?
- Out of cocoa? Use melted unsweetened baking chocolate (1 oz chocolate = about 3 tbsp cocoa adjust sugar down slightly). No brown sugar? Mix 2 tbsp molasses into 1/3 cup granulated sugar.
How I Like to Serve It
I serve these warm with a steaming mug of coffee or a cold glass of milk. They make a cozy neighbor gift tucked in a little box, and they shine on cookie platters at holiday parties. For brunch, I pile them next to fruit and scones—the contrast between sticky toffee and fresh berries delights everyone. In summer, I chill them briefly and serve with iced coffee.
Notes
- Store cookies in an airtight container at room temperature for up to 3 days, or freeze unfilled baked cookies for up to 1 month.
- If you use meat in a recipe elsewhere, remember safe cooking temps: poultry 165°F, ground meats 160°F—not directly relevant here but good to know.
Final Thoughts
Closing: Now go impress someone—or just yourself—with warm, chocolate-toffee thumbprints. They’re small, forgiving, and wildly addictive. Happy baking!