
When I was seven, my grandmother let me stand on a kitchen chair and stir the pot while she whispered the “secret” to making a perfect butterscotch: patience and a really good stir. That cozy afternoon left me with a love of that deep, caramel-y smell that curls into your nose and makes everyone ask, “Is that for dessert?” This pie brings that exact nostalgia—silky, buttery filling spooned into a crisp crust and topped with clouds of whipped cream. If you crave sticky-sweet comfort and want to impress without sweating it out, this Butterscotch Heaven Pie feels like a hug from an old friend and tastes like a celebration.
Quick Facts
- Yield: Serves 8
- Prep Time: 20 minutes
- Cook Time: 20 minutes (plus crust blind-bake 12–15 minutes)
- Total Time: 2 hours (includes chilling)
Why This Recipe is Awesome
This pie pairs a glossy, velvety butterscotch filling with a crisp, buttery crust—sweet, slightly salty, and ridiculously comforting. It’s easy enough for a weeknight treat and pretty enough for company. The filling cooks fast on the stove, and the smell of brown sugar and browned butter will practically perform a kitchen magic trick on anyone nearby. It’s so dependable that even your oven can’t mess it up.
Ingredients
For the Main Dish:
- 1 (9-inch) store-bought or homemade pie crust (unbaked)
- 6 tablespoons unsalted butter
- 1 cup packed dark brown sugar
- 2 tablespoons cornstarch
- 1/4 teaspoon fine salt
- 1 3/4 cups whole milk (or half-and-half for extra richness)
- 3 large egg yolks (reserve whites for another use)
- 2 teaspoons pure vanilla extract
- 1 tablespoon light corn syrup or honey (optional—keeps shine)
For the Sauce / Garnish (if applicable):
- 1 cup heavy whipping cream, whipped with 1–2 tbsp powdered sugar for topping
- Optional: flaky sea salt, chopped toasted pecans, or an extra drizzle of homemade butterscotch sauce (see notes)
How I Make It
Step 1:
Preheat the oven to 375°F. Crimp the edges of the pie crust and prick the bottom lightly with a fork. Line it with parchment and fill with pie weights or dried beans. Bake the crust for 12–15 minutes until the edges turn golden and the center looks set. Remove the weights and bake another 3 minutes if the center looks shiny. That little crackle of hot crust tells you it’s ready. Let it cool while you make the filling.
Step 2:
Melt the 6 tablespoons butter in a medium saucepan over medium heat. Swirl the pan and watch the butter foam then deepen to a nutty brown; it should smell warm and toasty—don’t walk away. Stir in the 1 cup dark brown sugar until it dissolves, then sprinkle in the 2 tablespoons cornstarch and 1/4 teaspoon salt and whisk for 30 seconds to cook the starchy taste away.
Step 3:
Slowly pour in the 1 3/4 cups milk while whisking steadily so the mixture stays smooth. Bring the mixture to a gentle simmer; listen for tiny bubbles forming at the edges. Whisk constantly and let it thicken—about 3–5 minutes. Temper the 3 egg yolks by whisking a few spoonfuls of the hot mixture into them, then pour the yolk mixture back into the pan and cook another minute until it becomes glossy and coats the back of a spoon. Stir in the 2 teaspoons vanilla and 1 tablespoon corn syrup.
Step 4:
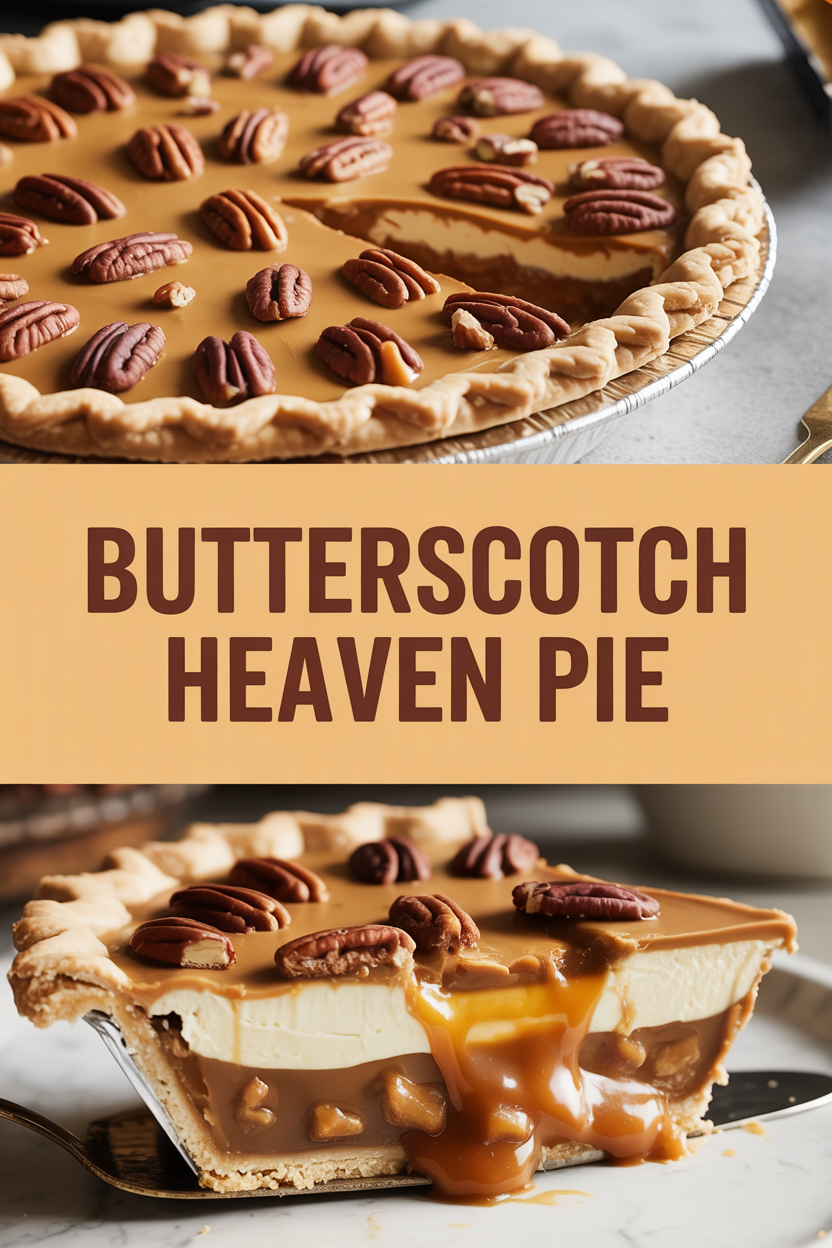
Pour the hot butterscotch filling into the cooled pie shell and smooth the top. You should see a rich, deep-golden color and feel the filling jiggle slightly when you tap the pie. Chill the pie in the refrigerator for at least 2 hours until the filling firms up nicely. If you rush this, the filling will slide—so let it set.
Step 5:
Top the chilled pie with freshly whipped cream, sprinkle a pinch of flaky sea salt or toasted pecans, and serve. Slice with a sharp knife wiped between cuts for clean pieces. The first bite gives you a silky, sweet hit of butterscotch and a crunch of crust—pure heaven.
Pro Tips
- Brown the butter carefully: watch the color and smell—it goes from golden to burnt quickly. Remove it from heat as soon as nuttiness appears.
- Whisk constantly while thickening the filling to avoid lumps. A silicone spatula helps scrape the pan edges cleanly.
- If your crust puffs during blind-baking, press it gently with the back of a spoon while hot to deflate it—no drama.
- Make the pie a day ahead: chilling overnight improves flavor and makes slicing neater.
Common Mistakes to Avoid
- Skipping preheating: Classic rookie move. It changes texture and bake time.
- Overmixing: Leads to dense or chewy results. Mix until just combined.
- Guessing cook time: Always use visual cues or a timer, not just vibes.
- Overcrowding pans: Give your food some breathing room to crisp properly.
Alternatives & Substitutions
- Use half-and-half or light cream instead of whole milk for richer filling; this yields a silkier texture.
- Substitute brown sugar with white sugar plus 1 tablespoon molasses per cup if you’re out of dark brown sugar—flavor shifts slightly toward plain caramel.
- For dairy-free: swap butter for vegan butter and use full-fat coconut milk for the milk. Expect a faint coconut note.
- For gluten-free: use a store-bought gluten-free pie crust or make a graham cracker crust with gluten-free graham crumbs.
Variations & Tips
- Add a teaspoon of instant espresso powder to the filling for a mocha-butterscotch twist.
- Stir in 1/2 cup toasted pecans or chopped roasted peanuts for texture—nutty contrast goes wonderfully with sweet.
- Make individual tartlets in a muffin tin for portable, party-friendly portions.
- Swap the vanilla for 1/2 teaspoon almond extract for a vintage diner vibe.
- Top with caramelized bananas for an over-the-top “banoffee-ish” version.
- For a boozy adult version, stir in 1–2 tablespoons of dark rum or bourbon after removing the filling from the heat.
FAQ (Frequently Asked Questions)
- Can I make this ahead of time?
- Yes! Chill the pie covered in the fridge up to 48 hours. If you add whipped cream, wait until serving day to top it so it stays fresh.
- Can I double the recipe?
- Sure thing. Double the filling ingredients and split into two pie shells or use a deep-dish pan. Increase chilling time slightly for a thicker set.
- Can I substitute butter with oil?
- Technically yes, but you’ll miss that buttery magic. Use ¾ the amount of oil and consider adding a touch of browned nutty flavor with a splash of browned vegan butter or toasted nut oil.
- How do I know it’s done?
- Look for a glossy, thick filling that coats the back of a spoon and a slight jiggle in the center when you tap the pie. The crust should look golden at the edges and feel firm when you press gently.
- What if I don’t have ingredient X?
- If you lack cornstarch, whisk 2 tablespoons all-purpose flour with a little cold milk before adding, or increase the egg yolks by 1 to help thicken. Out of brown sugar? Use white sugar + 1 tablespoon molasses per cup.
How I Like to Serve It
I serve this pie after a cozy dinner with strong coffee or a small glass of tawny port. For warm-weather evenings, the chilled filling feels refreshing with a cold iced latte. It fits holidays, potlucks, or a simple Sunday when you want to feel fancy without effort. Kids love it with extra whipped cream; grown-ups might opt for a salted pecan sprinkle.
Notes
- Store covered in the refrigerator up to 2 days; keep whipped cream separate until serving. Reheat slices gently in a microwave for 8–12 seconds if you like it a touch warm.
- If you brown the butter, act fast—brown butter continues to cook in the hot pan. Remove it promptly to preserve the toasted flavor.
Final Thoughts
Closing: Now go impress someone — or just yourself — with your homemade masterpiece! Slice generously, savor slowly, and don’t forget to breathe in that dreamy butterscotch aroma.