
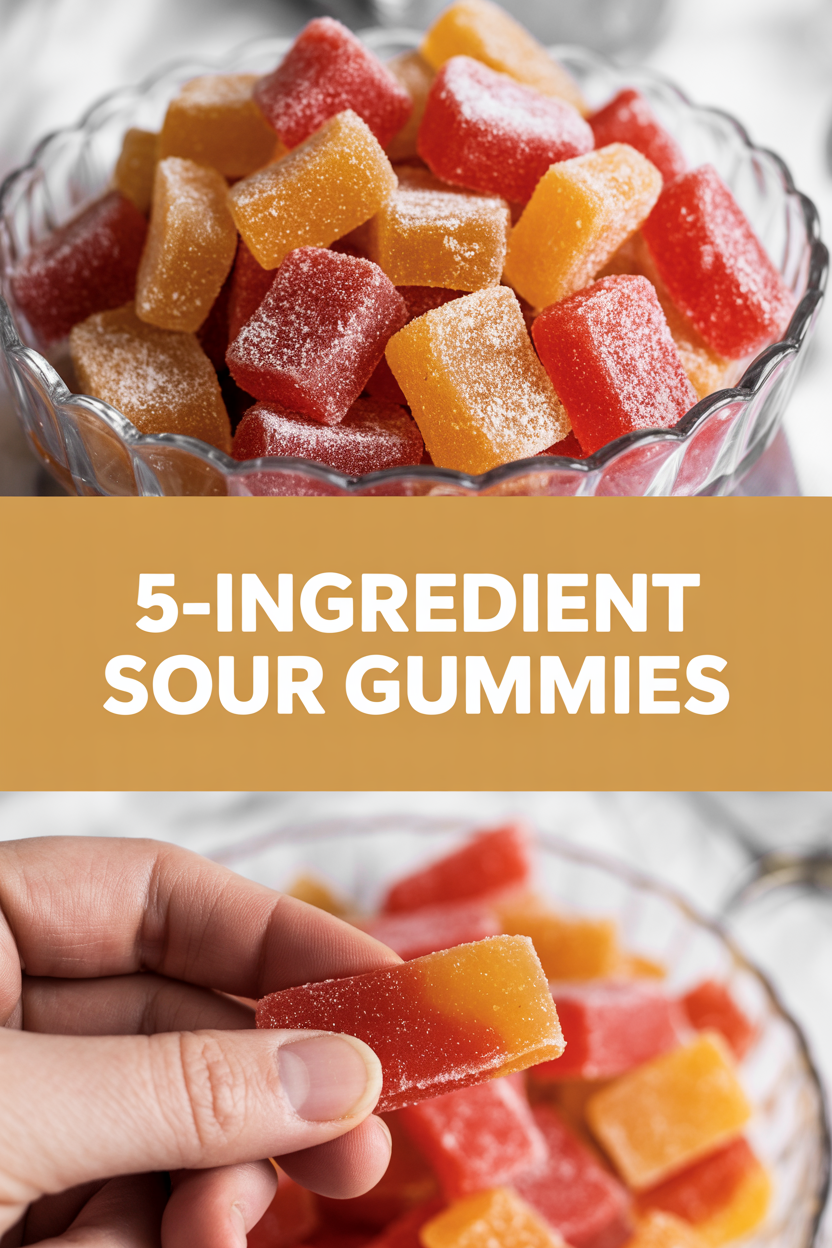
I promise these gummies won’t judge you for stealing spoonfuls of sugar straight from the jar—been there, done that, wore the sticky shirt. If you like puckering faces, tiny chewy bites, and a little kitchen magic that doesn’t require a candy thermometer or a PhD in chemistry, these 5-Ingredient Sour Gummies are your new best friend. I whipped up my first batch after a midnight craving and ended up handing them out to neighbors like candy-bandit confetti. They’re tart, chewy, and bright—the kind of little candy that smells like citrus peel and makes your teeth gossip with delight.
Quick Facts
- Yield: Makes about 30 small gummies (Serves 6–8)
- Prep Time: 10 minutes
- Cook Time: 5 minutes
- Total Time: 2 hours 15 minutes (including chill)
Why This Recipe is Awesome
These gummies prove you don’t need a pantry full of candy supplies to get candy-shop vibes at home. They’re chewy, brightly flavored, and finish with a whisper of sour that makes your tongue do tiny happy dances. Texture-wise, they hit that perfect bounce—not too rubbery, not too soft. Taste-wise, the citric acid gives a clean, lemony pucker without the fake aftertaste. Best of all: five simple ingredients, everyday kitchen tools, and no temperamental candy thermometer. It’s so easy even your oven can’t mess it up (because we don’t use an oven at all).
Ingredients
For the Main Dish:
- 1 cup fruit juice (I use cranberry, lemon, or apple—unsweetened)
- 1/2 cup granulated sugar (plus extra for coating if you like)
- 3 tbsp unflavored powdered gelatin (about 3 packets)
- 2 tbsp light corn syrup (for chew and shine)
- 2 tsp citric acid (for that tangy sour kick)
For the Sauce / Garnish (if applicable):
- Optional: extra 1–2 tbsp sugar mixed with 1/2–1 tsp citric acid for tossing & coating
How I Make It
Step 1:
I start by measuring everything out—trust me, candy is less scary when your stations don’t look like a flour bomb went off. Sprinkle the 3 tbsp gelatin evenly over 1 cup fruit juice in a medium saucepan and let it bloom for 3 minutes. You’ll watch the powder puff and drink in the liquid like a little sponge—cute and strangely satisfying.
Step 2:
Stir in the 1/2 cup sugar and 2 tbsp corn syrup. Heat the pan over medium, stirring constantly until the sugar dissolves and the mix gets glossy and steamy—aim for a gentle simmer, not a rolling boil. I look for little steam wisps and full dissolving of sugar, about 3–5 minutes. If you have a candy thermometer, keep it under 212°F—we don’t need a hard candy stage here, just warmth to melt and marry the ingredients.
Step 3:
Remove the pan from heat and whisk in 2 tsp citric acid while the mixture still bubbles gently. The aroma will pop—think tangy lemon peel with a hint of sweet syrup. Pour the mixture carefully into silicone molds or an oiled small baking dish (8×8 works). I prefer silicone because gummies pop out like little chewy miracles.
Step 4:
Chill in the refrigerator for 2 hours until firm and springy. You’ll know they’re ready when the surface looks matte rather than shiny and the center bounces back when you press it. If you used a dish, turn it out onto a cutting board and slice into bite-size squares.
Step 5:
For that candy-shop sour finish, toss the gummies in a small bowl with a few teaspoons of extra sugar mixed with citric acid—start light, taste, then add more if you crave more pucker. Store the batch in an airtight container in the fridge for up to 2 weeks. They age well—chewier and more intensely flavored after a day.
Pro Tips
- Bloom the gelatin properly: sprinkle, wait 3 minutes, then heat. Don’t dump it straight into hot liquid or it can clump.
- If you prefer firmer gummies, increase gelatin to 4 tbsp. For softer ones, use 2 tbsp, but expect a looser chew.
- Use clear, unsweetened fruit juices for clean color and true fruit flavor. Cranberry makes pretty pinks, apple gives amber, and lemon makes bright yellow.
- If your citric acid tastes too intense in the mix, add half to the mixture and save half for coating so you can control the surface pucker.
Common Mistakes to Avoid
- Skipping preheating: Classic rookie move. It changes texture and bake time.
- Overmixing: Leads to dense or chewy results. Mix until just combined.
- Guessing cook time: Always use visual cues or a timer, not just vibes.
- Overcrowding pans: Give your food some breathing room to crisp properly.
Alternatives & Substitutions
- Fruit juice swap: Use 100% juice like cherry, grape, or orange—each shifts color and flavor intensity.
- Sugar alternatives: Swap granulated sugar for coconut sugar for a caramel note, but color will darken and flavor will shift.
- Corn syrup substitute: Use honey (same amount) for stickier, slightly floral gummies; texture changes to a chewier bite.
- Dairy-free / gluten-free: This recipe is naturally dairy-free and gluten-free—just check your gelatin source if you need vegetarian (see note below for vegan swap).
Variations & Tips
- Spicy twist: Add a pinch (1/8 tsp) of chili powder or cayenne to the mixture for chile-laced sour gummies.
- Herbal note: Steep a sprig of rosemary or mint in the juice while heating for an herbal pop—strain before adding gelatin.
- Kids’ party version: Use bright juices and shape with fun silicone molds—make rainbow batches with different juices.
- Alcohol-adult gummies: Replace up to 1/4 cup juice with a liqueur, but add extra gelatin for structure.
- Creative twist: Layer two colors—pour half, chill until tacky, then pour second color for pretty, two-tone gummies.
FAQ (Frequently Asked Questions)
- Can I make this ahead of time?
- Yes! Make gummies up to 2 weeks ahead. Keep them in an airtight container in the fridge to maintain chew and freshness. If they dry out, toss with a tiny bit of corn syrup before storing.
- Can I double the recipe?
- Sure thing. Use a larger saucepan and divide into multiple molds or pans; chilling time may extend by 15–30 minutes for deeper pans.
- Can I substitute butter with oil?
- Technically yes, but you’ll miss that buttery magic. Use ¾ the amount of oil.
- How do I know it’s done?
- Look for a matte surface, a springy texture when gently pressed, and clean edges when unmolded. If it jiggles like gelatin dessert, it needs more chill time.
- What if I don’t have ingredient X?
- If you don’t have corn syrup, use honey or a neutral light syrup. If you’re out of citric acid, squeeze in extra lemon juice for tang (but expect less coated-pucker).
How I Like to Serve It
I pop a bowl of these on the coffee table during movie night, toss a few into a lunchbox for a cheeky treat, or include them on a dessert platter alongside dark chocolate squares. They shine at summer parties because they look like little jewels and play nice with cocktails—try one with a citrus gin spritz. In winter, I gift them in mason jars with twine; they feel homemade and festive.
Notes
- Store in the refrigerator in an airtight container for up to 2 weeks. If they stick together, toss with a dusting of sugar + citric mix.
- Vegan option: Use agar-agar instead of gelatin; follow package instructions for gelling strength (agar often needs boiling and sets firmer).
Final Thoughts
Closing: Now go make a batch, taste-test like a professional sampler, and share (or don’t—your secret gummy stash is safe with me).