
I promise I didn’t mean to become the person who brags about perfectly torched sugar at every dinner party, but here we are — and the truth is, cracking the top of a crème brûlée never gets old. If you love the little dramatic tap of a spoon against a glossy, caramelized shell followed by a pool of silky vanilla custard, welcome to your new favorite dessert. This version uses simple pantry staples, a real vanilla bean for that heady, floral punch, and a quick kitchen trick for foolproof custard. Plus, I’ll show you how to get that satisfying crack without a fancy torch (but if you have one, bring it out — it’s showtime).
Quick Facts
- Yield: Serves 6
- Prep Time: 15 minutes
- Cook Time: 40 minutes
- Total Time: 3 hours (including chilling)
Why This Recipe is Awesome
This crème brûlée feels fancy but behaves like a weeknight champion. The custard comes out impossibly silky and fragrant with real vanilla, and the caramelized top shatters with a glorious, audible crack. It’s rich without being heavy, smooth on the tongue, and that sugar crust gives every bite a crunchy contrast. Honestly, it’s so approachable even your oven can’t mess it up — and you’ll feel like a dessert wizard every time someone asks, “Did you make this?”
Ingredients
For the Main Dish:
- 3 cups heavy cream (36 fl oz)
- 1 vanilla bean, split lengthwise and seeds scraped (or 1 tsp pure vanilla extract)
- 6 large egg yolks
- 3/4 cup granulated sugar (for the custard)
- Pinch of fine sea salt
- Six 6-ounce ramekins
For the Sauce / Garnish (if applicable):
- Extra granulated sugar for topping — about 3 tbsp total (roughly 1/2 tbsp per ramekin)
- Fresh berries or a sprig of mint, optional for serving
How I Make It
Step 1:
Preheat your oven to 325°F. Pour the heavy cream into a saucepan, add the scraped vanilla seeds and the pod, and warm over medium heat until you see tiny bubbles at the edge — don’t let it come to a full boil. The kitchen will smell like a vanilla bakery and you’ll want to eat it straight from the pot; resist that urge. If you use vanilla extract, add it after the cream warms.
Step 2:
While the cream heats, whisk the egg yolks, 3/4 cup sugar, and a pinch of salt in a bowl until the mixture lightens slightly. To avoid scrambled eggs, temper the yolks: slowly drizzle about a cup of the hot cream into the yolks while whisking constantly. Then pour the yolk mixture back into the saucepan and stir gently to combine. I always strain the custard through a fine-mesh sieve into a large measuring cup or bowl to catch any cooked bits and the vanilla pod — it makes the texture silkier.
Step 3:
Arrange your ramekins in a deep baking dish. Pour the custard evenly into the ramekins. Carefully pour hot water into the baking dish until it reaches halfway up the sides of the ramekins — this bain-marie keeps the custard gentle and creamy. Slide the whole tray into the oven and bake for about 35–40 minutes, until the edges look set and the centers still have a slight jiggle when you gently shake the pan.
Step 4:
Remove the ramekins from the water bath and let them cool on a rack for 20–30 minutes. Then cover each ramekin and chill in the refrigerator for at least 2 hours, though overnight makes the flavor and texture even better. The custard will firm up and become luxuriously smooth and cool — like velvet on a spoon.
Step 5:
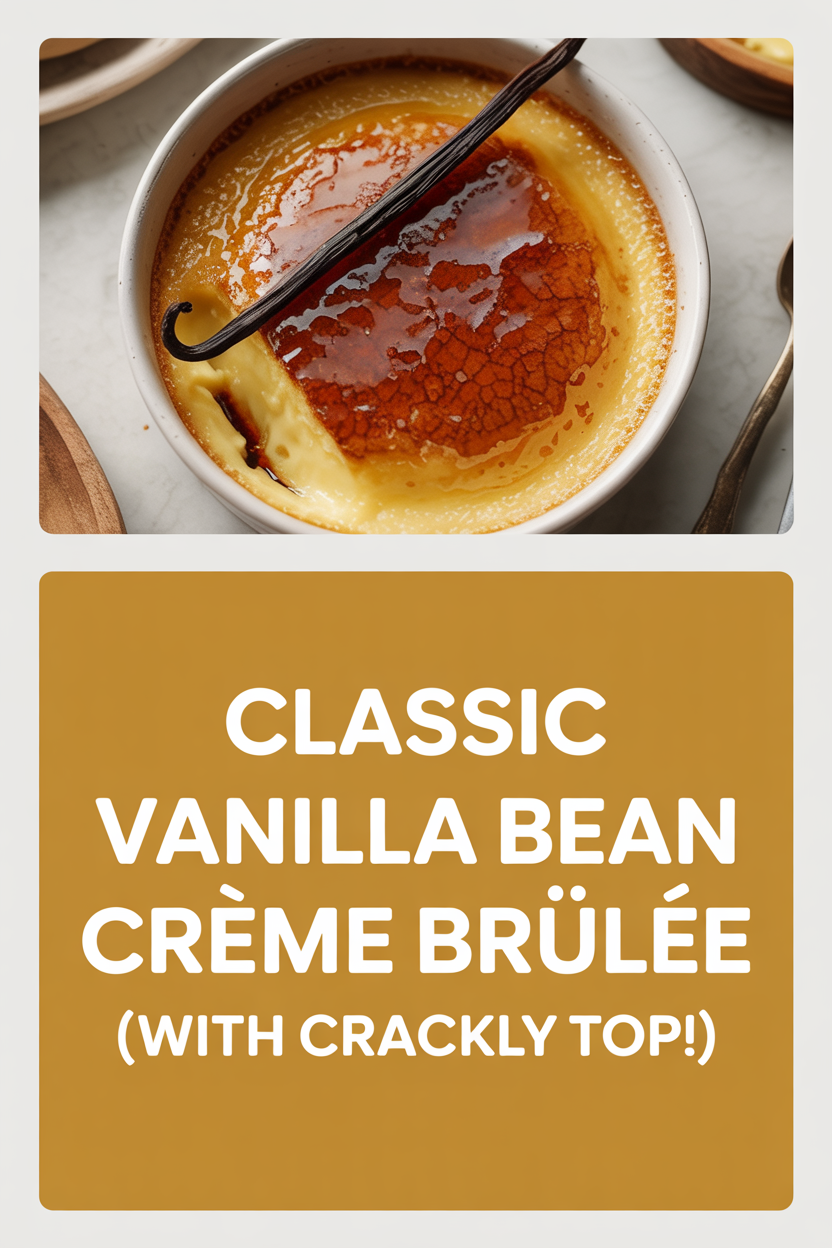
When you’re ready to serve, sprinkle about 1/2 tbsp granulated sugar evenly over each custard. Use a kitchen torch to melt and caramelize the sugar until it forms a deep amber, crackly top. No torch? Place the ramekins on a baking sheet and broil on HIGH for 1–2 minutes, watching like a hawk — the sugar goes from caramel to charcoal fast. Let the sugar harden for a minute, then tap it with a spoon and enjoy that satisfying crack.
Pro Tips
- Use a real vanilla bean if you can — the flecks and aroma make a noticeable difference. If you only have extract, add it after warming the cream.
- Strain the custard before baking to remove any cooked egg bits; that keeps the texture glass-smooth.
- Don’t skip the water bath. It provides gentle, even heat and prevents curdling.
- If you broil to caramelize, move the oven rack close to the broiler and watch constantly to avoid burning — two minutes is often plenty.
Common Mistakes to Avoid
- Skipping preheating: Classic rookie move. It changes texture and bake time.
- Overmixing: Leads to dense or chewy results. Mix until just combined.
- Guessing cook time: Always use visual cues or a timer, not just vibes.
- Overcrowding pans: Give your food some breathing room to crisp properly.
Alternatives & Substitutions
- Use full-fat coconut milk (not light) and 2 tsp cornstarch for a dairy-free version — expect a slightly coconut-forward flavor and a firmer texture.
- Swap vanilla for espresso powder (1 tsp) or orange zest for different flavor profiles.
- For fewer calories, try half-and-half instead of heavy cream, but the custard will taste less rich and slightly less silky.
- This dessert is naturally gluten-free.
Variations & Tips
- Chocolate crème brûlée: whisk 3 oz melted dark chocolate into the warm cream before tempering the eggs.
- Citrus-brûlée: steep orange or lemon zest in the cream and finish with a candied citrus slice.
- Lavender twist: add 1 tsp dried culinary lavender to the cream and strain it out before mixing with eggs.
- Boozy upgrade: stir 1–2 tbsp bourbon or Grand Marnier into the custard after straining.
- Salted caramel: sprinkle a tiny pinch of flaky sea salt over the caramelized sugar for a sweet-salty pop.
FAQ (Frequently Asked Questions)
- Can I make this ahead of time?
- Yes! Make the custards, chill them covered up to 48 hours ahead. Wait to caramelize the sugar until right before serving for the best crack and texture.
- Can I double the recipe?
- Sure thing. Keep the same baking temperature and use two trays if you need to. Make sure the water bath level reaches halfway up each ramekin; you may need to bake in batches if your oven struggles with heat distribution.
- Can I substitute butter with oil?
- Technically yes, but you’ll miss that buttery magic. Use ¾ the amount of oil. (This question doesn’t really apply to crème brûlée since it doesn’t use butter, but good to know for other desserts.)
- How do I know it’s done?
- Look for set edges with a slight, gentle jiggle in the center — the custard will finish firming as it chills. An internal temperature around 170–175°F works if you use a thermometer.
- What if I don’t have ingredient X?
- No vanilla bean? Use 1 tsp vanilla extract. Out of heavy cream? Try full-fat coconut milk for dairy-free or half-and-half for a lighter take (expect differences in richness and texture).
How I Like to Serve It
I love serving this after a relaxed dinner with friends — a small ramekin alongside a strong espresso or a sweet dessert wine. In summer, top it with macerated berries; in winter, add a sliver of candied orange peel. It works for romantic dinners, holiday spreads, or when you want to end a meal on a mini-showstopper note.
Notes
- Store chilled, covered, for up to 48 hours. Caramelize sugar only when ready to serve for the best texture.
- If you must reheat after chilling, warm gently under a broiler for just a minute to encourage a fresh crack; avoid overheating the custard itself.
Final Thoughts
Closing: Now go impress someone — or just yourself — with your homemade masterpiece!