
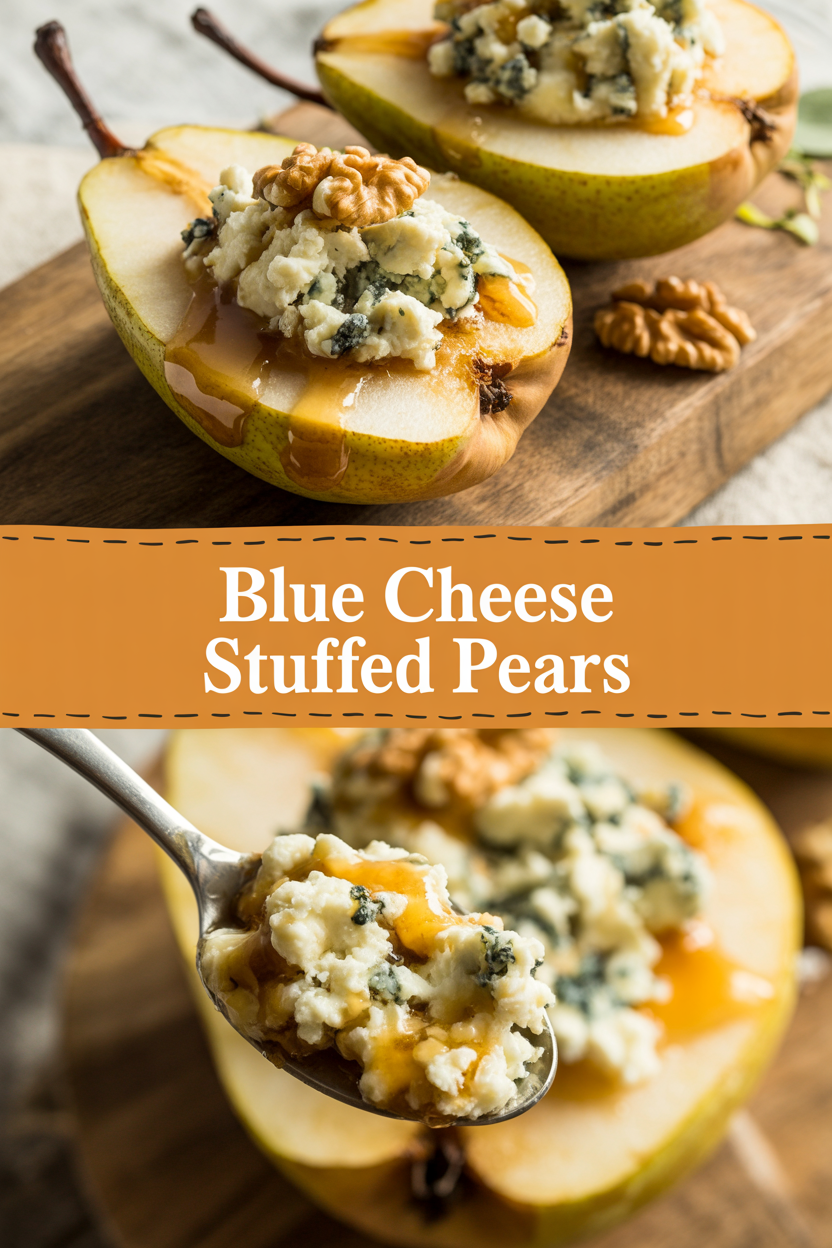
Chef’s secret time: I stumbled on this combo while sneaking bites in a restaurant kitchen, and I’ve never looked back. If you want a tiny luxury that feels like a five-star appetizer but takes under 40 minutes, this is your trick. I stuff halved pears with a tangy mound of **blue cheese**, crunchy **walnuts**, and a drizzle of **honey**, then roast until the fruit sighs and the cheese melts into salty rivers. The aroma? Warm honey and tangy cheese flirting with browned butter—instant mood lift. Keep a spoon handy; you’ll want to taste-test before anyone else sees it.
Quick Facts
- Yield: Serves 4
- Prep Time: 15 minutes
- Cook Time: 20–25 minutes
- Total Time: 35–40 minutes
Why This Recipe is Awesome
This recipe feels fancy but behaves like a weeknight hero. It balances juicy, caramelized pear sweetness with the sharp, creamy bite of **blue cheese** and a satisfying walnut crunch. It’s the kind of dish that makes people pause mid-bite and say, “Wait — did you make this?” It’s easy, forgiving, and versatile: serve as an appetizer, a salad topper, or a light dessert. It’s so straightforward even your oven can’t mess it up.
Ingredients
For the Main Dish:
- 2 large ripe but firm pears (I like **Bosc** or **Anjou**)
- 4 oz **blue cheese**, crumbled (Gorgonzola or Roquefort work great)
- ½ cup **walnuts**, chopped and lightly toasted
- 2 tbsp **honey**, plus more for drizzling
- 2 tbsp **unsalted butter**, melted
- 1 tsp fresh **lemon juice**
- 1 tsp fresh **thyme** leaves (or ½ tsp dried thyme)
- Pinch of flaky **sea salt** and a few grinds of **black pepper**
- 1 tbsp **olive oil** (for brushing)
For the Sauce / Garnish (optional):
- 2 tbsp **balsamic glaze** or reduced balsamic for drizzling
- Extra honey and thyme sprigs for serving
How I Make It
Step 1:
Preheat the oven to 375°F. While it warms, slice the pears in half lengthwise and use a small spoon or melon baller to **core** them, leaving a neat cavity for the filling. Brush the cut sides with **olive oil** and a little **lemon juice** so they brown nicely and don’t oxidize. The kitchen already smells like your next favorite appetizer.
Step 2:
Mix the filling: combine the **crumbled blue cheese**, **toasted walnuts**, **1 tbsp honey**, **thyme**, and a pinch of **salt** and **pepper** in a bowl. Stir gently so the walnuts stay chunky and the cheese keeps some texture. Taste once—if it needs more punch, add a touch more honey or a squeeze of lemon.
Step 3:
Spoon the blue cheese mixture into each pear cavity, mounding it slightly. Dot the tops with the **melted butter** (this helps brown the cheese and gives a glossy finish). Arrange the pear halves cut-side up in a baking dish so air circulates and edges caramelize. Pop the dish into the oven.
Step 4:
Roast for 20–25 minutes until the pears give a little when you press the skin and the cheese melts and edges turn golden brown. You’ll hear soft bubbling and smell warm honey and browned butter notes. If the tops brown too quickly, loosely tent with foil for the last 5 minutes.
Step 5:
Remove from the oven and let rest 3–5 minutes. Drizzle with extra **honey** and a little **balsamic glaze** if using. Scatter a few extra chopped walnuts and a sprig of fresh **thyme** over the top for color and crunch. Serve warm—each bite should offer silky pear, creamy tang, and crisp walnut contrast.
Pro Tips
- Pick pears that feel firm but not hard; they soften in the oven but you want them to keep shape.
- Toast the walnuts in a dry skillet for 3–4 minutes until fragrant — it deepens the flavor and keeps them crunchy in the final bite.
- If you don’t love intense blue cheese, use half blue cheese and half cream cheese for a milder, creamier filling.
- For extra caramelization, broil for 1–2 minutes at the end, watching closely so the cheese doesn’t burn.
Common Mistakes to Avoid
- Skipping preheating: Classic rookie move. It changes texture and bake time.
- Overmixing: Leads to dense or chewy results. Mix until just combined.
- Guessing cook time: Always use visual cues or a timer, not just vibes.
- Overcrowding pans: Give your food some breathing room to crisp properly.
Alternatives & Substitutions
- Blue cheese substitute: use **goat cheese** for a milder, tangy profile; it melts creamier and suits picky eaters.
- Nuts swap: use **pecans** or **almonds** if you prefer their flavor — pecans get sweeter when toasted.
- Dairy-free option: swap blue cheese for a store-bought **dairy-free savory cheese** or a mixture of mashed roasted sweet potato + a pinch of salt and apple cider vinegar for tang.
- Make it vegan and gluten-free: use vegan cheese and maple syrup instead of honey; pears are naturally gluten-free.
Variations & Tips
- Spicy twist: add a pinch of red pepper flakes to the filling for a gentle heat that plays nicely with honey.
- Kid-friendly: replace blue cheese with cream cheese mixed with a little honey for a sweet, mellow version kids will eat.
- Bacon + pear: sprinkle crumbled cooked bacon over the finished pears for smoky-salty contrast (not vegetarian).
- Dessert version: serve with vanilla ice cream and a warm caramel drizzle instead of balsamic glaze.
- Herb swap: use rosemary instead of thyme for a piney aroma that pairs well with balsamic.
- Wine pairing twist: drizzle a little port reduction instead of balsamic for a decadent, wine-forward finish.
FAQ (Frequently Asked Questions)
- Can I make this ahead of time?
- Yes! Stuff the pears and store them covered in the fridge for up to 24 hours. Bake just before serving for the best texture. Reheat at 350°F for about 8–10 minutes until warm.
- Can I double the recipe?
- Sure thing. Use two baking dishes or a large roasting pan and rotate halves halfway through baking to ensure even caramelization. Timing stays about the same, maybe add 3–5 minutes.
- Can I substitute butter with oil?
- Technically yes, but you’ll miss that buttery magic. Use ¾ the amount of oil (about 1½ tbsp) and expect a slightly different finish—less sheen, less nutty browning.
- How do I know it’s done?
- You’ll see golden-brown cheese edges, a glossy top from the butter and honey, and pears that yield slightly to gentle pressure without collapsing.
- What if I don’t have ingredient X?
- Swap similar textures: if you lack walnuts, use chopped pecans or almonds. No honey? Use maple syrup or a bit of brown sugar mixed with water to mimic the glaze effect.
How I Like to Serve It
I love these pears on a small board with crusty bread, a handful of arugula dressed in lemon vinaigrette, and a glass of chilled Riesling or dry rosé. They also play nicely atop a simple green salad as a show-stopping lunch, or as a sweet-savory dessert after a heavy meal. Serve warm on cool evenings and keep napkins handy—the juices get cozy and a little drippy.
Notes
- Store leftover roasted pears in an airtight container in the fridge for up to 2 days; reheat at 350°F until warm.
- No meat here; if you pair with chicken, cook poultry to a safe internal temp of 165°F.
Final Thoughts
Closing: Now go impress someone — or just yourself — with this simple, elegant dish that tastes like a secret passed between friends.