
Chef’s tip time: I stole this trick from a pastry chef friend and now I refuse to make coconut cream pie any other way. I learned that brightening a coconut custard with a hit of fresh lemon and a little crunchy lemon sugar turns a cozy classic into something that sings. This pie balances pillowy coconut cream, a crisp buttery crust, and that zingy, almost-sparkling lemon finish that makes everyone ask “What did you do?” Honestly, the kitchen will smell like toasted coconut and citrus heaven — the best kind of trouble. I’ll walk you through the simple steps, my favorite small fixes, and how to make it look like you actually had help.
Quick Facts
- Yield: Serves 8
- Prep Time: 25 minutes (plus 30 minutes active chilling & cooling)
- Cook Time: 15 minutes (filling) + 10 minutes (crust bake)
- Total Time: About 3 hours 40 minutes (includes chilling)
Why This Recipe is Awesome
This Lemon Sugar Coconut Cream Pie hits a delightful balance: the custard stays luxuriously silky while toasted coconut adds chew and crunch, and the lemon sugar gives a tiny, sparkly crunch on the top. It tastes tropical but bright, like sunshine with a little attitude. Plus, it’s forgiving — no pastry school pressure, just real ingredients and a few small tricks. It’s so easy even your oven can’t mess it up (but I still watch it like a hawk because burnt coconut = sad face).
Ingredients
For the Main Dish:
- 1 1/2 cups graham cracker crumbs (about 10 full sheets) or crushed digestive biscuits
- 6 tbsp unsalted butter, melted
- 1/4 cup granulated sugar (for crust)
- 2 1/2 cups whole milk
- 1 cup heavy cream
- 3/4 cup granulated sugar (for filling)
- 1/3 cup cornstarch
- 4 large egg yolks
- 1 cup sweetened shredded coconut, toasted (see Step 3)
- 2 tbsp unsalted butter (for finishing custard)
- 2 tsp vanilla extract
- zest of 2 lemons (about 2 tbsp zest) and 2 tbsp fresh lemon juice
- 1 pre-baked 9-inch pie shell (use homemade or store-bought; see note)
- 1 cup heavy cream (for whipped topping)
- 2 tbsp powdered sugar (for whipped cream)
For the Sauce / Garnish (if applicable):
- 1/4 cup granulated sugar + zest of 1 lemon — rub together to make lemon sugar for sprinkling
- Extra toasted shredded coconut for sprinkling
How I Make It
Step 1:
Preheat your oven to 350°F. If you make the crust from scratch, toss the **graham cracker crumbs**, **melted butter**, and **1/4 cup sugar** in a bowl until the crumbs look like wet sand. Press the mixture firmly into a 9-inch pie pan, up the sides slightly. Bake for about 10 minutes until the edge smells toasty and the top glows golden. Let it cool while you make the custard. If your crust seems crumbly after cooling, press it again with the back of a spoon — that extra tamping helps it hold together.
Step 2:
Whisk together the **sugar**, **cornstarch**, and a pinch of salt in a medium saucepan. In a separate bowl, whisk the **egg yolks** with a splash of the milk to temper. Heat the remaining **milk** and **1 cup heavy cream** until it steams and small bubbles form at the edge — don’t let it boil. Slowly whisk about 1 cup of the hot milk into the yolks, then pour the yolk mixture back into the pan, whisking constantly. Cook over medium heat, whisking, until the custard thickens and bubbles gently — it should coat the back of a spoon, about 3–5 minutes.
Step 3:
Remove the pan from heat and stir in **2 tbsp butter**, **vanilla**, **lemon zest**, and **lemon juice**. Fold in **1 cup** toasted shredded coconut. To toast coconut quickly, spread it on a baking sheet and bake at 350°F for 5–7 minutes, stirring once, until it smells nutty and turns golden. Pour the hot custard into your cooled crust, smooth the top, and press a sheet of plastic wrap directly onto the custard to prevent a skin from forming. Chill in the fridge for at least 3 hours until set.
Step 4:
When the pie has chilled and the filling feels set to the touch, whip **1 cup heavy cream** with **2 tbsp powdered sugar** to soft peaks. Dollop or pipe the whipped cream over the pie. The contrast between the cold cream and the dense custard looks and feels lovely.
Step 5:
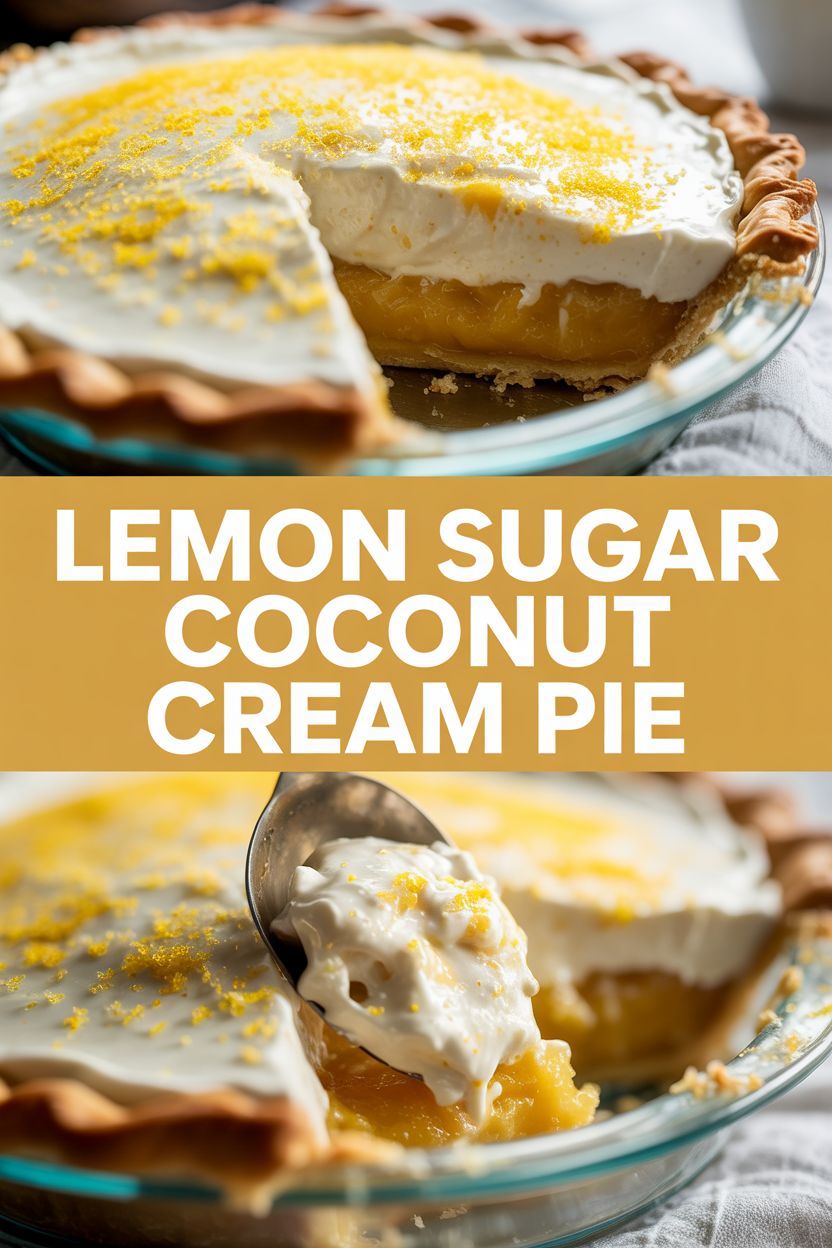
Sprinkle the top with a generous pinch of your homemade **lemon sugar** and a little more toasted coconut for crunch and sparkle. Let the pie sit out 10–15 minutes before slicing so the knife glides cleanly and your slices keep their shape. Serve chilled and watch people’s faces light up as they take that first bite — bright citrus, rich coconut, creamy bliss.
Pro Tips
- Warm the lemon first: roll it on the counter to release extra juice — you’ll get more flavor without adding acidity.
- Temper your eggs properly: pour hot milk into yolks slowly while whisking to avoid scrambled bits. If a few lumps form, strain the custard through a fine sieve.
- If your custard seems too thin after chilling, whisk a tiny bit of warm milk and cornstarch together, heat until thickened, then stir a spoonful into the pie to strengthen it — do this sparingly.
- Toast coconut on a sheet pan and watch closely; it goes from perfect to too-dark in seconds. Stir halfway for even color.
Common Mistakes to Avoid
- Skipping preheating: Classic rookie move. It changes texture and bake time.
- Overmixing: Leads to dense or chewy results. Mix until just combined.
- Guessing cook time: Always use visual cues or a timer, not just vibes.
- Overcrowding pans: Give your food some breathing room to crisp properly.
Alternatives & Substitutions
- Use a store-bought graham or cookie crust to save time; flavor stays great but texture may vary slightly.
- Swap the whole milk for 2% if needed; the custard will still be rich but slightly less silky.
- For dairy-free: use full-fat coconut milk in place of milk and coconut cream instead of heavy cream; the texture will become more coconut-forward and slightly looser, so chill longer.
- For gluten-free: use gluten-free graham crumbs or crushed gluten-free cookies for the crust — flavor remains nearly identical.
Variations & Tips
- Add a thin layer of lemon curd between crust and custard for an extra tangy surprise.
- Stir 1/4 tsp toasted coconut extract into the custard for an intense coconut punch.
- Top with macerated berries (strawberries or raspberries) for color and brightness.
- Make mini tarts using a muffin tin and reduce chilling time slightly for individual portions.
- Swap lemon for lime for a little island-y twist — very refreshing.
- Create a crunchy top by sprinkling crushed graham crackers mixed with brown sugar and broiling for 30–60 seconds (watch closely).
FAQ (Frequently Asked Questions)
- Can I make this ahead of time?
- Yes! Make the pie up to 2 days ahead. Keep it tightly covered in the refrigerator. Add the whipped cream and lemon sugar right before serving to keep those textures crisp and fresh.
- Can I double the recipe?
- Sure thing. Use two 9-inch pans or one 10–11 inch pan. Cook the custard in a larger pot and watch the thickening stage carefully — it may take a minute or two longer.
- Can I substitute butter with oil?
- Technically yes, but you’ll miss that buttery magic. Use ¾ the amount of oil.
- How do I know it’s done?
- The custard will thicken in the pan and hold when you pull the whisk through — it should coat the back of a spoon. After chilling, the filling should feel set and slice cleanly. Look for a glossy, slightly springy surface.
- What if I don’t have ingredient X?
- Out of lemon? Use 2 tbsp of white wine vinegar or 1 tbsp lime juice plus extra zest to mimic brightness. No cornstarch? Use 1/2 cup flour, but the texture will be a touch denser.
How I Like to Serve It
I like to slice this pie and serve it with a hot cup of coffee in the morning or chilled rosé in the evening. It shines at summer potlucks, brunches, or as a lighter-feeling finish to a heavy meal. If friends come over, I make it the day before and add the lemon sugar just before they arrive — little dramatic flourish, big payoff.
Notes
- Store leftovers covered in the fridge for up to 3 days. The crust will soften a bit over time but still taste great.
- If you reheat slices (I don’t recommend often), warm them for just 8–10 seconds in the microwave to take the chill off — don’t overdo it.
Final Thoughts
Closing: Now go impress someone — or just yourself — with your homemade masterpiece!