
Okay, confession time: I sometimes make these mini cheesecakes just so I can eat one while singeing the edges of my browning butter (I don’t recommend doing both at once). They’re tiny, cheeky, and stick-to-your-fork creamy — basically dessert in bite-size therapy form. If you want something that smells like warm graham crackers and vanilla, looks like little edible moons of silk, and gets polished off suspiciously fast at parties, you’re in the right place. I promise they’re way easier than full-size cheesecakes and forgiving enough for distracted cooks who briefly go “let me just check Instagram.”
Quick Facts
- Yield: Serves 12 (makes 12 mini cheesecakes)
- Prep Time: 20 minutes
- Cook Time: 18 minutes
- Total Time: 158 minutes (includes 120 minutes chilling)
Why This Recipe is Awesome
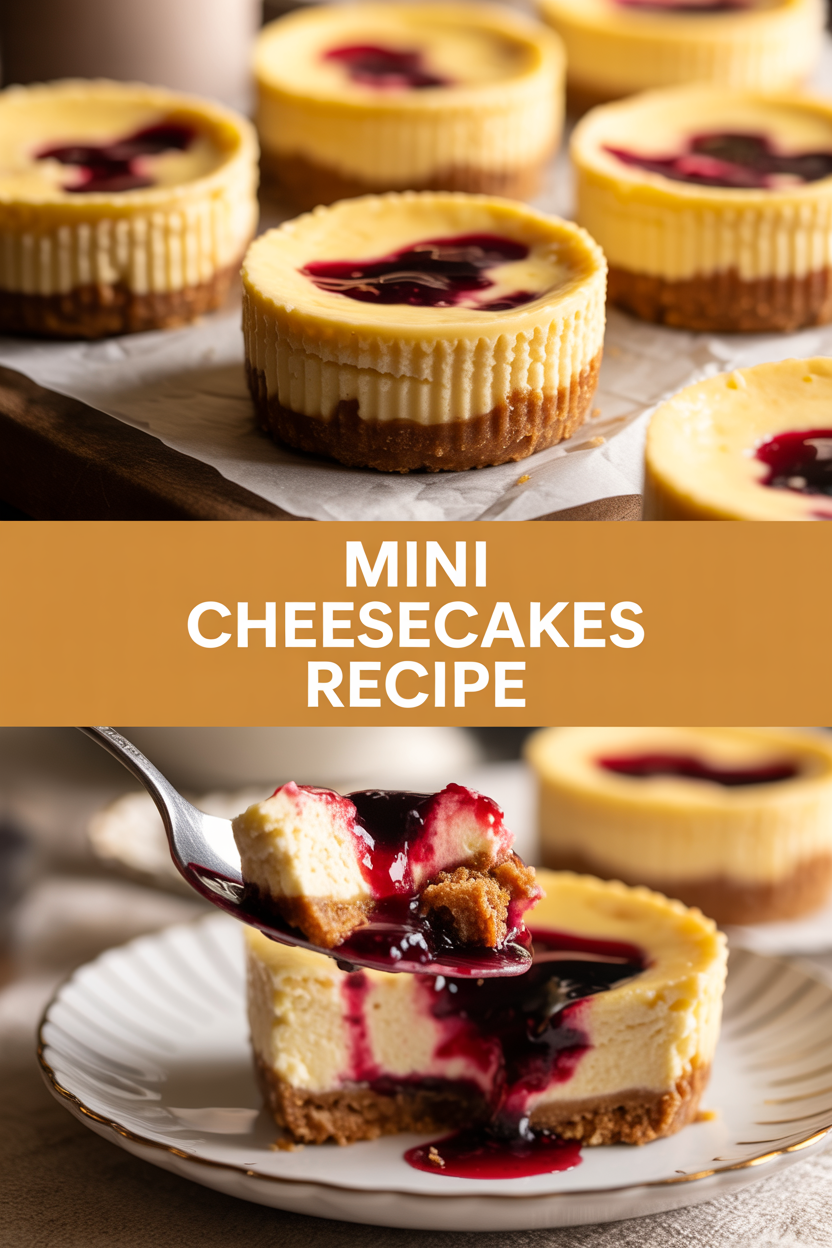
These mini cheesecakes pack all the rich, tangy, velvet-smooth goodness of a classic cheesecake, but in a petite package that cools faster and feeds a crowd without drama. The crust gets that buttery, crumbly crunch; the filling sets silky with just a gentle jiggle; and the top stays glossy and uncracked if you follow my tiny but mighty tricks. It’s so easy even your oven can’t mess it up — and they look fancy enough to make you feel like a dessert wizard.
Ingredients
For the Main Dish:
- 1 1/2 cups graham cracker crumbs (about 10 full sheets)
- 5 tbsp unsalted butter, melted
- 3 tbsp granulated sugar (for crust)
- 16 oz cream cheese, room temperature (2 blocks)
- 1/2 cup granulated sugar (for filling)
- 2 large eggs, room temperature
- 1/3 cup sour cream, room temperature
- 1 tsp pure vanilla extract
- 1 tbsp all-purpose flour (helps stabilize)
- Pinch of salt
For the Sauce / Garnish (optional):
- 1 cup mixed berries (fresh or frozen)
- 2 tbsp granulated sugar
- 1 tsp lemon juice
- Whipped cream or a dusting of powdered sugar for serving
How I Make It
Step 1:
I preheat the oven to 325°F and line a 12-cup muffin tin with paper liners — the ones with a little nonstick coating work best. I toss the graham crumbs with the melted butter and 3 tbsp sugar, then press about 2 tablespoons into the bottom of each liner to form a compact crust. Press firmly with the back of a spoon until the crust holds together; you’ll smell that warm, toasty graham aroma — instant comfort.
Step 2:
I beat the 16 oz cream cheese with 1/2 cup sugar until fluffy and smooth, scraping the bowl so no lumps hide. Then I add the eggs one at a time, mixing gently, followed by the 1/3 cup sour cream, 1 tsp vanilla, 1 tbsp flour, and a pinch of salt. Don’t overbeat — stop as soon as the batter looks silky and homogenous.
Step 3:
I spoon the filling into each crust, filling about 3/4 of the way up. The batter should glisten and look silky; when I tap the pan on the counter, I watch for bubbles to settle. For extra-crack prevention, I place the muffin tin inside a shallow roasting pan and pour hot water around it until the water reaches halfway up the muffin cups (careful — it steams!). The oven fills with a gentle vanilla-butter fragrance as they bake.
Step 4:
I bake them at 325°F for about 18 minutes, or until the edges look set and the centers still have a slight, controlled jiggle — like gelatin on a dance floor. Don’t wait for them to be rock-solid; that leads to dryness. If you see any browning or cracking, you baked too long or the oven runs hot.
Step 5:
I remove the pan from the water bath and let the cheesecakes cool on the counter for 30 minutes, then chill in the fridge for at least 120 minutes. Before serving, I top with a quick warm berry compote (simmer 1 cup berries, 2 tbsp sugar, and 1 tsp lemon juice for 5 minutes) or a dollop of whipped cream. The colors pop — ruby berries on creamy ivory — and the first bite makes that satisfied “mmm” noise every time.
Pro Tips
- Use room-temperature cream cheese and eggs — they blend faster and leave fewer lumps.
- Don’t overfill the cups; leave a little headroom so the tops stay smooth.
- If you don’t want to use a water bath, place a small oven-safe dish of water on the rack below to add humidity and reduce cracking.
- Chill fully for the cleanest slices and creamiest texture — patience pays off.
Common Mistakes to Avoid
- Skipping preheating: Classic rookie move. It changes texture and bake time.
- Overmixing: Leads to dense or chewy results. Mix until just combined.
- Guessing cook time: Always use visual cues or a timer, not just vibes.
- Overcrowding pans: Give your food some breathing room to crisp properly.
Alternatives & Substitutions
- Swap graham crackers for digestive biscuits or crushed shortbread for a sweeter crust; expect a slightly richer bite.
- Use full-fat Greek yogurt instead of sour cream for a tangier, lighter texture (reduces richness slightly).
- Dairy-free option: use dairy-free cream cheese and full-fat coconut yogurt; expect a coconut-leaning flavor but still creamy.
- Gluten-free option: use gluten-free graham crumbs or almond meal for the crust — almond adds a nutty chewy texture.
Variations & Tips
- Chocolate swirl: fold 2 tbsp melted dark chocolate into half the batter and swirl for a marbled effect.
- Lemon poppy seed: add 1 tbsp lemon zest and 1 tsp poppy seeds to the batter for a bright, zippy mini.
- Salted caramel pretzel crust: swap half the graham crumbs for crushed pretzels and top with caramel drizzle and flaky sea salt.
- Espresso kick: dissolve 1 tsp instant espresso in 1 tsp hot water and stir into the batter for a mocha note.
- Kid-friendly: top with rainbow sprinkles and berry jam — instant party pleasers.
FAQ (Frequently Asked Questions)
- Can I make this ahead of time?
- Yes! Make them a day ahead and keep them covered in the fridge. They taste even better the next day when flavors marry. For longer storage, freeze without toppings for up to 1 month; thaw overnight in the fridge.
- Can I double the recipe?
- Sure thing. Use two muffin tins or bake in batches. If you bake two tins at once, rotate them halfway through baking for even color.
- Can I substitute butter with oil?
- Technically yes, but you’ll miss that buttery magic. Use ¾ the amount of oil.
- How do I know it’s done?
- Look for set edges and a slightly wobbly center — not soupy, but not rock-solid. The tops may have a faint sheen and the sides will pull slightly away from the paper liner.
- What if I don’t have ingredient X?
- Out of graham crackers? Use crushed vanilla wafers or even granola in a pinch. No sour cream? Stir in plain yogurt or a tablespoon of heavy cream for richness.
How I Like to Serve It
I serve these at brunch with sparkling water and fresh fruit, or at dinner parties with espresso and a dark chocolate square. They fit summer picnics (chilled and topped with citrus curd) and cozy winter nights (warm berry compote and a dusting of cinnamon). Little bites travel well to potlucks and always disappear first.
Notes
- Store leftover mini cheesecakes in an airtight container in the fridge for up to 4 days; freeze for up to 1 month.
- Reheat neither — serve chilled. No meat safety temps apply here; this is a fully baked, refrigerated dessert.
Final Thoughts
Closing: These mini cheesecakes prove that big flavor doesn’t need big fuss. Now go impress someone — or just yourself — with your homemade masterpiece!