
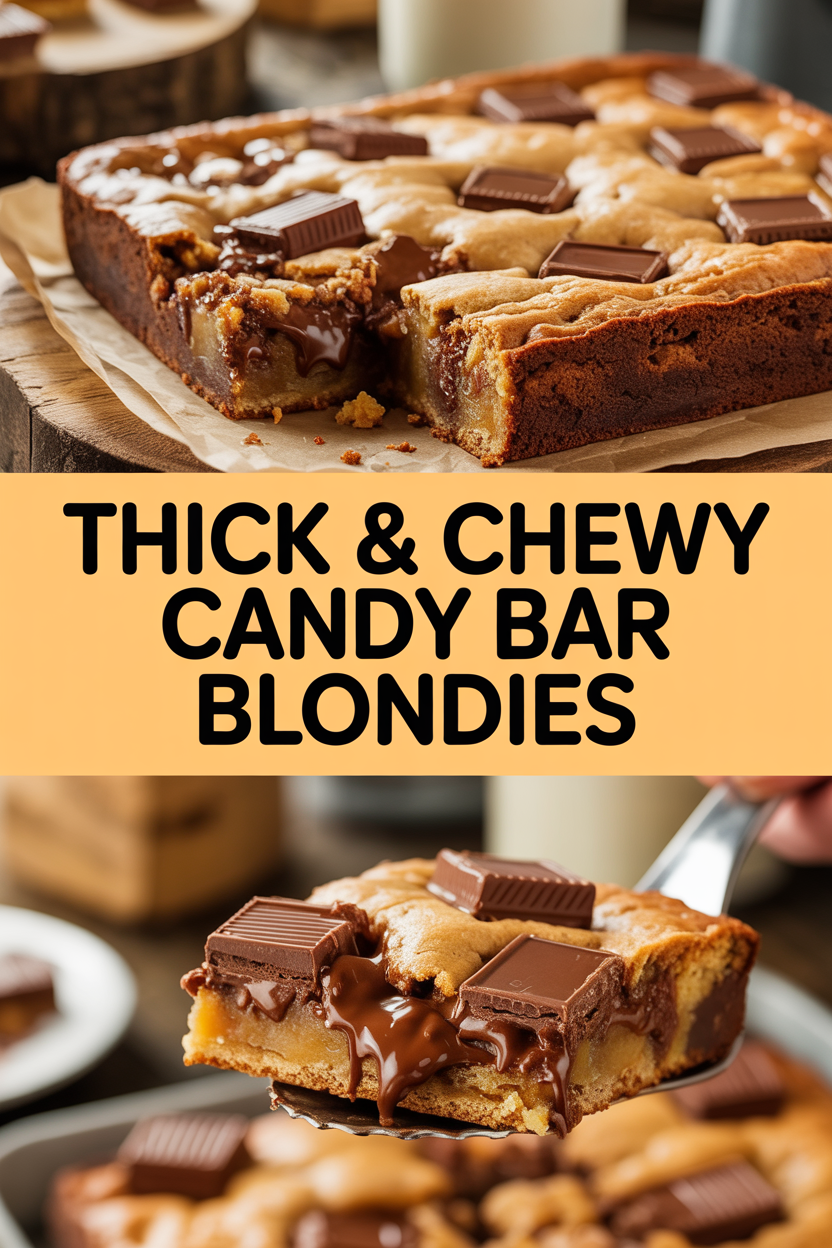
Warning: I take candy bars very seriously. I once hid a stash of chocolate in the pantry and pretended I didn’t know the sticky fingerprints led directly to my couch — which is why this recipe exists. These Thick & Chewy Candy Bar Blondies feel like a tiny, dramatic rescue mission for lonely candy bars: I chop them up, toss them into a buttery, caramel-scented batter, and bake until the house smells like a candy shop that forgot to close. They come out with crackly, golden edges, a soft, gooey center, and enough sticky, nutty surprises to make anyone forgive me for eating the corner piece.
Quick Facts
- Yield: Serves 16
- Prep Time: 15 minutes
- Cook Time: 30 minutes
- Total Time: 45 minutes
Why This Recipe is Awesome
These blondies deliver thick, chewy centers with deliciously crisp, golden edges — like the best parts of cookie and brownie had a dramatic union. They use simple pantry staples and rescued candy bars, so you get salt, caramel, chocolate, and crunch in every bite. And honestly? They smell like a Saturday morning bakery while they bake. It’s so easy even your oven can’t mess it up (but I’ll still remind you to preheat — because ovens sometimes forget).
Ingredients
For the Main Dish:
- 1 cup (8 oz) unsalted butter, melted (about 2 sticks)
- 2 cups packed light brown sugar
- 2 large eggs + 1 large egg yolk (for extra chew)
- 2 tsp vanilla extract
- 2 cups (10 oz) all-purpose flour
- 1 tsp baking powder
- 1 tsp fine sea salt
- 1 cup (6 oz) semisweet chocolate chips (optional but delicious)
- 10–12 oz chopped candy bars (two to three standard bars — Snickers, Twix, Heath, Milky Way, or a mix), chopped into bite-sized pieces
- Flaky sea salt, for finishing (optional)
For the Sauce / Garnish (if applicable):
- Optional: ½ cup warmed store-bought caramel sauce for drizzling
- Optional: extra chopped candy bar or toasted nuts for sprinkling on top
How I Make It
Step 1:
I preheat the oven to 350°F and line a 9×13-inch pan with parchment, leaving an overhang for easy removal. I melt the butter in a saucepan until it shimmers and smells nutty, then stir in the brown sugar until the mixture looks glossy — that caramel smell always makes me impatient in the best way.
Step 2:
Off the heat, I whisk in the eggs, egg yolk, and vanilla until smooth. Don’t panic if the batter looks a little thin — it firms up when you add the dry ingredients. I sift in the flour, baking powder, and salt, then fold gently with a spatula until the streaks disappear. Tip: fold, don’t beat — overmixing kills the chew.
Step 3:
I stir in the chocolate chips and most of the chopped candy bars, reserving a handful to press on top. The batter smells like brown sugar and toasted butter here — irresistible. If you like an extra gooey top, scatter the reserved candy pieces across the surface; they toast and get melty while the edges crisp.
Step 4:
I spread the batter into the prepared pan, smoothing with an offset spatula. I bake at 350°F for about 28–32 minutes. Watch for golden, slightly cracked edges and a center that still jiggles a little when you nudge the pan. Insert a toothpick: it should come out with a few moist crumbs, not wet batter. That gives you the perfect thick-and-chewy texture.
Step 5:
I let the blondies cool in the pan for at least 20 minutes so they set up — patience yields cleaner cuts and fewer sticky fingers. Then I lift them out on the parchment, slice into squares, and finish with flaky sea salt or a drizzle of warm caramel. The contrast between crunchy candy shards and chewy blondie makes that first bite sing.
Pro Tips
- Use melted butter at room temperature; too hot will cook the eggs when you add them. If it’s very warm, let it sit a minute.
- Chop candy bars into uniform pieces so you don’t get one massive candy tsunami in every slice. Aim for ¾–1 inch chunks.
- If you want ultra-chewy centers, underbake by a minute or two — the blondies continue to set as they cool.
- Line the pan with parchment and spray lightly with nonstick spray for perfect removal and neat squares.
Common Mistakes to Avoid
- Skipping preheating: Classic rookie move. It changes texture and bake time.
- Overmixing: Leads to dense or chewy results. Mix until just combined.
- Guessing cook time: Always use visual cues or a timer, not just vibes.
- Overcrowding pans: Give your food some breathing room to crisp properly.
Alternatives & Substitutions
- Swap light brown sugar for dark brown sugar for a deeper molasses flavor — your blondies will taste richer and a touch darker.
- Replace chocolate chips with white chocolate or peanut butter chips for a different sweetness profile; texture stays the same.
- Dairy-free option: use 1 cup vegan butter or coconut oil (use ¾ the amount for oil: ~¾ cup) — expect a slightly different mouthfeel and less buttery flavor.
- Gluten-free: use a 1-to-1 gluten-free flour blend; the texture stays chewy but may crumb differently.
Variations & Tips
- Nutty Blondies: fold in 1 cup chopped toasted pecans or walnuts for extra crunch.
- Salted Caramel: swirl ½ cup warmed caramel into the batter before baking for ribbons of gooey caramel.
- Espresso Twist: add 1 tbsp instant espresso powder to the batter to amplify chocolate notes.
- Fruit & Candy: toss in ½ cup dried cherries plus chopped candy bars for a sweet-tart contrast.
- Kid-Friendly: use mini candy bar pieces and rainbow sprinkles on top before baking for a party-ready tray.
- Creative Twist: press thin potato chip pieces on top right at the end of baking for a salty-crunch finish.
FAQ (Frequently Asked Questions)
- Can I make this ahead of time?
- Yes! Bake as directed, cool completely, then wrap tightly in plastic wrap or store in an airtight container at room temperature for up to 3 days. For longer storage, freeze individual squares in a single layer on a baking sheet, then transfer to a freezer bag for up to 2 months. Thaw at room temperature or warm gently in the oven.
- Can I double the recipe?
- Sure thing. Use two 9×13 pans and keep the same temperature. Watch the bake time — thicker batter in one larger pan may need an extra 5–8 minutes. If you only have one pan, bake the second tray after the first finishes.
- Can I substitute butter with oil?
- Technically yes, but you’ll miss that buttery magic. Use ¾ the amount of oil (so ¾ cup oil for 1 cup butter) and expect a slightly softer edge and a different flavor.
- How do I know it’s done?
- Look for golden, slightly cracked edges and a center that jiggles but doesn’t slosh. A toothpick should come out with moist crumbs, not wet batter. The edges continue to set as they cool.
- What if I don’t have ingredient X?
- Out of candy bars? Chop up a mix of chocolate bars and add ½ cup chopped nuts. No brown sugar? Mix 1¾ cups granulated sugar with 2 tbsp molasses per cup to mimic brown sugar.
How I Like to Serve It
I serve these warm with a scoop of vanilla ice cream and a drizzle of caramel at casual parties or when I want a ridiculously comforting night in. They also shine at potlucks — people always ask what candy bars you used. In summer, pair one with iced coffee; in winter, grab a mug of hot cocoa. They suit brunches, bake sales, or solo dessert-attacks on the couch.
Notes
- Store at room temperature in an airtight container for up to 3 days, or freeze for up to 2 months. Rewarm in a 350°F oven for a few minutes for fresh-from-the-oven warmth.
- No meat here, so no internal safe-temp notes, but always handle eggs responsibly and use fresh eggs.
Final Thoughts
Closing: Now go impress someone — or just yourself — with your homemade candy bar blondies. Cut a square, take a bite, and enjoy the glorious, sticky reward of your efforts!