
I have to confess: I make these mini cheesecakes whenever I need a tiny victory in life. Think of them as dessert-sized high-fives. They come together so fast that I sometimes catch myself singing while crushing graham crackers — yes, I know that sounds dramatic, but the buttery crumbs really do smell like a campfire memory. These are perfect for last-minute guests, potlucks, or when you want something that looks fancy but demands very little sweat. Plus, no oven means I avoid the usual “did I overbake it?” panic. You’ll get creamy, tangy filling, a crisp buttery base, and a pop of fresh fruit that makes your kitchen table look like you tried way harder than you did.
Quick Facts
- Yield: Serves 12
- Prep Time: 20 minutes
- Cook Time: 0 minutes
- Total Time: 2 hours 20 minutes (includes chilling)
Why This Recipe is Awesome
These mini no-bake cheesecakes deliver that luxurious, creamy texture without firing up the oven. They feel indulgent — silky filling, crisp buttery base, bright fruit on top — but they stay simple. They impress at parties and travel well. Best of all: they won’t overbake (I call that a win), and the chill time only makes the flavors sing. Who doesn’t love a dessert that looks complicated but tastes like something a pastry chef might argue about while I sneak a bite?
Ingredients
For the Main Dish:
- Graham cracker crumbs: 1 1/2 cups (about 12 full crackers, crushed)
- Unsalted butter: 6 tbsp, melted
- Granulated sugar: 2 tbsp (for crust)
- Cream cheese: 16 oz (2 8-oz packages), room temperature
- Granulated sugar: 1/2 cup (for filling)
- Vanilla extract: 1 tsp
- Fresh lemon juice: 1 tbsp (brightens the filling)
- Salt: Pinch
- Heavy cream: 1 cup, cold (to whip)
For the Sauce / Garnish (if applicable):
- Fresh berries: 1 cup (strawberries, raspberries, or blueberries)
- Optional quick berry sauce: 1 cup mixed berries + 2 tbsp sugar + 1 tbsp lemon, simmered 3–5 minutes
- Optional chocolate ganache: 4 oz dark chocolate + 1/3 cup heavy cream (warmed and stirred)
How I Make It
Step 1:
Line a 12-cup muffin tin with paper liners or use a silicone mold. In a bowl, mix 1 1/2 cups graham cracker crumbs, 2 tbsp sugar, and 6 tbsp melted butter. Press about 2 tbsp of the crumb mix firmly into the bottom of each liner until you form a compact base. I press with the bottom of a shot glass to get tidy edges; you’ll smell that warm, buttery aroma and know you’re on the right track.
Step 2:
Beat 16 oz cream cheese with 1/2 cup sugar, 1 tsp vanilla, 1 tbsp lemon juice, and a pinch of salt until silky and smooth. Use a hand mixer on medium speed and scrape the bowl once or twice. Avoid overworking — stop when the mixture looks glossy and lump-free.
Step 3:
In a chilled bowl, whip 1 cup cold heavy cream to medium-stiff peaks (about 2–3 minutes with a mixer). Gently fold the whipped cream into the cream cheese mixture in two additions. Fold with a spatula using big, airy motions so you keep the filling light and cloud-like — you’ll hear soft swooshes and see the pale cream settle into a velvety texture.
Step 4:
Spoon or pipe the filling onto the prepared crusts, filling each cup nearly to the top. Tap the tin on the counter once to settle the filling and release any trapped air. Chill the mini cheesecakes upright in the refrigerator for at least 2 hours or until the centers feel set but still slightly jiggly. That chill gives the texture a clean, firm finish without turning it into a brick.
Step 5:
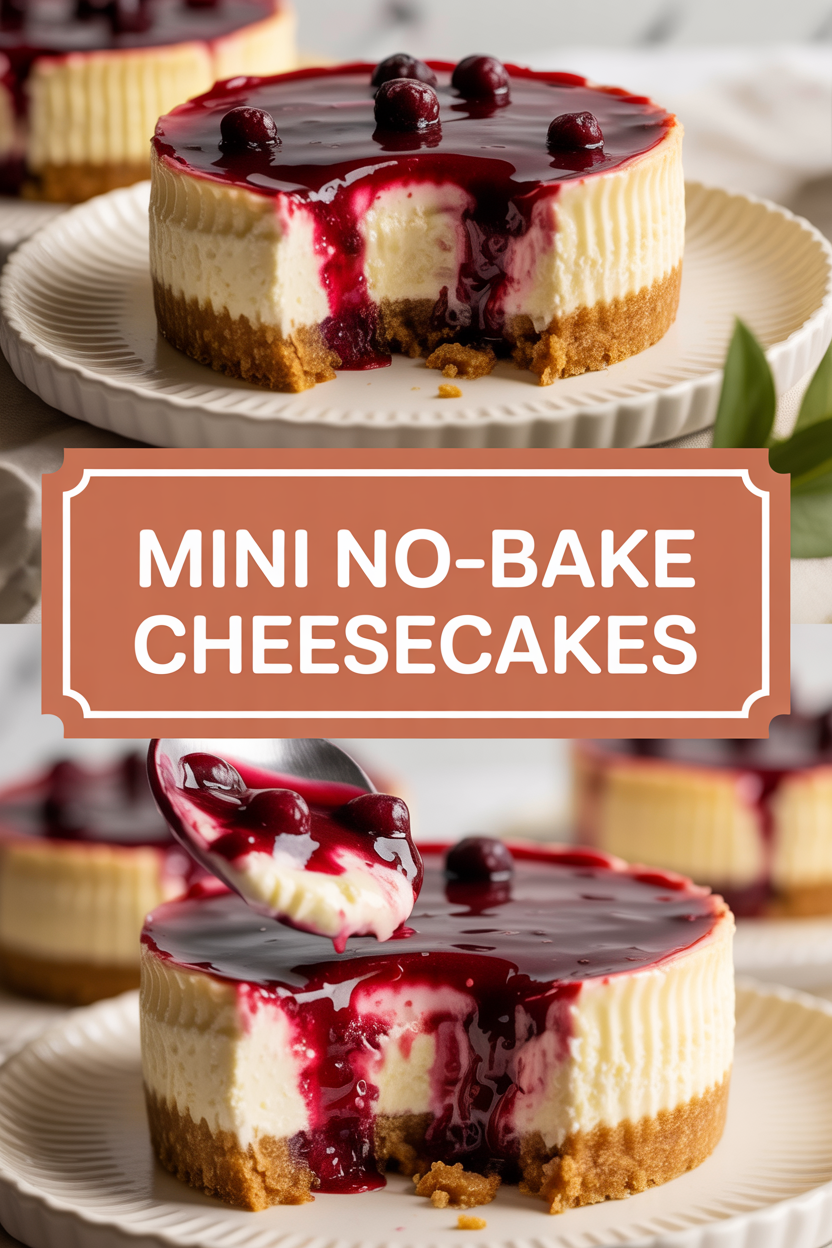
Top with fresh berries or a spoonful of quick berry sauce. If you made ganache, drizzle a little and finish with flaky sea salt for drama. Run a thin knife around the liner and remove the paper before serving, or let guests peel their own — either way, enjoy the first creamy, cool bite.
Pro Tips
- Chill the mixing bowl and beaters before whipping cream — they whip faster and hold peaks better.
- If your cream cheese feels cold, microwave it in 5-second bursts until pliable; don’t melt it.
- Press crusts firmly so they don’t crumble when you bite in — a solid base creates that satisfying contrast.
- Make these a day ahead; they taste even better after the flavors meld overnight.
Common Mistakes to Avoid
- Skipping preheating: Classic rookie move. It changes texture and bake time.
- Overmixing: Leads to dense or chewy results. Mix until just combined.
- Guessing cook time: Always use visual cues or a timer, not just vibes.
- Overcrowding pans: Give your food some breathing room to crisp properly.
Alternatives & Substitutions
- Use gluten-free graham crackers or almond flour crust (1 1/2 cups almond flour + 3 tbsp melted butter + 1 tbsp sugar) for a gluten-free option; texture gets nuttier and more crumbly.
- Swap full-fat cream cheese for a light version, but expect less richness and a slightly tangier bite.
- For dairy-free: replace cream cheese with 16 oz vegan cream cheese and whip 1 cup chilled coconut cream instead of heavy cream; flavor stays creamy but picks up a subtle coconut note.
- Want a shortcut? Use 1 cup of store-bought fruit compote instead of fresh berries — saves time and tastes great.
Variations & Tips
- Chocolate lovers: Fold 2 tbsp unsweetened cocoa into the filling and top with chocolate ganache.
- Citrus twist: Add 1 tsp orange zest and swap lemon juice for lime for a bright pop.
- Caramel sea salt: Drizzle salted caramel and finish with a pinch of flaky salt.
- Espresso kick: Add 1 tsp instant espresso powder to the filling for a mocha vibe.
- Mini parfaits: Layer crumbled crust, filling, and fruit in small jars for grab-and-go treats.
- Party tray hack: Make normal-size cupcakes instead of minis for easier transport and bigger slices.
FAQ (Frequently Asked Questions)
- Can I make this ahead of time?
- Yes! Make the crust and filling the day before, assemble, and chill overnight. Keep covered in the fridge up to 48 hours for best texture; longer than that the crust can soften.
- Can I double the recipe?
- Sure thing. Double all ingredients and use two muffin tins or bake sheets. Chill time stays the same, but allow a little extra time for larger batches to cool fully in the fridge.
- Can I substitute butter with oil?
- Technically yes, but you’ll miss that buttery magic. Use ¾ the amount of oil.
- How do I know it’s done?
- Look for a filling that holds its shape with a slight jiggle in the center. The edges should feel firm to the touch; the center should not slump when you move the pan.
- What if I don’t have ingredient X?
- No graham crackers? Crush digestive biscuits or vanilla wafers. No heavy cream? Use 1/2 cup sour cream + 1/2 cup whipped coconut cream for a similar lift.
How I Like to Serve It
I serve these chilled with a small spoonful of fresh berries and a sprig of mint. They pair beautifully with black coffee or a glass of sparkling wine for celebrations. Take them to picnics, potlucks, or keep a tray in the fridge for an indulgent weekday treat — they brighten any table from summer BBQs to cozy winter movie nights.
Notes
- Store leftovers covered in the refrigerator for up to 4 days. Don’t freeze — the texture changes.
- No meat here, but remember safe minimum cooking temps if you try any meat-based sides: 165°F for poultry.
Final Thoughts
Closing: Now go impress someone — or just yourself — with these tiny, show-stopping cheesecakes. You deserve a treat that’s both easy and a little bit fancy.