
When I was a kid, my mom used to fry everything that could possibly go crunchy — shoes, I’m convinced, would have been next if she’d had the recipe. These baked chicken chimichangas (we call them “Chichis” at home because nicknames make food more lovable) grew out of that desire for crispy, golden edges without a vat of oil. I remember the smell of cumin and frying tortilla wafting through the house and a chorus of “Please, just one more!” around the table. Baking them keeps the crunch, lets the kitchen keep its dignity, and gives you time to make a quick salsa while they brown to a bubbly, toasty perfection.
Quick Facts
- Yield: Serves 4 (8 chimichangas)
- Prep Time: 20 minutes
- Cook Time: 25 minutes
- Total Time: 45 minutes
Why This Recipe is Awesome
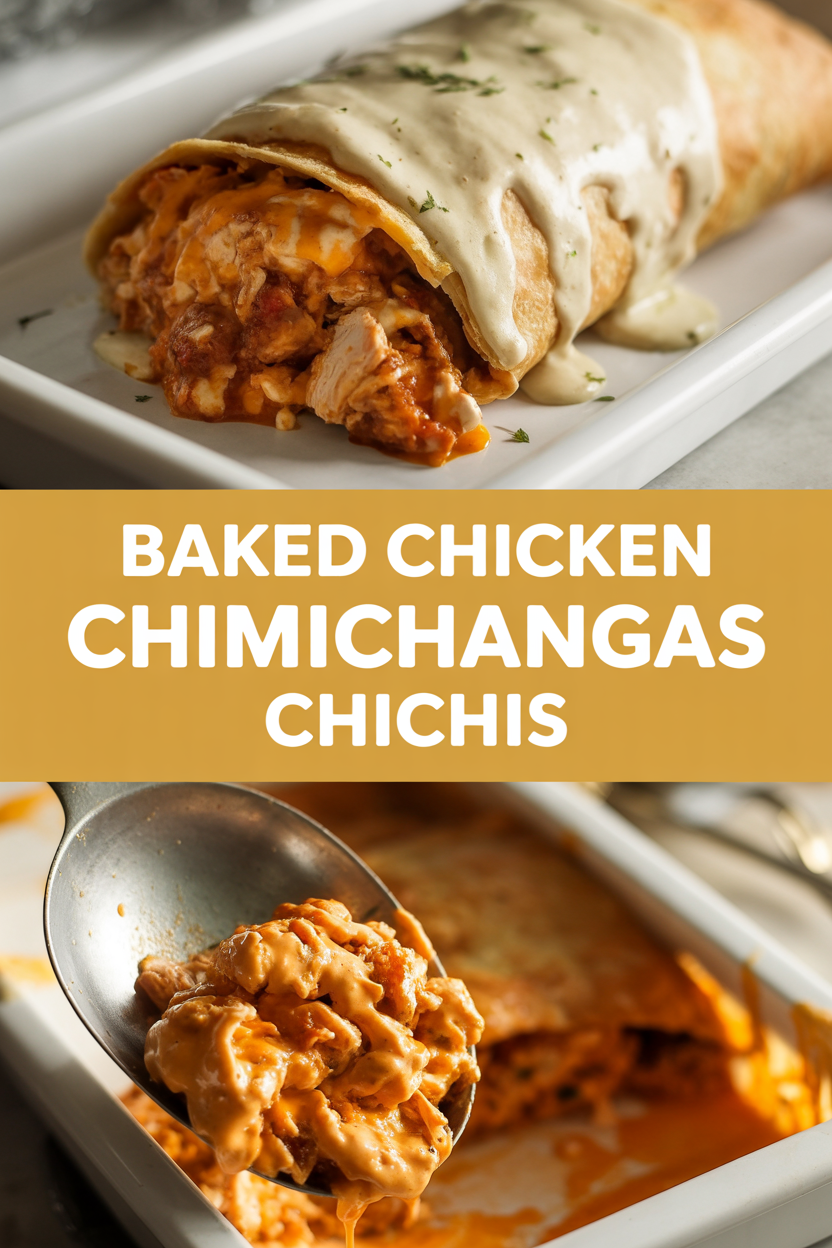
These baked chimichangas deliver *that* crave-worthy crunch and melty, savory filling without deep-frying or fancy ingredients. Think golden, blistered tortillas, warm, smoky chicken, gooey cheese, and a bright hit of lime and cilantro. It’s simple enough for a weeknight, showy enough for guests, and forgiving — which means you can relax and enjoy the sizzling aromas as the kitchen fills with cumin, garlic, and toasty tortilla notes. It’s so easy even your oven can’t mess it up.
Ingredients
For the Main Dish:
- 1 lb cooked, shredded chicken (about 3 cups; rotisserie chicken works great)
- 8 8-inch flour tortillas (look for soft, pliable ones)
- 2 cups shredded cheese (cheddar, Monterey Jack, or a blend)
- 1/2 cup diced onion (yellow or white)
- 2 cloves garlic, minced
- 1/2 cup salsa (mild or medium)
- 1 tsp ground cumin
- 1 tsp chili powder
- 1/2 tsp smoked paprika (optional, for that smoky hit)
- 1 tbsp lime juice
- 2 tbsp chopped cilantro (plus more for garnish)
- 2 tbsp olive oil or melted butter (for brushing)
- Salt and pepper to taste
- Cooking spray or parchment paper for the pan
For the Sauce / Garnish (optional):
- 1/2 cup sour cream or Greek yogurt
- 1 tbsp lime juice
- 1/4 cup pico de gallo or fresh salsa
- Avocado slices or guacamole, for serving
How I Make It
Step 1:
Preheat the oven to 425°F and line a baking sheet with parchment. In a skillet over medium heat, warm 1 tbsp olive oil, sauté the 1/2 cup diced onion until soft and translucent (about 4 minutes), then add the minced garlic and cook 30 seconds until fragrant — you’ll smell that sweet garlic-pop. Toss in the shredded chicken, 1/2 cup salsa, 1 tsp cumin, 1 tsp chili powder, smoked paprika if using, and salt and pepper. Stir until the filling looks saucy and evenly seasoned. Finish with 1 tbsp lime juice and 2 tbsp cilantro.
Step 2:
Warm the tortillas briefly in the microwave (wrap in a damp paper towel and zap for 15–20 seconds) so they bend without cracking — this little trick saves so much frustration. Spoon about 1/3 to 1/2 cup of the chicken mixture down the center of each tortilla, sprinkle with about 1/4 cup shredded cheese, then fold the sides in and roll tightly into a burrito-shape to form your chimichangas. Don’t overstuff; you want room to seal the seams.
Step 3:
Place seam-side down on the prepared baking sheet and brush the tops with melted butter or olive oil (about 2 tbsp total) — that’s your shortcut to golden, crisp edges. If you want extra browning, give them a very light spray of cooking spray. Slide the tray into the oven and bake for 12–14 minutes. You’ll hear a faint crackle as the tortillas crisp and see little bubbles of cheese peek out.
Step 4:
Flip each chimichanga and bake another 8–11 minutes until both sides are deeply golden and the cheese melts through. Look for **golden edges**, tiny blistered spots on the tortillas, and a warm, steamy center when you press them gently. If you used raw chicken breasts instead of cooked, confirm the internal temp reaches 165°F.
Step 5:
Let the chimichangas rest for 3 minutes to firm up (this helps avoid molten cheese eruptions). Serve with a dollop of sour cream or yogurt mixed with lime, a spoonful of pico, sliced avocado, and extra cilantro. Cut one open and admire the cheesy, saucy cross-section — always satisfying.
Pro Tips
- Warm tortillas briefly before filling so they fold without tearing.
- If you crave extra crunch, brush with melted butter and broil for 30–60 seconds at the end — watch closely!
- Use rotisserie chicken to cut prep time in half and add instant, savory flavor.
- Don’t overfill; you want a tight roll that keeps its shape while baking.
Common Mistakes to Avoid
- Skipping preheating: Classic rookie move. It changes texture and bake time.
- Overmixing: Leads to dense or chewy results. Mix until just combined.
- Guessing cook time: Always use visual cues or a timer, not just vibes.
- Overcrowding pans: Give your food some breathing room to crisp properly.
Alternatives & Substitutions
- Chicken ↔ Tofu: Use 1 lb firm tofu, pressed and crumbled, sautéed with the same spices for a vegetarian version (adds a firmer texture).
- Cheese swap: Use dairy-free shredded cheese for lactose-free needs (texture will differ slightly).
- Flour tortillas ↔ Corn or gluten-free: Use large corn tortillas (they may need warming and careful folding) or gluten-free wraps for a gf option.
- Sour cream ↔ Greek yogurt: Greek yogurt brightens flavor and adds protein.
Variations & Tips
- Spicy: Add chopped pickled jalapeños or a teaspoon of chipotle in adobo to the filling.
- Kid-friendly: Use mild salsa and swap black beans for chicken for a gentler flavor and fun texture.
- BBQ twist: Mix chicken with 1/2 cup BBQ sauce and red onion for a smoky, tangy chimichanga.
- Southwest veg: Add roasted corn and black beans for a vegetarian star.
- Tropical twist: Stir in 1/4 cup finely chopped pineapple for a sweet-and-spicy surprise.
FAQ (Frequently Asked Questions)
- Can I make this ahead of time?
- Yes! Assemble the chimichangas, place them seam-side down on a tray, cover tightly, and refrigerate up to 24 hours. Bake from chilled and add a few extra minutes to the bake time. For freezing, freeze unbaked on a tray, then transfer to a bag; bake from frozen at 425°F for 25–30 minutes, flipping halfway.
- Can I double the recipe?
- Sure thing. Use two baking sheets and rotate them in the oven halfway through the bake so each tray gets even heat. Avoid stacking or overcrowding.
- Can I substitute butter with oil?
- Technically yes, but you’ll miss that buttery magic. Use ¾ the amount of oil and brush lightly for crisping.
- How do I know it’s done?
- Look for golden-brown, blistered tortillas, melted cheese through seams, and a hot filling. If you used raw chicken, check for an internal temp of 165°F.
- What if I don’t have ingredient X?
- Swap salsa with canned diced tomatoes + a pinch of sugar and salt. Swap cilantro with parsley or omit. No cheese? Use extra salsa and avocado for creaminess.
How I Like to Serve It
I serve these chimichangas with a bright bowl of pico de gallo, lime-spiked sour cream, and a cold cerveza or an ice-cold margarita for weekend vibes. They work just as well on a rainy weeknight with a simple green salad and a soundtrack of something cozy. For potlucks, slice into thirds so people can sample without committing to a whole Chichi.
Notes
- Store leftovers covered in the fridge for up to 3 days; reheat in a 375°F oven for 8–10 minutes to restore crispiness.
- Safe internal temp for cooked chicken: 165°F. Use an instant-read thermometer for confidence.
Final Thoughts
Closing: You just made crunchy, cheesy, comforting chimichangas without frying — high five. Now go impress someone — or just yourself — with your homemade masterpiece!