
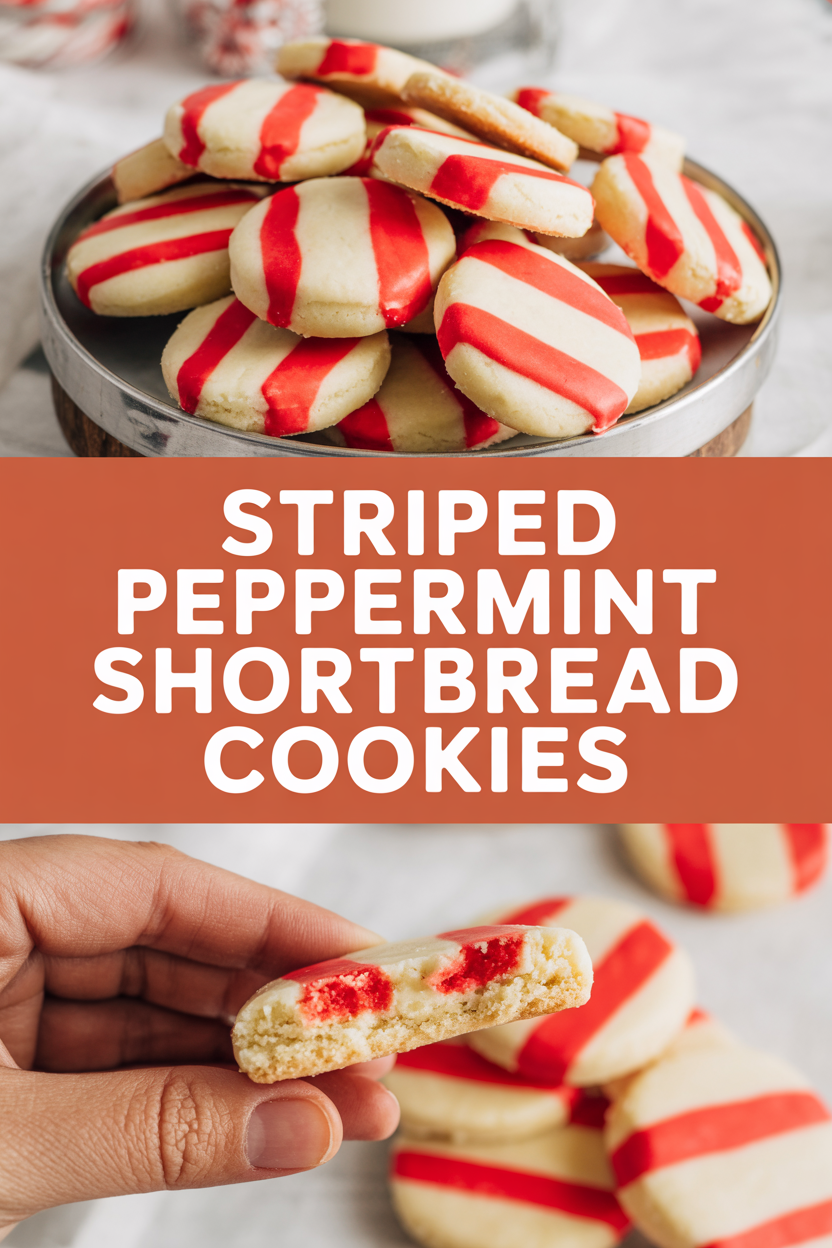
There’s something about the smell of butter, sugar, and a little peppermint that teleports me straight to cozy winter evenings with fairy lights and mismatched mugs. I crave that simple comfort, so I made these striped peppermint shortbread cookies to capture the warm, buttery crumble of classic shortbread with a festive peppermint kick and a cheerful red stripe. They look fancy but they behave like a home-cook’s dream — sturdy enough to dunk in cocoa, delicate enough to melt on your tongue, and loud enough to make guests ask for the recipe. Grab your mixer, your favorite holiday playlist, and let’s make a tray of nostalgia.
Quick Facts
- Yield: Serves 8–10 (about 36 cookies)
- Prep Time: 20 minutes active (+ 1 hour chill)
- Cook Time: 12–14 minutes per batch
- Total Time: ~1 hour 40 minutes (including chill)
Why This Recipe is Awesome
These cookies deliver buttery, crumbly shortbread with a bright peppermint snap and festive red stripes — they look like you spent hours but really take little time. The texture splits the difference between melt-in-your-mouth and slightly crisp edges, and the peppermint gives a lively, aromatic lift. It’s so easy even your most distracted oven-handling friend could pull it off. Plus, the striped presentation makes them irresistible on cookie trays.
Ingredients
For the Main Dish:
- 1 cup (2 sticks) unsalted butter, room temperature
- 1/2 cup powdered sugar (confectioners’ sugar)
- 1/4 cup granulated sugar
- 1 tsp vanilla extract
- 1/2 tsp peppermint extract
- 2 1/2 cups all-purpose flour
- 1/4 tsp fine sea salt
- Red gel food coloring, a few drops (or 1/8 tsp powdered beet for natural color)
- Crushed candy canes or candy cane pieces for garnish (about 1/3 cup)
For the Sauce / Garnish (if applicable):
- Optional: 1/2 cup powdered sugar mixed with 1–2 tsp milk for a light glaze
- Optional: Extra crushed candy canes for sprinkling while cookies are warm
How I Make It
Step 1:
Preheat your oven to 325°F. In my stand mixer bowl, I cream together 1 cup unsalted butter (room temp) with 1/2 cup powdered sugar and 1/4 cup granulated sugar until the mix looks pale and fluffy — about 2–3 minutes. You’ll smell the butter and sugar bloom into something almost cookie-dough heaven. Mix in 1 tsp vanilla and 1/2 tsp peppermint extract.
Step 2:
Whisk together 2 1/2 cups all-purpose flour and 1/4 tsp salt. Add the dry mix to the butter in two additions, pulsing or mixing on low until the dough just comes together. Keep your motion gentle — overworking makes shortbread tough. The dough will feel soft, slightly crumbly, and fragrant.
Step 3:
Divide the dough roughly two-thirds plain and one-third for the red stripe. I scoop out about 2/3 into a separate bowl and press the rest together with a few drops of red gel until I like the color. Add one extra drop of peppermint extract to the red portion if you want a more pronounced mint note. Roll the plain portion into a log about 1 inch in diameter. Roll the red dough into a thin rope and spiral it snugly around the plain log to create that candy-cane stripe. Press seams gently to stick the dough together but don’t mash the pattern flat.
Step 4:
Wrap the striped log tightly in plastic and chill for at least 1 hour — this firms the butter and makes slicing clean. When chilled, slice the log into 1/4-inch rounds and place them on a baking sheet lined with parchment, leaving about 1 inch between cookies. If you like, press a little crushed candy cane into the tops now so it sticks during baking. Bake at 325°F for 12–14 minutes, until the bottoms turn just a pale golden and the tops look set. You’ll smell bright peppermint and warm butter filling the kitchen.
Step 5:
Let the cookies cool on the sheet for 5 minutes, then transfer to a rack to cool completely. If you want glaze, whisk powdered sugar with a teaspoon of milk until smooth and drizzle over cooled cookies, then sprinkle extra crushed candy cane. Store in an airtight container at room temperature for up to 5 days. These keep well and actually mellow into an even lovelier texture overnight.
Pro Tips
- Use room temperature butter for easier creaming; too cold won’t blend, too warm will make a greasy dough.
- Gel food coloring gives vivid stripes without adding liquid. Start with a tiny bit — you can always add more.
- Chill the log thoroughly. Cold dough slices clean and keeps the stripes crisp. If the cookies spread, chill the slices briefly on the sheet before baking.
- For even thinner stripes, divide dough into more pieces and layer; for bolder stripes, make the colored portion wider.
Common Mistakes to Avoid
- Skipping preheating: Classic rookie move. It changes texture and bake time.
- Overmixing: Leads to dense or chewy results. Mix until just combined.
- Guessing cook time: Always use visual cues or a timer, not just vibes.
- Overcrowding pans: Give your cookies breathing room to crisp properly.
Alternatives & Substitutions
- Swap all-purpose flour for a 1:1 gluten-free blend — texture will be slightly more tender and crumbly.
- Use coconut oil for a dairy-free option (use ¾ cup coconut oil by volume instead of 1 cup butter); expect a slightly different mouthfeel and a hint of coconut flavor.
- Replace peppermint extract with orange extract for a citrusy twist; omit crushed candy canes and use orange zest on top.
- If you lack granulated sugar, use all powdered sugar but reduce by 1–2 tablespoons to avoid a too-sweet, cakey texture.
Variations & Tips
- Add 2 tbsp cocoa powder to the colored portion for a chocolate-peppermint swirl.
- Stir 1/4 cup finely chopped dark chocolate into the plain dough for chocolate chips that melt into little pockets.
- Make mini sandwich cookies with peppermint buttercream between two slices — kids love these.
- For a more elegant look, create thin stripes by flattening rectangles of dough, stacking alternating colors, and rolling into a log.
- Make a batch with natural color from beet powder for a pretty pink stripe instead of red.
- Turn them into gifts: stack with parchment between layers, tie with ribbon, and add a little jar of extra crushed candy canes.
FAQ (Frequently Asked Questions)
- Can I make this ahead of time?
- Yes! Prepare the logs and keep them wrapped in the fridge for up to 2 days, or freeze for up to 1 month. Slice and bake straight from frozen, adding a couple extra minutes.
- Can I double the recipe?
- Sure thing. Make two logs and chill them together on one tray. Baking time stays the same; you’ll just work in batches on the sheet pans.
- Can I substitute butter with oil?
- Technically yes, but you’ll miss that buttery magic. Use ¾ the amount of oil and expect a softer, less crumbly cookie.
- How do I know it’s done?
- You’ll know they’re done when the bottoms turn a pale golden and the tops look set — not browned. The edges may firm up slightly; the centers should still feel delicate. They firm as they cool.
- What if I don’t have ingredient X?
- Out of peppermint extract? Use 1 tsp vanilla and add 1 tsp finely grated orange zest for a citrusy twist. No powdered sugar? Increase granulated sugar slightly and sift it in for a smoother dough.
How I Like to Serve It
I love these cookies with a mug of hot cocoa or espresso — the peppermint cuts through the richness. They also sit happily on a holiday cookie tray next to gingerbread and jam thumbprints. For a grown-up twist, serve them with a small glass of peppermint-infused hot toddy at a cozy winter gathering. They feel festive any time you want to make ordinary tea time feel slightly magical.
Notes
- Store in an airtight container at room temperature for up to 5 days; separate layers with parchment to prevent sticking.
- If you bake from frozen, add 2–3 minutes to baking time. No meat safety temps necessary here — just buttery bliss.
Final Thoughts
Closing: Now go impress someone — or just yourself — with these striped peppermint shortbread cookies. They look fancy, taste like winter cheer, and perform beautifully at any cookie swap.