
I still smell my grandma’s tiny kitchen when I bite into this cake — the light vanilla that seemed to float across the table and the way she’d wink while sliding a warm pan from the oven. I learned to bake on her chipped mixing bowl and a wooden spoon that wore grooves from years of stirring. This “Heavenly White Snack Cake” grew out of those afternoons: simple, slightly pillowy, and just sweet enough to make you pause and inhale. I’ll show you how to make it in a busy weeknight version and a show-off version for company. Trust me — the first slice will make you close your eyes and smile the way I do every time.
Quick Facts
- Yield: Serves 8
- Prep Time: 15 minutes
- Cook Time: 25–30 minutes
- Total Time: 40–45 minutes
Why This Recipe is Awesome
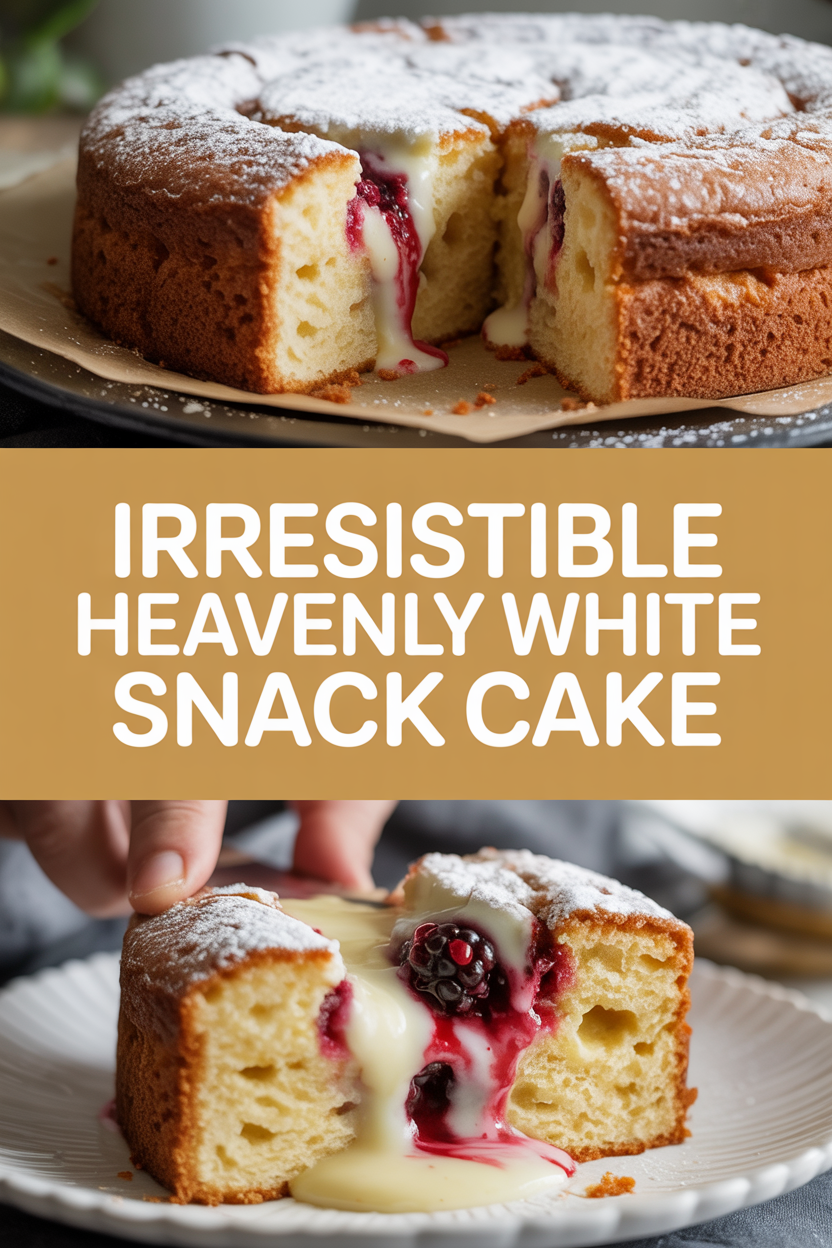
This cake feels fancy but behaves like your favorite hoodie: comforting, forgiving, and ready at a moment’s notice. It bakes into a pale, tender crumb with slightly crisp, golden edges and a glossy white glaze that crackles when you slice it. It tastes like vanilla clouds and buttered sunshine — and it’s so easy even a rookie baker can nail it. Who doesn’t love crispy edges and a soft, pillowy center?
Ingredients
For the Main Dish:
- 2 cups all-purpose flour
- 1 1/2 cups granulated sugar
- 2 tsp baking powder
- 1/2 tsp salt
- 1/2 cup (1 stick / 8 tbsp / ~4 oz) unsalted butter, softened
- 2 large eggs, room temperature
- 3/4 cup milk (whole milk gives the richest crumb)
- 1/2 cup sour cream or plain yogurt (adds tenderness)
- 2 tsp vanilla extract
- Optional: 1/2 cup white chocolate chips or shredded coconut for texture
For the Sauce / Garnish (if applicable):
- 1 1/2 cups powdered sugar
- 2–3 tbsp milk (or almond milk for dairy-free)
- 1/2 tsp vanilla extract
- Pinch of salt
- Optional: white chocolate shavings or toasted coconut for topping
How I Make It
Step 1:
I preheat the oven to 350°F and grease a 9×9-inch pan. In a bowl, I whisk together the dry ingredients: 2 cups all-purpose flour, 1 1/2 cups sugar, 2 tsp baking powder, and 1/2 tsp salt. This keeps lumps out and gives the cake an even lift. Pro tip: tap the flour scoop to settle it — no angry flour clouds allowed.
Step 2:
In a large bowl, I beat the softened butter and sugar together until pale and fluffy, about 2–3 minutes. You’ll hear a faint hum from the mixer and see the mixture lighten — that airy texture makes the cake tender. Scrape down the sides and add the eggs one at a time, beating briefly after each. Add the vanilla.
Step 3:
I add the dry mix and the milk (and sour cream) in three alternations: flour, milk, flour, milk, finishing with flour. Stir gently until just combined — you want a smooth batter, not a workout for your mixer. Watch for the batter’s texture: it should be thick enough to hold a glossy ribbon when you lift the spoon.
Step 4:
I pour the batter into the prepared pan and smooth the top. Slide it into the oven and bake for 25–30 minutes, until the edges turn pale gold and a toothpick inserted into the center comes out with a few moist crumbs (not wet batter). You’ll smell warm vanilla and butter filling the kitchen — that’s your cue.
Step 5:
I let the cake cool in the pan for about 10 minutes, then transfer it to a rack. For the glaze, I whisk 1 1/2 cups powdered sugar with 2–3 tbsp milk, 1/2 tsp vanilla, and a pinch of salt until silky. Drizzle the glaze over the warm cake and scatter white chocolate shavings or toasted coconut if I’m feeling extra. Let the glaze set for 10 minutes before slicing.
Pro Tips
- Use room-temperature eggs and butter so they blend evenly and the cake rises predictably.
- If your oven runs hot, drop the temp by 10–15 degrees and add a few extra minutes to the bake time.
- Don’t overmix the batter; stop as soon as streaks disappear — overmixing makes the crumb tough.
- For an ultra-moist cake, swap the milk for buttermilk or add an extra tablespoon of sour cream.
Common Mistakes to Avoid
- Skipping preheating: Classic rookie move. It changes texture and bake time.
- Overmixing: Leads to dense or chewy results. Mix until just combined.
- Guessing cook time: Always use visual cues or a timer, not just vibes.
- Overcrowding pans: Give your food some breathing room to crisp properly.
Alternatives & Substitutions
- Swap milk for almond or oat milk for a dairy-free version; texture stays tender but flavor shifts slightly.
- Use a 1:1 gluten-free flour blend if you need gluten-free; expect a slightly crumblier crumb.
- Replace butter with coconut oil (solid) for a dairy-free twist; the cake gains a faint coconut note.
- For vegan: use flax eggs (1 tbsp ground flax + 3 tbsp water per egg) and dairy-free milk, but expect a denser texture.
Variations & Tips
- Add the zest of 1 lemon to the batter and a lemon glaze for a bright twist.
- Stir in 1/2 cup white chocolate chips for pockets of sweet melt-in-your-mouth bites.
- Top with a thin layer of raspberry jam before glazing for a sweet-tart contrast.
- Sprinkle toasted coconut and a dusting of powdered sugar for a tropical vibe.
- Make mini cupcakes instead of a pan cake — bake 12–15 minutes at the same temp.
- For a mocha kick, add 1 tbsp instant espresso powder to the batter.
FAQ (Frequently Asked Questions)
- Can I make this ahead of time?
- Yes! Bake the cake, cool completely, then store it in an airtight container at room temperature for up to 2 days or in the fridge for 4 days. Reheat single slices in the microwave for 10–12 seconds to revive the softness.
- Can I double the recipe?
- Sure thing. Use two 9×13 pans or double-batch in two 9×9 pans. Bake time may change — check at 22 minutes for smaller pans and 30–35 minutes for deeper pans.
- Can I substitute butter with oil?
- Technically yes, but you’ll miss that buttery magic. Use ¾ the amount of oil and expect a slightly different crumb and flavor.
- How do I know it’s done?
- Look for pale-golden edges, a springy top, and a toothpick that comes out with a few moist crumbs. The cake should feel set, not jiggly, when you gently press the center.
- What if I don’t have ingredient X?
- Out of sour cream? Use plain yogurt. No vanilla? Use a splash of almond extract (start small). Flour substitute? Use a 1:1 gluten-free blend.
How I Like to Serve It
I cut this cake into squares and serve it with a hot mug of coffee or a cold glass of milk. For brunch, I add fresh berries and a dollop of whipped cream. It works as a weeknight dessert or a potluck hero — light, unfussy, and reliably loved. In summer, I pair it with a berry compote; in winter, I warm a slice and top it with a drizzle of hot caramel.
Notes
- Store leftover cake in an airtight container at room temperature for up to 2 days, or refrigerate up to 4 days. Reheat gently before serving.
- If you ever bake meat alongside desserts (why?), remember safe temps: poultry needs 165°F
Final Thoughts
Closing: Now go impress someone — or just yourself — with your homemade masterpiece!